How to call a protected external API using AppSync HTTP data source
Read the API key stored securely in AWS and call the service


Calling protected APIs
The AppSync HTTP data source can invoke any HTTP-based API. Since many services offer such APIs, this opens a lot of integration possibilities for AppSync. While a Lambda function is always there to act as a middleman, in simple cases it's easier to use the HTTP data source directly.
In this article, we'll implement a GraphQL API that can send messages to Telegram chats using a bot. For this, we'll combine a lot of different features of AppSync and will also follow best practices for sensitive information.
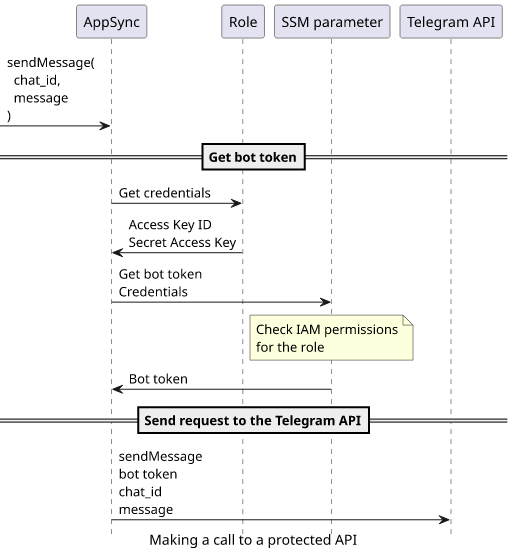
We'll use the SSM Parameters Store to securely persist the bot token, a sensitive information that is the API key for all bot-related operations. Then we'll use an HTTP resolver to retrieve the value using an IAM Role and a policy attached to that role.
To send the Telegram message, we'll add another HTTP resolver that interacts directly with the Telegram API. To combine these two resolvers, we'll add a pipeline so AppSync will perform the two steps in sequence.
In the end, we'll have a simple API that gets the Chat ID and a message and sends that to the target chat:
type Mutation {
	sendMessage(chat_id: String!, message: String!): String!
}

type Query {
	me: AWSJSON!
}

schema {
	query: Query
	mutation: Mutation
}
Let's get started!
Bot token and Chat ID
To send a message to a Telegram chat, we'll need 2 things: the bot token and a chat_id.
The bot token is the API key for the bot and allows sending requests to the Telegram API as the bot. This is a sensitive value as anybody who knows this will be able to reconfigure and impersonate the bot.
The bot token is tied to the bot itself and is generated when you create the bot. So use BotFather to create a bot or, if you already have one, to retrieve the token.

The Chat ID identifies the chat the bot is having with users. This is to allow multiple simulateous chats as you'd expect from a bot. To get a Chat ID, the easiest way is to use the telegram-bot-setup package that sets up a chat and outputs the id.

Storing the bot token
As we've discussed, the bot token is a sensitive value. In AWS, that means to store it either in the SSM Parameters Store or the Secrets Manager. Both are good choices, and in this article we'll use the former.
Give AppSync access to the value using an IAM policy:
data "aws_iam_policy_document" "appsync" {
  statement {
    actions = [
      "ssm:GetParameter"
    ]
    resources = [
			aws_ssm_parameter.value.arn
    ]
  }
}
Retrieving the bot token
Then AppSync needs to send a signed request to the SSM service to retrieve the current value. We'll use the HTTP data source's feature of automatically adding a signature using an IAM Role's credentials.
resource "aws_appsync_datasource" "parameter_store" {
  api_id           = aws_appsync_graphql_api.appsync.id
  name             = "ssm"
  service_role_arn = aws_iam_role.appsync.arn
  type             = "HTTP"
	http_config {
		endpoint = "https://ssm.${data.aws_arn.ssm_parameter.region}.amazonaws.com"
		authorization_config {
			authorization_type = "AWS_IAM"
			aws_iam_config {
				signing_region = data.aws_arn.ssm_parameter.region
				signing_service_name = "ssm"
			}
		}
	}
}
This part only configures the signing and the endpoint, all the other details, such as the path, the body, and headers, are defined by the resolver.
{
	"version": "2018-05-29",
	"method": "POST",
	"params": {
		"headers": {
			"Content-Type" : "application/x-amz-json-1.1",
			"X-Amz-Target" : "AmazonSSM.GetParameter"
		},
		"body": {
			"Name": "${aws_ssm_parameter.value.name}",
			"WithDecryption": true
		}
	},
	"resourcePath": "/"
}
The result is a JSON with the value:
#if ($ctx.error)
	$util.error($ctx.error.message, $ctx.error.type)
#end
#if ($ctx.result.statusCode < 200 || $ctx.result.statusCode >= 300)
	$util.error($ctx.result.body, "StatusCode$ctx.result.statusCode")
#end
$util.toJson($util.parseJson($ctx.result.body).Parameter.Value)
Note the error handling: the status code check is essential here as the $ctx.error does not report non-2XX responses.
Pipeline resolvers
When a resolver needs to do multiple things it needs to be a pipeline resolver. In a pipeline, individual functions are called sequentially, each getting the result of the previous one.
In our case, we need two steps: the first one retrieving the bot token, then the second one sending the request to the Telegram API to send a message. There,
the bot token is available at $ctx.prev.result.

Interacting with the Telegram API
In the second step of the pipeline, we have everything required to send a message: the bot token is coming from the previous step, then the chat_id is a
resolver argument. The only step here is to assemble the HTTP request and send it to the Telegram API.
First, configure the data source for the Telegram API. This is simple, as we don't need signatures here, only the endpoint:
resource "aws_appsync_datasource" "telegram" {
  api_id           = aws_appsync_graphql_api.appsync.id
  name             = "telegram"
  type             = "HTTP"
	http_config {
		endpoint = "https://api.telegram.org"
	}
}
Then the resolver defines the request path and the arguments:
{
	"version": "2018-05-29",
	"method": "POST",
	"params": {
		"headers": {
			"Content-Type" : "application/json"
		},
		"body": {
			"chat_id": $util.toJson($ctx.args.chat_id),
			"text": $util.toJson($ctx.args.message)
		}
	},
	"resourcePath": "/bot$ctx.prev.result/sendMessage"
}
The path is /bot<token>/sendMessage. Since the token is coming from the previous step, it is available at $ctx.prev.result.
Then the body is defined by the Telegram API for this operation. The documentation page shows all required and optional parameters.
The response is a JSON:
#if ($ctx.error)
	$util.error($ctx.error.message, $ctx.error.type)
#end
#if ($ctx.result.statusCode < 200 || $ctx.result.statusCode >= 300)
	$util.error($ctx.result.body, "StatusCode$ctx.result.statusCode")
#end
#if (!$util.parseJson($ctx.result.body).ok)
	$util.error($ctx.result.body)
#end
$util.toJson($util.parseJson($ctx.result.body).result.message_id)
Notice the extra step in error handling. Telegram defines an ok property that signals whether the
request was successful or not.
Configuring the pipeline
The last thing is to wire the two resolvers into a pipeline:
resource "aws_appsync_resolver" "Mutation_sendMessage" {
  api_id      = aws_appsync_graphql_api.appsync.id
  type        = "Mutation"
  field       = "sendMessage"
  request_template  = "{}"
  response_template = "$util.toJson($ctx.result)"
  kind              = "PIPELINE"
  pipeline_config {
    functions = [
      aws_appsync_function.get_secret.function_id,
      aws_appsync_function.send_message.function_id,
    ]
  }
}
Testing
To test it, let's make a GraphQL request:
mutation MyMutation {
  sendMessage(chat_id: "1588718028", message: "test")
}
The result is a JSON with a number:
{
"data": {
"sendMessage": "283"
}
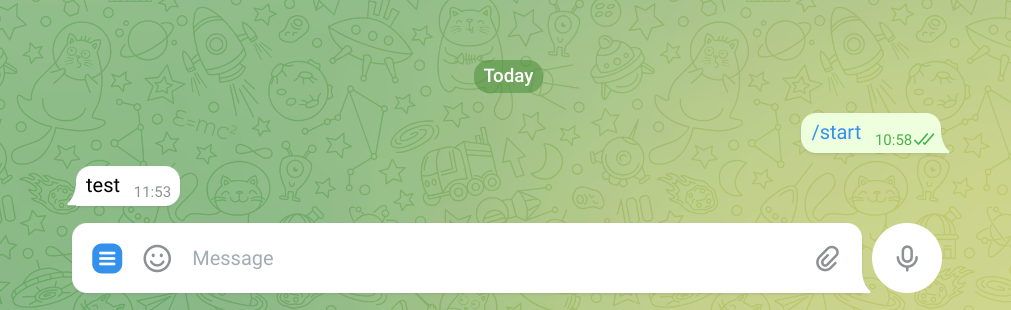
}And the message is delivered:
Considerations
Rate limits
SSM Parameters Store free tier has a relatively low limit for requests per second. Calling the above mutation reads the value every time, which means it's easy to reach the ceiling for request rate.
If you want to keep using the free tier, a better alternative is to use a Lambda function with some caching built in.

The SSM higher throughput and the Secrets Manager has high enough limits that it's unlikely you'll reach them.
Sensitive values in logs
If you have resolver logging enabled, AppSync puts all available data for the resolvers into a CloudWatch log group. And this includes the secret value:

So be careful when you enable logging.