Deploy a serverless Telegram bot to AWS using Terraform
A step-by-step guide on getting started with Telegram bot development


Telegram bots
Telegram, one of the biggest messenger platform, offers a Bot API that allows third-party automation. Users can start chatting with bots and these bots can send message to users. This opens a wide range of what's possible on the platform: sending commands to a system, receiving security notifications, or any other integration.
Since you, the developer, control the bot, you can define how it interacts with your environment. It could start EC2 instances, monitor Kubernetes clusters in GCP, or send a notification when a backup is completed. Or the tea.
Why build on an existing platform and not start a separate project, probably a website?
With Telegram, you get push notifications, account security with 2-factor authentication (phone number and an optional password), chat history, form support, and more. For simple or personal projects, taking advantage of the platform makes things easier. That's what prompted me to look into it in a bit more detail and start experimenting.
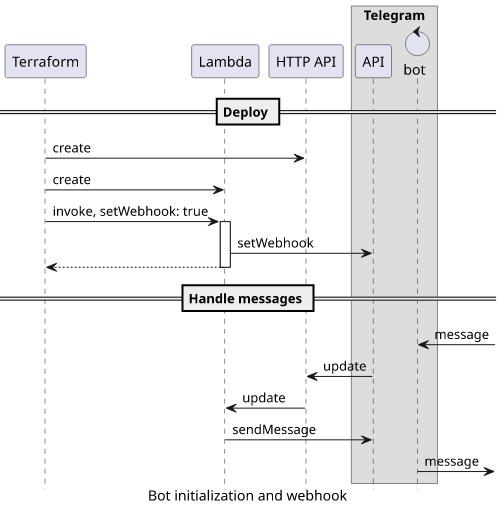
In this article, we'll deploy a serverless Telegram bot to AWS using Terraform. It runs on AWS Lambda behind an HTTP API and implements a simple echo functionality: whatever you send to it, it echoes it back.
When deploying a Telegram bot (or any similar one), 3 areas need extra care:
- Token storage
- Webhook initialization
- Secret path
We'll take a detailed look into all of them and discuss best practices. By the end of the article, you'll have a bot that you can deploy with a single command and then anyone can interact with it.
Bot token
But first, let's register a new bot! You'll need a bot for this, BotFather. Start a chat and choose a bot name that is available. If you are successful, it gives you an access token:
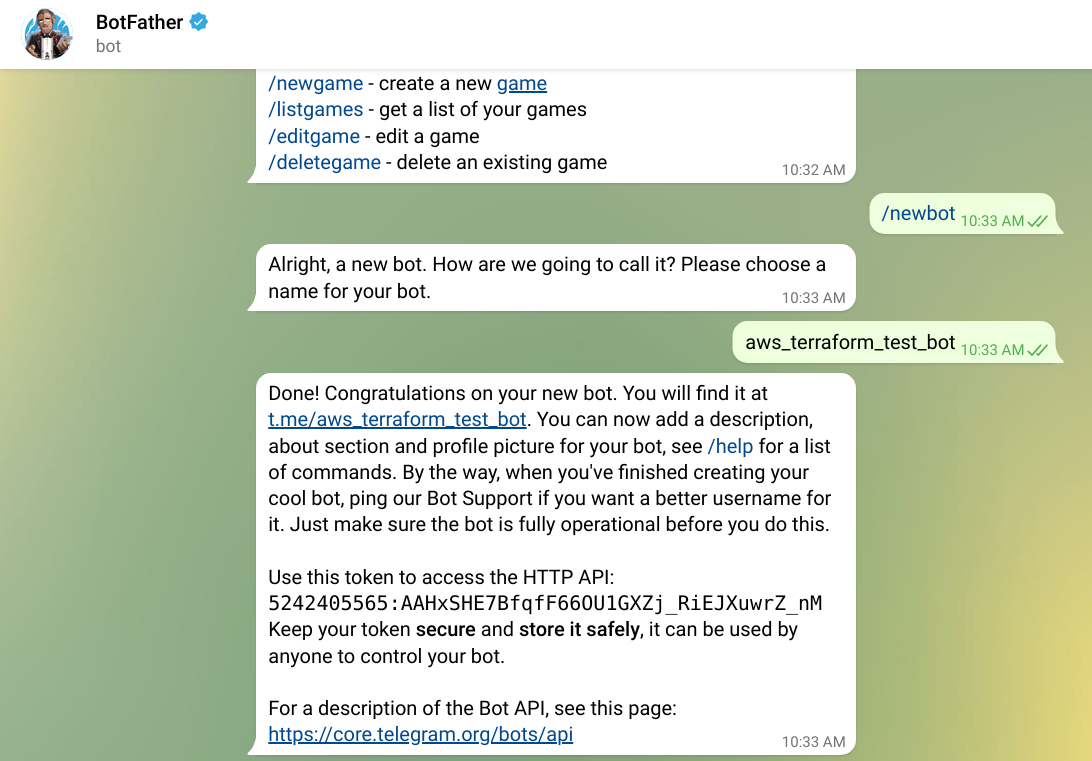
As BotFather tells you, it is a secret value and don't show it to anyone (if you are wondering, the token on the image is invalidated). This token is the key to the bot, it allows anyone to send and receive messages, set the webhook, and practically everything the bot can do. So handle it with care.
When I researched for this article I found that most tutorials jump to code at this point and define a variable for this token. This is wrong on many levels, as it is a secret value it should not be hardcoded anywhere in the code. Even environment variables are not suitable for this.
What's wrong with adding the token to the code? Anyone who has access to the code can extract this value. And accessing the code can happen in many places, from the version control, to deployment, to the actual function running on AWS. Anyone who has access to any of these has access to the token.

Storage for secrets
A better place is to use a separate service that is designed to hold secret values. In AWS, that would be the Secrets Manager or its predecessor, SSM Parameter Store. In this article, I'll use the latter.
Why use a service like this?
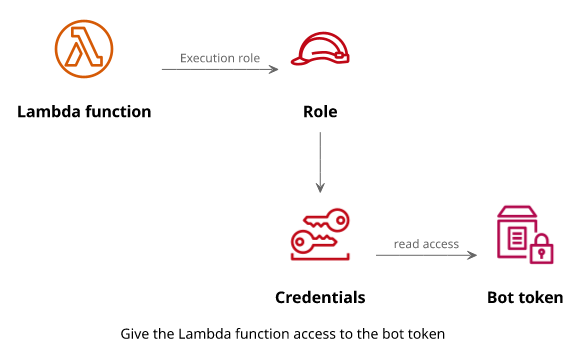
With a dedicated secret manager, the secret value is not exposed anywhere and only available to the function via IAM permissions. Instead of having the code or an environment variable expose it, only a pointer to the secret store is provided to the function and it needs to use its role's permissions to access the value. As a result, if somebody has read access to anything except the secret itself, they still can't access it.
To keep this example easy-to-deploy, there is an input variable that creates the SSM parameter. In production, you'd want to create the parameter separately and only provide its ARN to the stack.
variable "telegram_token" {
	type = string
	sensitive = true
}

resource "aws_ssm_parameter" "bot-token" {
	name = "bot-token"
	type = "SecureString"
	value = var.telegram_token
}
Then the Lambda function needs the parameter's name:
resource "aws_lambda_function" "lambda" {
	# ...
	environment {
		variables = {
			token_parameter  = aws_ssm_parameter.bot-token.name
		}
	}
}
As well as permissions to read its value:
data "aws_iam_policy_document" "lambda_exec_role_policy" {
	statement {
		actions = [
			"ssm:GetParameter",
		]
		resources = [
			aws_ssm_parameter.bot-token.arn
		]
	}
}
When the bot needs the token, it can read it from SSM:
import { SSMClient, GetParameterCommand } from "@aws-sdk/client-ssm";

const token = await new SSMClient().send(new GetParameterCommand({
	Name: process.env.token_parameter,
	WithDecryption: true,
}));
Combined with the caching implementation described in this article, this provides a robust way to store and access the secret value.

Webhook
When a user sends a message to the bot, it generates an Update. While the bot could fetch these updates periodically using the getUpdates function, it is better to set up a webhook.
A webhook is an HTTP endpoint that Telegram calls when there is an event for the bot. It provides a way to process these events in real-time, so a bot will be responsive to incoming messages.
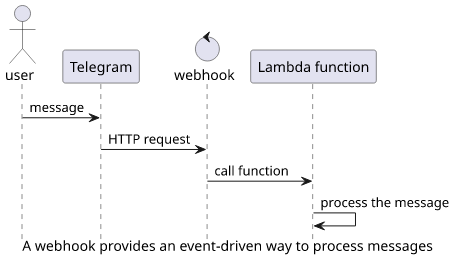
It also fits nicely into the serverless application model. The Lambda function can run whenever there is a new event, process it in some way, then wait for the next message.
To provide an HTTP endpoint that can work as a webhook, we need an API Gateway that forwards requests to the Lambda function.
HTTP endpoint
While the Lambda service provides a way to invoke a function with an HTTP request it requires a specific structure and a signature calculated using AWS's signature algorithm. Because of this, this is usually not the way to provide a way to call a Lambda function.
To add a proper HTTP endpoint to a function, you can use an HTTP API service. It provides a publicly-accessible URL that forwards all requests to the function and returns its results, which is all we need for a webhook.
The resources you'll need to create and configure this API:
resource "aws_apigatewayv2_api" "api" {
	name          = "api-${random_id.id.hex}"
	protocol_type = "HTTP"
}

resource "aws_apigatewayv2_integration" "api" {
	api_id           = aws_apigatewayv2_api.api.id
	integration_type = "AWS_PROXY"

	integration_method     = "POST"
	integration_uri        = aws_lambda_function.lambda.invoke_arn
	payload_format_version = "2.0"
}

resource "aws_apigatewayv2_route" "api" {
	api_id    = aws_apigatewayv2_api.api.id
	route_key     = "ANY /${random_id.random_path.hex}/{proxy+}"

	target = "integrations/${aws_apigatewayv2_integration.api.id}"
}

resource "aws_apigatewayv2_stage" "api" {
	api_id      = aws_apigatewayv2_api.api.id
	name        = "$default"
	auto_deploy = true
}

# give permission to call the lambda
resource "aws_lambda_permission" "apigw" {
	action        = "lambda:InvokeFunction"
	function_name = aws_lambda_function.lambda.arn
	principal     = "apigateway.amazonaws.com"

	source_arn = "${aws_apigatewayv2_api.api.execution_arn}/*/*"
}
It seems like a lot of resources, and you may be wondering why not just take advantage of the target argument that also creates the integration, the
route, and the stage?
In this implementation the Lambda sets the webhook (as we'll cover later), so it needs the API's endpoint URL. But if the
aws_apigatewayv2_api depends on the Lambda function then the Lambda can't depend on the API. That's why we need to separate the integration from the API.
Secret path
As mentioned in the Telegram documentation, it's a good idea to provide a secret value in the path so you can be sure updates are coming from Telegram and not somewhere else. The above code implements this using a route key and a random ID:
resource "random_id" "random_path" {
	byte_length = 16
}

resource "aws_apigatewayv2_route" "api" {
	# ...
	route_key     = "ANY /${random_id.random_path.hex}/{proxy+}"
}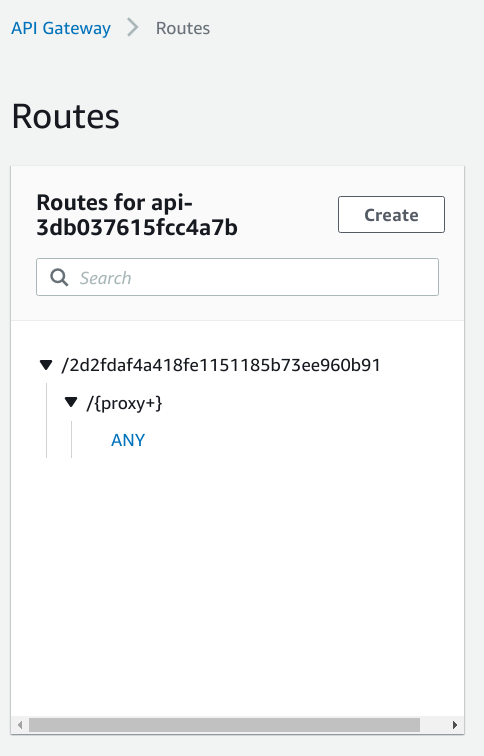
As a result, every request that does not include this random path will be rejected by the API Gateway.
Sending a request to the API Gateway root, such as https://j57slvqwac.execute-api.eu-central-1.amazonaws.com/ results:
{
	"message": "Not Found"
}
But with the correct path (https://j57slvqwac.execute-api.eu-central-1.amazonaws.com/2d2fdaf4a418fe1151185b73ee960b91/) it runs the webhook.
Set the webhook
Now that we have the full infrastructure in place to process messages via the webhook, the only remaining thing is to notify Telegram of the URL. This is done using the setWebhook function, and we need 3 things for that:
- The bot token
- The API endpoint URL
- The secret path
The function has access to all three:
resource "aws_lambda_function" "lambda" {
	# ...
  environment {
    variables = {
      domain          = aws_apigatewayv2_api.api.api_endpoint
      path_key        = random_id.random_path.hex
      token_parameter = aws_ssm_parameter.bot-token.name
    }
  }
}
The final webhook URL is ${domain}/${path_key}/ and the token is needed for authentication. The only missing step is to call this function and make it set
the URL.
Terraform provides a data source to call a Lambda function as part of the deploy process, which is perfect for this use-case. Since Telegram does not mind if
the setWebhook is called multiple times, using this data source is a good way to initialize the webhook.
This calls the function with a specific event object:
data "aws_lambda_invocation" "set_webhook" {
	function_name = aws_lambda_function.lambda.function_name

	input = <<JSON
{
	"setWebhook": true
}
JSON
}
Then the handler can check the setWebhook in the event and set the webhook if it is true:
if (event.setWebhook) {
	// set webhook
	// domain is the API gateway endpoint
	// path_key is the random part of the path
	// token comes from the SSM
	const {domain, path_key} = process.env;
	await sendTelegramCommand("setWebhook", {
		url: `${domain}/${path_key}/`
	});
}else {
	// process message
}
Since a Telegram bot can have only one webhook, the last deployment wins.
Process messages
The bot is now ready to receive updates, so let's move on to how to process incoming messages and make the bot send its own to the chat. All communication is based on the bot token and the chat id. In Telegram, a user needs to initiate the chat by sending a message, but after that the bot is free to reply immediately or later. But it needs the chat id for that.
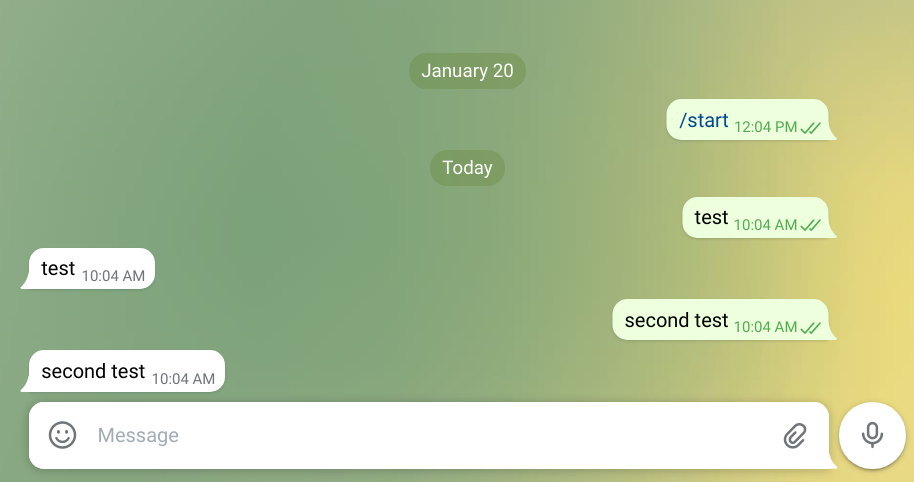
Let's implement an echo functionality!
The update object has several fields:
{
	"update_id": 794048666,
	"message": {
		"message_id": 53,
		"from": {
			"id": "...",
			"is_bot": false,
			"first_name": "Tamás",
			"username": "...",
			"language_code": "en"
		},
		"chat": {
			"id": "...",
			"first_name": "Tamás",
			"username": "...",
			"type": "private"
		},
		"date": 1642935026,
		"text": "test"
	}
}
This is a message update, so the message field is defined. There are several other types, but we are interested only in messages:
const update = JSON.parse(event.body);
const {message: {chat: {id: chat_id}, text}} = update;
await sendTelegramCommand("sendMessage", {
	chat_id,
	text,
});
The sendTelegramCommand is a small utility function that reads the token and sends a POST message with a JSON payload to the Telegram API:
const sendTelegramCommand = async (url, params) => {
	const token = (await getParam()).Parameter.Value;

	const res = await fetch(`https://api.telegram.org/bot${token}/${url}`, {
		method: "POST",
		headers: {
			"Content-Type": "application/json"
		},
		body: JSON.stringify(params),
	});
	if (!res.ok) {
		throw new Error(res);
	}
	const result = await res.json();
	if (!result.ok) {
		throw new Error(result.description);
	}
	return result.result;
};
With this implementation, the bot responds to incoming messages: