Custom Aggregations in Logstash with the Ruby Filter Plugin
How to fine-tune log entry processing with custom filters in Logstash using Ruby

The previous posts were about Elastic Stack and its integration possibilities with Logstash. This post is about how to fine-tune the processing of the log entries with custom filters in Logstash using Ruby.


For the sake of an example, let's imagine the following problem: assume that a third-party batch processing application emits a log entry when a scheduled job starts and finishes:
...
Job started
...
Job finished
...
Based on the timestamps of these log entries, I was wondering: how is it possible to measure the duration of these jobs in Elastic Stack?
Exploring the alternatives
The easiest solution would be to modify the application to also log the job duration at the end and extract it with a Grok processor. But, because the application is a third-party, this is off the table.
The duration of the job could be calculated using a stateful processor on the log files that does some kind of aggregation. I found a few built-in mechanisms in Elastic Stack for this, but unfortunately, they were not suitable for this use-case:
- Serial Difference Aggregation: judging from it's name, I thought this will be the one I need.
With Serial Difference Aggregation values in a time series are subtracted from itself at given time lag. Can be useful to de-trend the data (e.g. remove constant linear growth) or remove seasonal behavior.
Unfortunately, for my case it was not useful because it follows a strict time-based formula:
f(x) = f(xt) - f(xt-n), wherenis a constant. So, it can be configured with n=7 minute to subtract the current record's value from a value that was recorded 7 minutes ago, but not based on some arbitrary condition like matching a text. - Search Aggregations and Bucket Aggregations: It's easy to create ad-hoc aggregations like calculating the average of a field, however I did not find a way to configure it to handle my rather unique use-case.
So, I decided to check how to write a custom aggregator. Elasticsearch's Ingest Pipelines seems to be not capable of such thing yet, so I went with Logstash and it's Ruby Filter Plugin.
Hello Ruby Filter Plugin
Before you continue with this post I recommend reading How to integrate with Elastic Stack via Logstash for a guide on setting up your local infrastructure with Elasticsearch and Logstash.
The Ruby Filter Plugin is a filter that can be configured with a Ruby code snippet to transform log messages sent to Logstash. It can modify, filter or even create entries.
To start out let's see how a simple filter looks like.
First, modify logstash.conf to include the filter:
input {
    tcp {
        port  => "5000"
        codec => json_lines
    }
}
filter {
    ruby {
        path => "/etc/logstash/filters/duration.rb"
    }
}
output {
    elasticsearch {
        hosts    => ["http://elasticsearch:9200"]
        index    => "myapplication-%{+YYYY.MM.dd}"
        user     => "elastic"
        password => "changeme"
    }
}
Next, create the duration.rb file and mount it to the Logstash container:
def filter(event)
  event.set('message', "Hello, from Ruby! Message: #{event.get('message')}")
  return [event]
end
This filter transforms each incoming log message, prepending "Hello, from Ruby! Message:" to each of them.
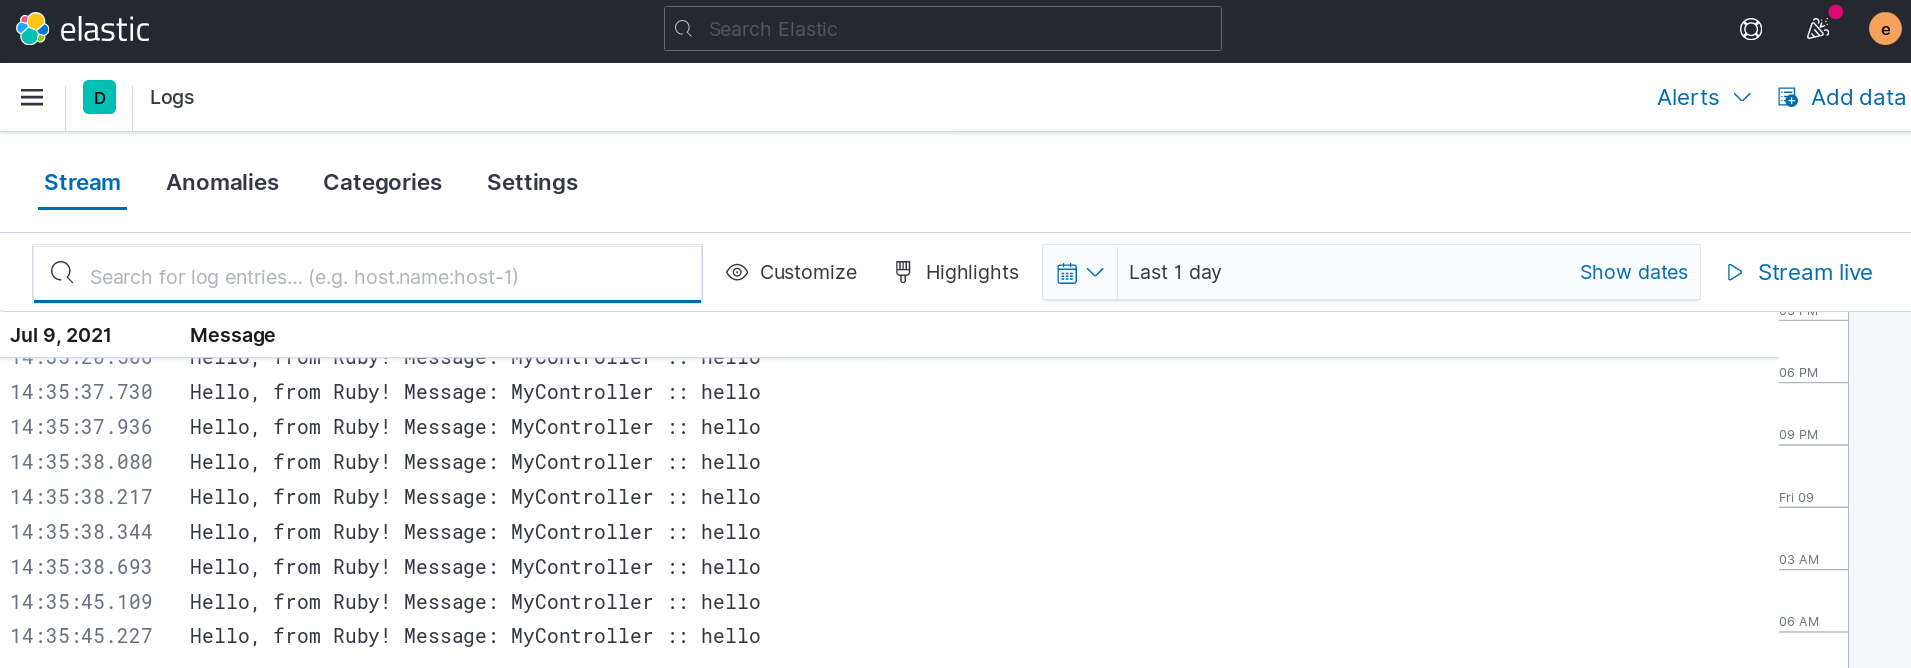
That's is. At this point if you fire up your Elastic Stack and send some messages, you'll see something like this:
There's one caveat though: it's really painful to develop a plugin like this, as for every little change you have to restart the stack and do the verification manually.
Luckily, there's an easy fix for this problem recommended by the plugin documentation: you can write automated tests for your code.
So, as a final touch let's modify the duration.rb script to include a test:
def filter(event)
  event.set('message', "Hello, from Ruby! Message: #{event.get('message')}")
  return [event]
end

test 'modify messages' do
  in_event { { 'message' => 'Example message' } }

  expect('prefix to be added') do |events|
    events.size == 1
    events.first.get('message') == 'Hello, from Ruby! Message: Example message'
  end
end
The tests will run every time the filter is loaded. More importantly, Logstash can be started in a test mode with a test config to run the tests exclusively without starting the service.
I created the following Bash script in the same directory as the Ruby filter to run the tests using the Logstash Docker image:
#!/bin/bash

set -euox pipefail

SCRIPT_DIR="$( cd "$( dirname "${BASH_SOURCE[0]}" )" &> /dev/null && pwd )"

docker run \
    --rm \
    -v ${SCRIPT_DIR}:/etc/logstash docker.elastic.co/logstash/logstash:7.12.0 \
    logstash -e "filter { ruby { path => '/etc/logstash/duration.rb' } }" -t
Now we are ready to develop the filter to measure the duration between the start and the end messages.
Add parameters to the filter
We'd like to measure duration between 2 log entries somehow we have to encode this in the filter. One option would be to hard-code it, but that's usually not practical. Let's see how it is possible to use parameters instead.
Parameters can be specified in the logstash.conf file:
filter {
    ruby {
        path => "/etc/logstash/filters/duration.rb"
        script_params => {
            'start_text' => 'Job started'
            'end_text'   => 'Job finished'
        }
    }
}
The map specified by script_params can be accessed during the plugin's registration, by adding the register method to the script:
def register(params)
  @start_text = params['start_text']
  @end_text = params['end_text']
end
In Ruby if a variable's name starts with @ then it is an instance variable, which means that it will be accessible in the filter method later.
def filter(event)
  event.set('message', "Start text: #@start_text End text: #@end_text Message: #{event.get('message')}")
  return [event]
end
We can verify this with the following test:
test 'modify messages' do
  parameters do
  {
    'start_text' => 'Job started',
    'end_text' => 'Job finished'
  }
  end

  in_event { { 'message' => 'Example message' } }

  expect('prefix to be added') do |events|
    events.size == 1
    events.first.get('message') == 'Start text: Job started End text: Job finished Message: Example message'
  end
end
Emitting extra log messages
Another important aspect is how we'll present the calculated duration. The simplest option would be to simply append the calculated information to the message of the end text, however later on it would be difficult to process this value.
A better alternative is to add this information as a new attribute while keeping the original message intact. This way the information would be still tied to the ending log entry, but it is much easier to handle later on:
def filter(event)
  event.set('duration', "TODO: calculate elapsed time")
  return [event] # return the modified event
end
For this experiment I decided to go with a third option and decided to emit a dedicated extra log entry for each calculated duration. To do this I had to create a new Event object and return it in addition to the original event:
def filter(event)
   duration_event = LogStash::Event.new
   duration_event.set('message', 'Job duration')
   duration_event.set('duration', 'TODO: calculate elapsed time')

   return [event, duration_event] # return an extra event in addition to the original one
end
Currently this way our filter produces a second log entry for each incoming message, which can be verified with a test:
test 'extra log messages' do
  in_event do
    [
      {
        'message' => 'First entry'
      },
      {
        'message' => 'Second entry'
      }
    ]
  end

  expect('twice the events') do |events|
    events.size == 4
  end
end
Using state
We can calculate the duration when the end log entry is received if the timestamp of the previous start log entry is stored.
Let's modify the filter method accordingly:
def filter(event)
  message = event.get('message')
  timestamp = event.get('@timestamp')

  if message.include? @start_text
    @start_time = timestamp
    return [event]
  elsif message.include? @end_text
    time_diff = timestamp.to_f - @start_time.to_f

    duration_event = LogStash::Event.new
    duration_event.set('message', 'Job duration')
    duration_event.set('duration', time_diff)

    return [event, duration_event]
  else
    return [event]
  end
end
It can behave three ways depending on the log event's message:
- If the message contains the configured start message, it records the timestamp of the event, and does nothing else.
- If the log contains the end message, it calculates the elapsed time and emits the extra event with this information.
- For all other log events, it does nothing, just let them pass.
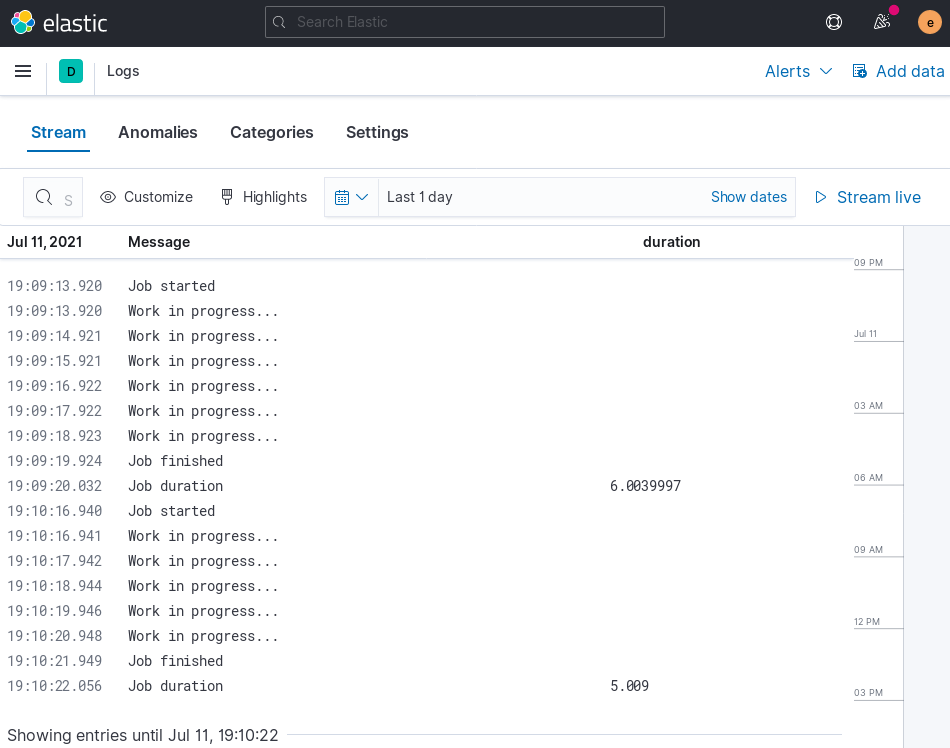
So far so good, for each "Job finished" log entry there's one "Job duration" that includes an additional parameter, the duration:
Concurrency issues
As advised in the plugin documentation, it's not recommended to modify instance variables during filtering as they are shared between multiple worker threads. Unfortunately this how the filter currently handles state.
Using Ruby's thread local variables likely wouldn't help in this case, because it is no guaranteed that the same thread will handle the start and the finish message.
To improve the situation I settled with using Concurrent::Map. Upon registration, I created a new one and stored it as an instance variable,
then used it to store and read the start timestamp in the filter method.
// register
@start_times = Concurrent::Map.new

// access
@start_times[:start_time] = timestamp
Summary
This post was about a PoC to demonstrate programmatic server-side processing of log entries using Ruby code with Logstash. This is mainly for inspiration as in this form this filter may have some downsides depending on an actual use-case. For one, its state is lost on restarts and it does not handle the case when it encounters the end message before the start message. Also, it's quite easy to imagine that log events might come from multiple sources, so the filter would also need to ensure that we are matching the end log messages with the corresponding start messages.