The first steps from Grunt to Webpack
Getting started with Webpack after using Grunt


Motivation
After Grunt, Gulp, then Browserify, Webpack is the new leading build technology for the frontend. Just as Grunt, it helps you build your codebase, and just as Browserify, it brings support to modularization; but it has more impetus than the others for now. In this post starting with a simple Grunt build, you'll learn the basics of Webpack and the philosophy behind it.
Comparing Grunt and Webpack
While the use case is quite similar in the two, they are conceptionally different. Grunt is a task runner, while Webpack is a module bundler. Effectively they both take your source files and do a series of transformations to generate some compiled code you can run and deploy.
Also you can integrate Webpack into Grunt, so you don't need to choose if you don't want to.
(To learn about other bundlers, click here)

Why Grunt
Grunt is a task runner, that is, a utility to run tasks; be them compilation-related or anything else. There are many tasks for Grunt for frontent compilation, but you are free to use it for others purposes. This makes up an easy-to-comprehend architecture; basically there are tasks and configurations. This makes it a very versatile approach.
Why Webpack
Webpack on the other hand is a module bundler. It was built with javascript and web applications in mind, making it a more opinionated approach. It encourages modularization and supports the main module schemes. GWT (Google Web Toolkit) admittedly influenced it; for example it also supports code splitting.
It's main concept is fairly simple. You define entry points, and Webpack recursively resolves dependencies; then packs your app into bundles. You can define so called Loaders to define how different types of resources can be loaded (like SCSS needs some preprocessing). That's basically it.
Some advantages of Webpack over Grunt:
- As a more opinionated tool, it requires simpler configuration while it fits most projects
- Supports modules, even the ES6 syntax out of the box.
- There are many loaders and plugins and a vibrant ecosystem.
- The loaders are like simple UNIX scripts, they can be piped to make more complex transformations easily.
(To learn how to write code that is easier to maintain, click here)
Update 2017.09.25.
As jqn pointed out, the examples were seriously outdated. Based on his PR, I've updated them to the latest Webpack/React versions. Thanks!
Tutorial
For the sake of example, let's start with a basic Grunt build and then rewrite it for Webpack!
From Grunt
The original Gruntfile can be found here
I'll start from the Grunt-based build I introduced in an earlier post. It provides two tasks:
- grunt: Builds the app to the dist directory
- grunt dev: Same as the grunt task, but also watches the src for changes
It uses Babel to transform JSX into plain Javascript, otherwise it copies everything from the src to the dist.
(To get started with React, click here)
To Webpack
package.json
The end result can be found here
As with Grunt, we need to define some dependencies for the build. A notable difference is that Webpack prefers npm dependencies over Bower ones, so the package.json would contain those too. For the devDependencies section, we'll use the following:
- webpack, webpack-dev-server: Obviously we need Webpack
- style-loader, css-loader: These will load CSS files
- babel-core, babel-preset-es2015, babel-preset-react, babel-loader: These will do the transformations required for React.
- html-webpack-plugin: This will modify the HTML file so that the resulting js will be referenced
The dependencies section contains the runtime dependencies; we'll only need React for now.
We should define scripts here for building and development:
"scripts": {
	"build": "webpack",
	"watch": "webpack-dev-server --hot --inline --progress --colors --watch-poll"
},
The first one invokes Webpack. By default, it uses webpack.config.js.
The watch script invokes webpack-dev-server instead of webpack. It is used during development; it does not write anything to the disc. The --hot turns on hot deployment (a page refresh would be needed after every change otherwise), and --inline tells the server to use inline mode, instead of Iframing. Finally, --watch-poll will help if hot loading is not working otherwise, more on this later.
We can run these as npm run build and npm run watch, respectively.
webpack.config.js
The end result can be found here
The configuration file is actually a runnable Javascript, and it exports the configuration. This makes it quite versatile, as arbitrary code can be run and Webpack cares only the end result. We need to specify the entry point first, then the output; these are self-explanatory:
entry: "./src/app.jsx",
output: {
	path: path.join(__dirname, "dist"),
	filename: "bundle.js"
},
Then to the plugins section. The one thing Webpack needs is an HTML file that actually loads it's generated bundle. The easiest way is to use the HtmlWebpackPlugin, and pass it a template.
plugins: [
	new HtmlWebpackPlugin({
		template: "src/index.html"
	})
],
The next section is the modules. You can specify filename patterns and you can configure the different kinds of assets in one single place. Also you can pass parameters to the loaders, like the presets for Babel.
In the rules section, we can add a test for the js and jsx files that use the babel-loader.
The options is passed to the loader (this case, Babel) as-is, therefore the latest and
react presets will be used, along with the transform-class-properties plugin. Also
we can add a loader for the styles, piping the css-loader to the style-loader.
module: {
	rules: [
			{
				test: /\.js[x]?$/,
				exclude: /node_modules/,
				use: [
					{
						loader: "babel-loader",
						options: {
							presets: [
								["latest", {"es2015": false}],
								"react",
							],
							plugins: ['transform-class-properties']
						},
					}
				]
			},
			{
				test: /.css$/,
				loader: "style-loader!css-loader"
			}
	]
},
Finally, the devtool: "source-map" specifies that we want source maps too.
Usage
As we have everything in place, we can write our Javascript app with all the goodness of Webpack. We can add CSS to the module with a simple require:
require("./style.css");Export the component:
export default React.createClass({
	...
});
Then import and use it whenever needed:
import Component from "./Component.jsx";

ReactDOM.render(<Component/>, document.getElementById("main"));
Thanks to the Webpack Hot Loader, if you make a change in any component, the server will update the code and automatically reloads the page. This seriously shortens the time needed to test a change.
Problems
Albeit the transition to Webpack went smoother than expected, it comes with it's own set of problems. These are mostly annoying things that might be fixed eventually and luckily only affect development.
Hot loading vs Vim
If you are using Vim to edit sources, your changes might not be detected by the hot loader unless you use --watch-poll. This is a known issues and caused by how Vim saves files. To make this working, you can configure Vim or simply use --watch-poll.
(To learn more about new Vim features, click here)

Sources in the developer console
The next thing leaves you wondering is where the sources are in the developer console. They reside in the webpack://. folder:
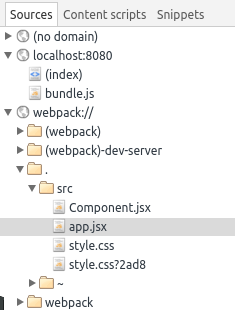
This is a little surprise you'll eventually get used to.
Debugging with hot reloading
If you use breakpoints, Webpack hot deploy holds some additional surprises for you. You can set breakpoints to your code and they get hit without problems. If you modify something in the code and the modifications are deployed, a new file is created from the modified one. Your already set breakpoints will be useless now, but you can set others in this new file.
However, if you change your code another time, you are out of luck. You can not set additional breakpoints. You need to do a full reload to regain this capability; a quirk I hope will soon be fixed.
Imports renaming
Even if you manage to stop the code at a breakpoint, it is still hard to evaluate anything in the console. Even though there is an import ReactDOM from "react-dom"; line earlier and the Component properly showing up, typing ReactDOM to the console gives an Uncaught ReferenceError: ReactDOM is not defined. After a bit of trial and error, you could figure out it's current name, like _reactDom2, but it makes copy-pasting carefully crafted snippets back to the codebase quite hard.
This is a known issue, but unfortunately a necessary one to be spec-compliant.
On the bright side, it can be tackled on the browser-side. There is an issue in the Chromium tracker, and the necessary proposals are handled in to make this happen. Seems like it won't happen anytime soon, but it's nice to see things are progressing.
Closing remarks
Apart from the aforementioned problems, working with Webpack is a breeze. It's opinionated configuration requires little tweaking, and it's notion of loaders fits nicely into the frontend projects. The support for ES6 modules makes Javascript much more mature. Even though we needed to wait so many years for this, things are looking bright for the future.