Getting started with OpenCV for Java on Ubuntu
A guide to build and try OpenCV for Java on Ubuntu.


In this post I'd like to provide a brief summary about what it takes to try OpenCV from a Java application on Ubuntu. OpenCV is a great open source computer vision library, written in C++. It has great tutorials (go ahead and read them, if you haven't already), but anyway, I'd like to share some of the gotchas I've encountered along the way.
1. Get the source
The source code is in a public Git repository hosted on Github. Clone it and switch to the 2.4 branch.
git clone https://github.com/Itseez/opencv.git
cd opencv
git checkout -b 2.4 origin/2.4
2. Compile
First, create a directory for the build in the cloned directory.
mkdir build
cd build
Then configure the project with cmake with BUILD_SHARED_LIBS parameter unset. From the docs: "When OpenCV is built as a set of static libraries (-DBUILD_SHARED_LIBS=OFF option) the Java bindings dynamic library is all-sufficient, i.e. doesn’t depend on other OpenCV libs, but includes all the OpenCV code inside."
cmake -D BUILD_SHARED_LIBS=OFF ..Ensure that the output contains something like this in the Java section:
--   Java:
--     ant:                         /usr/bin/ant (ver 1.9.6)
--     JNI:                         /usr/lib/jvm/java-8-oracle/include /usr/lib/jvm/java-8-oracle/include/linux /usr/lib/jvm/java-8-oracle/include
--     Java tests:                  YES
It's important to note, that you can continue if the Java dependencies are not set appropriately, but the compiled version will not include Java bindings.
- If the value for ant is NO, then run sudo apt-get install ant.
- If the JAVA_HOME environment variable is not correctly set, it causes NO to appear for JNI. In this case just export the variable to refer the correct path, for example with export JAVA_HOME=/usr/lib/jvm/java-8-oracle.
After the necessary changes rerun cmake and make sure to everything is correctly set up.
Now, start the build:
make -j8(The -j option specifies the number of jobs to be run simultaneously.)
This is going to take a while, but eventually it creates a JAR (bin/opencv-xxx.jar) containing the Java interfaces and the files of native library.
3. Try it
With the following steps, you can use the compiled library directly from Eclipse.
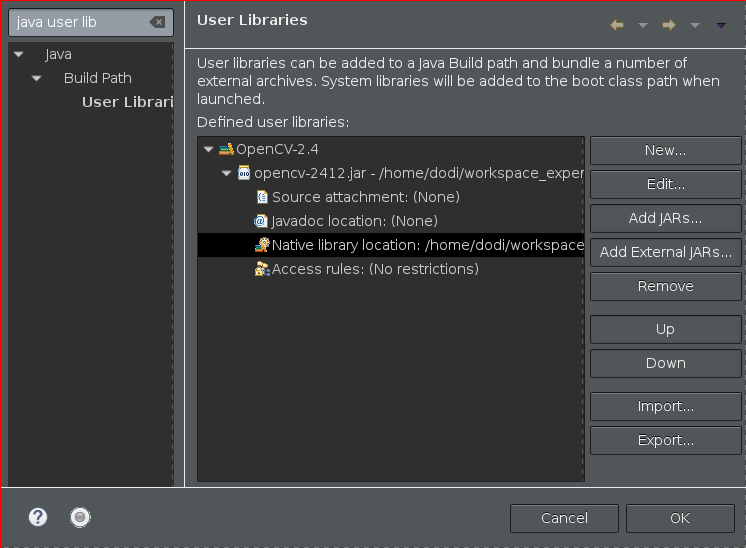
First, register the OpenCV native library:
- In Window -> Preferences, go to the Java -> Build Path -> User Libraries section.
- Click New to add a new library, and give it a name (for example OpenCV-2.4).
- Select it and press Add External JARs... to browse the previously compiled JAR file (opencv/build/bin/opencv-xxx.jar).
- Specify the native library location to refer the correct files (opencv/build/lib).
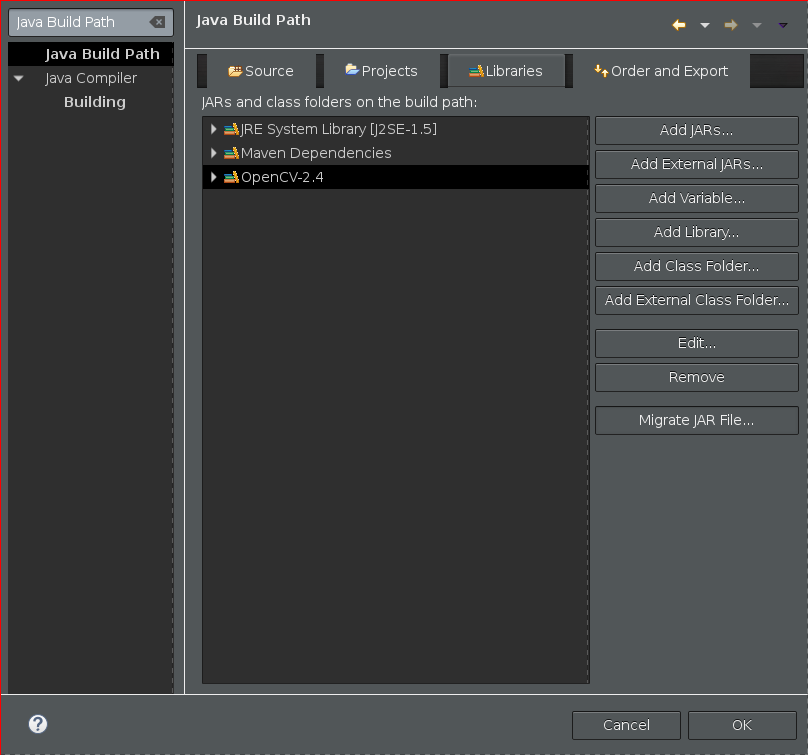
For the test, create a simple Project:
- Create a new Java project.
- Add the newly created user library (OpenCV-2.4) to the Java Build Path -> Libraries section, by pressing the Add library... button.
- Create a Java Class with the following snippet (source):
import org.opencv.core.Core;
import org.opencv.core.CvType;
import org.opencv.core.Mat;

public class Hello {
   public static void main( String[] args ) {
      System.loadLibrary(Core.NATIVE_LIBRARY_NAME);
      Mat mat = Mat.eye(3, 3, CvType.CV_8UC1);
      System.out.println("mat = " + mat.dump());
   }
}
If everything is fine then running this program should print the 3x3 identity matrix.