How to add Cognito login to a website
How to use Cognito users and implement an OAuth 2.0 login flow in a webapp

Cognito offers a managed way to add user handling to an application. With it you can outsource password management, MFA support, account recovery, session handling, and a lot of other tasks that are hard to implement. Instead, you need to use the OAuth 2.0 flow and make sure it's secure.
In this article you'll learn how to create and configure a user pool and how to implement the login flow in a web application. You'll also learn how to secure your backend by checking the tokens the users get from Cognito.
There is a GitHub repository that deploys everything in your account with Terraform so you can see how everything works.
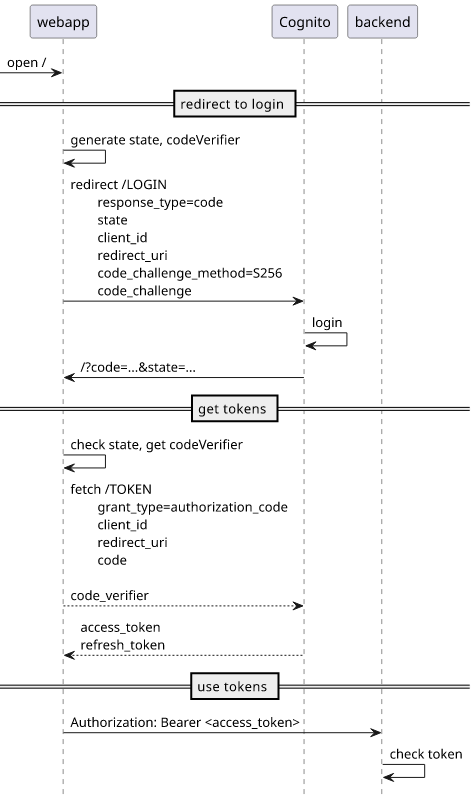
This is the full flow we'll implement:

And here's how it works:
User pool or identity pool?
Cognito offers two types of credentials. A user pool is used to implement the OAuth flow and generate access tokens. You can then use these tokens to give access to your services, for example, you can set up API Gateway to only allow requests that contain a valid access token. Then, in your backend code you can retrieve the user and the groups it belongs.
Identity pools are used to generate IAM credentials, the same ones that IAM users and roles use. This allows the client to directly access AWS resources in your account.
Which one to choose?
If you want the client to send requests to AWS APIs, such as storing files in S3 buckets or invoking Lambda functions without an API Gateway, then choose identity pools. It sounds good, but usually this is not what you'll need.
If you want sign-in functionality to a webapp, user pools are the better solution. You still need to implement a backend but you won't need to think about logins and logouts, just need to check the tokens.
In short: if you don't know that you specifically need an identity pool then use a user pool.
Setting up a user pool with login
There are only 3 resources needed to set up login:
- a user pool
- a domain
- and an app client
Let's see each of them!
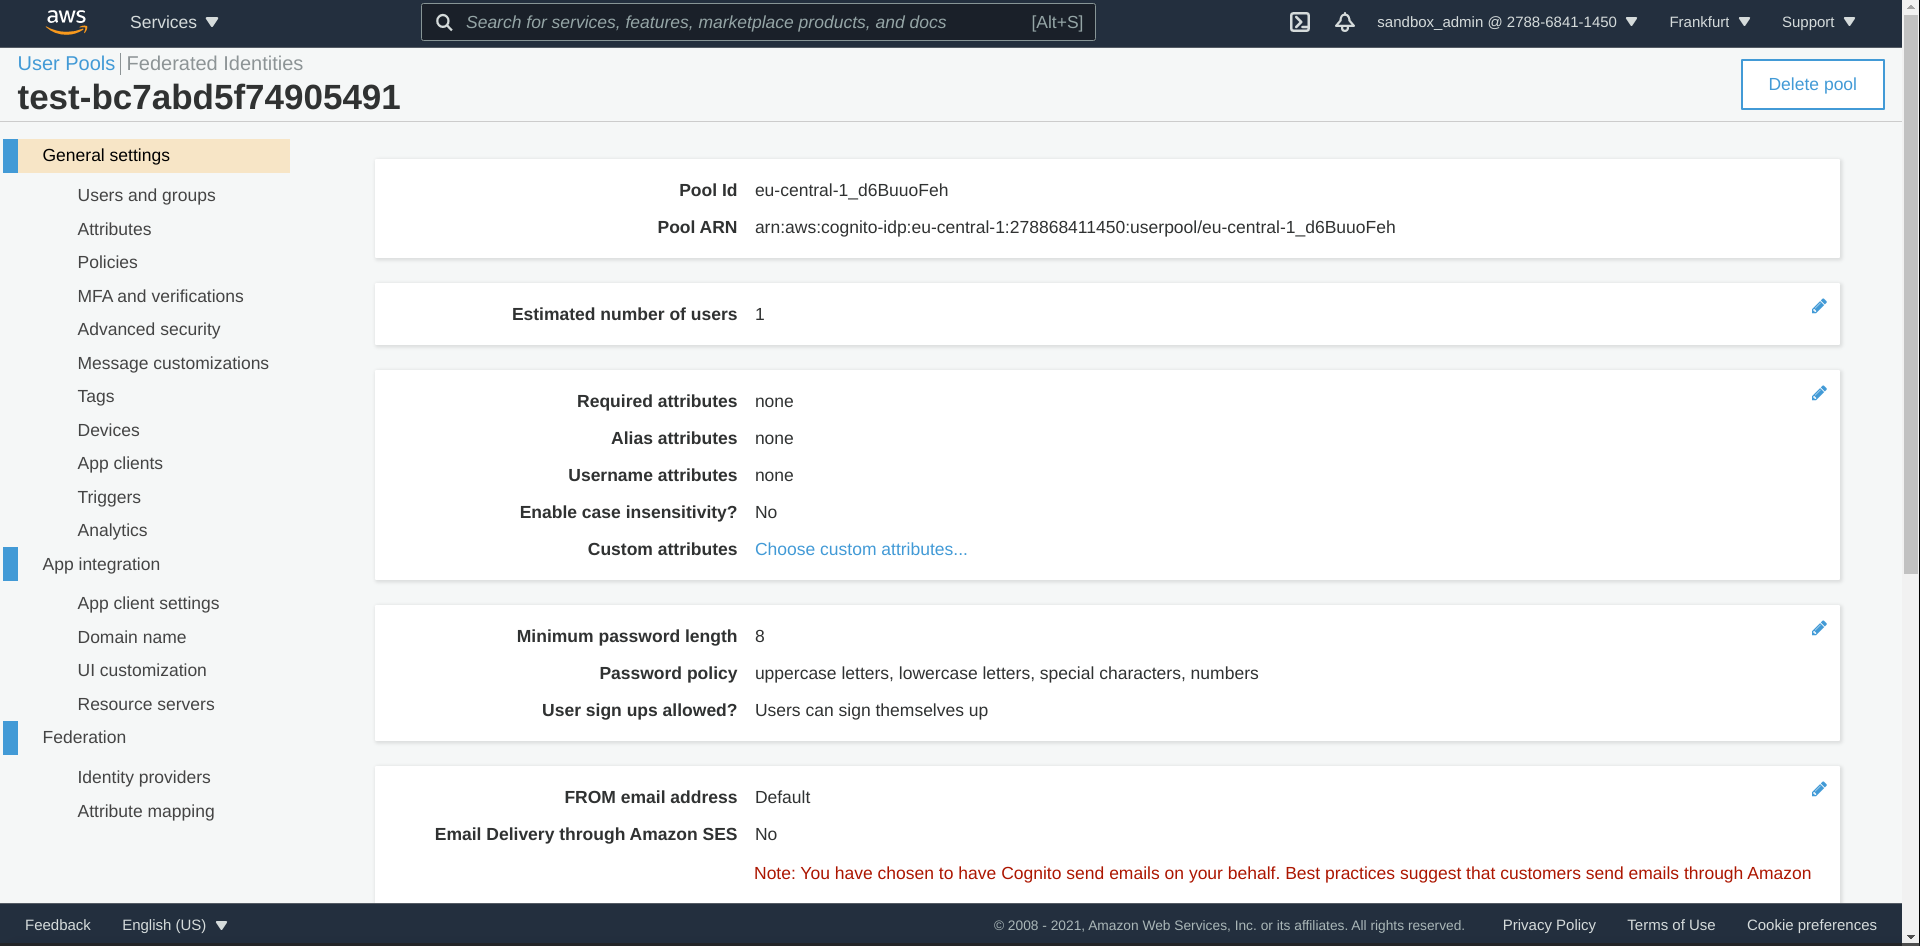
User pool
The user pool is the container for the users and there is a ton of settings it accepts. Fortunately, the defaults are quite sensible, at least for starting out:
resource "aws_cognito_user_pool" "pool" {
  name = "test-${random_id.id.hex}"
}
Domain
The domain can be either an AWS-provided (<name>.auth.<region>.amazoncognito.com) or a custom domain (login.example.com). If you have your own
domain then using that is always the better option, but for getting started the AWS-provided one is also good. Just make sure to use a unique name as it's
shared between all AWS Cognito users.
resource "aws_cognito_user_pool_domain" "domain" {
  domain       = "test-${random_id.id.hex}"
  user_pool_id = aws_cognito_user_pool.pool.id
}
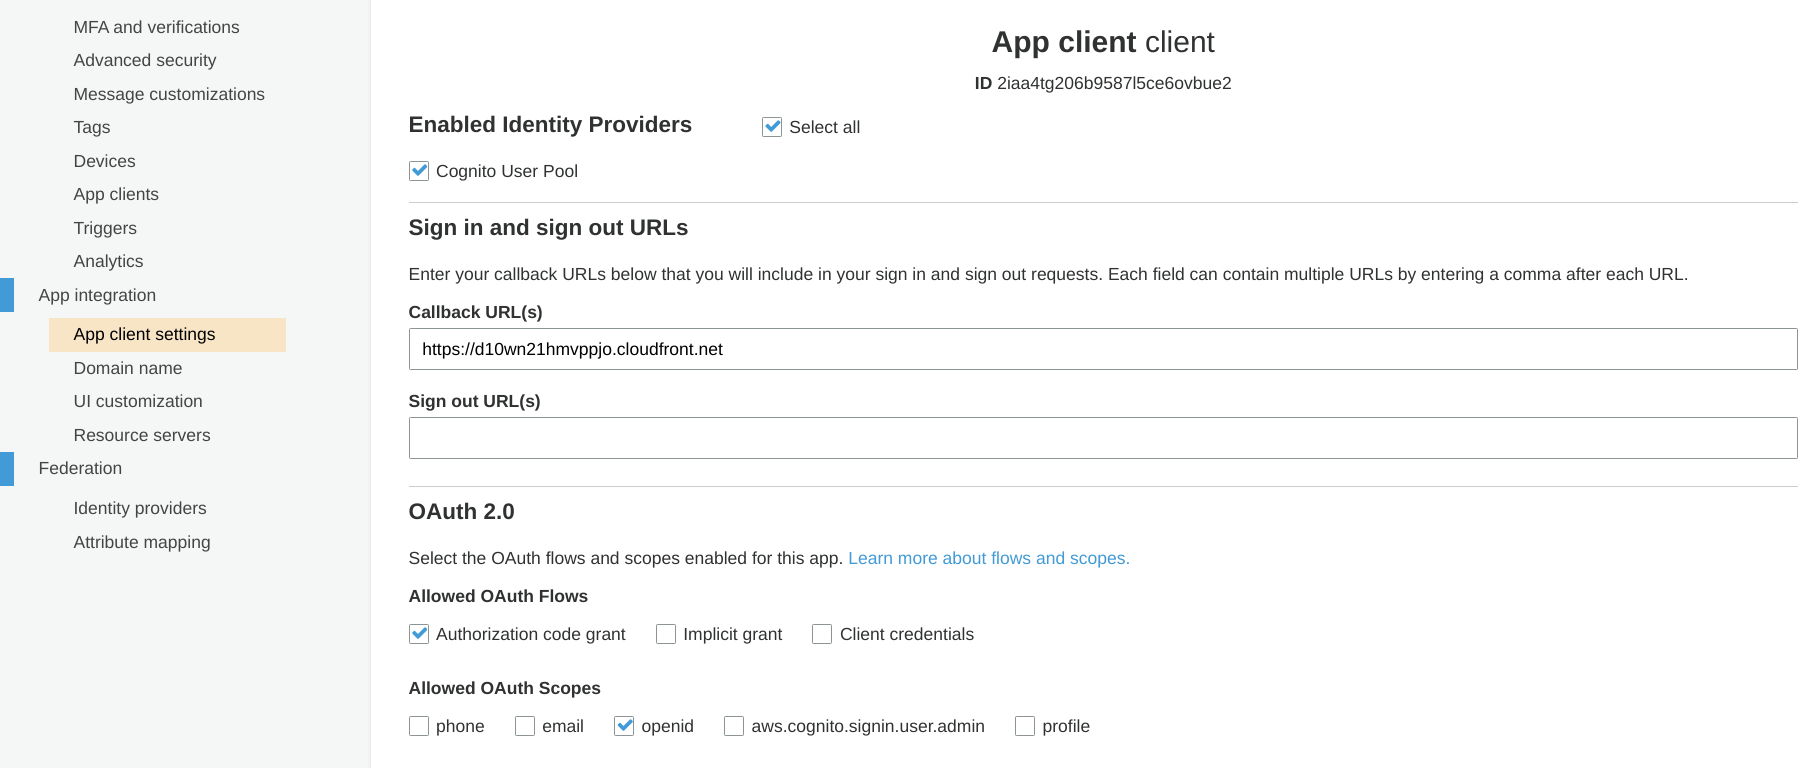
App client
The third resource is an app client. It defines the flow that users can use to log in to the user pool. You need to define a callback URL, what flows the users can use, what scopes they can request, and a couple of other parameters.
resource "aws_cognito_user_pool_client" "client" {
  name = "client"

  user_pool_id                         = aws_cognito_user_pool.pool.id
  allowed_oauth_flows                  = ["code"]
  callback_urls                        = ["https://${aws_cloudfront_distribution.distribution.domain_name}"]
  allowed_oauth_scopes                 = ["openid"]
  allowed_oauth_flows_user_pool_client = true
  supported_identity_providers         = ["COGNITO"]
}
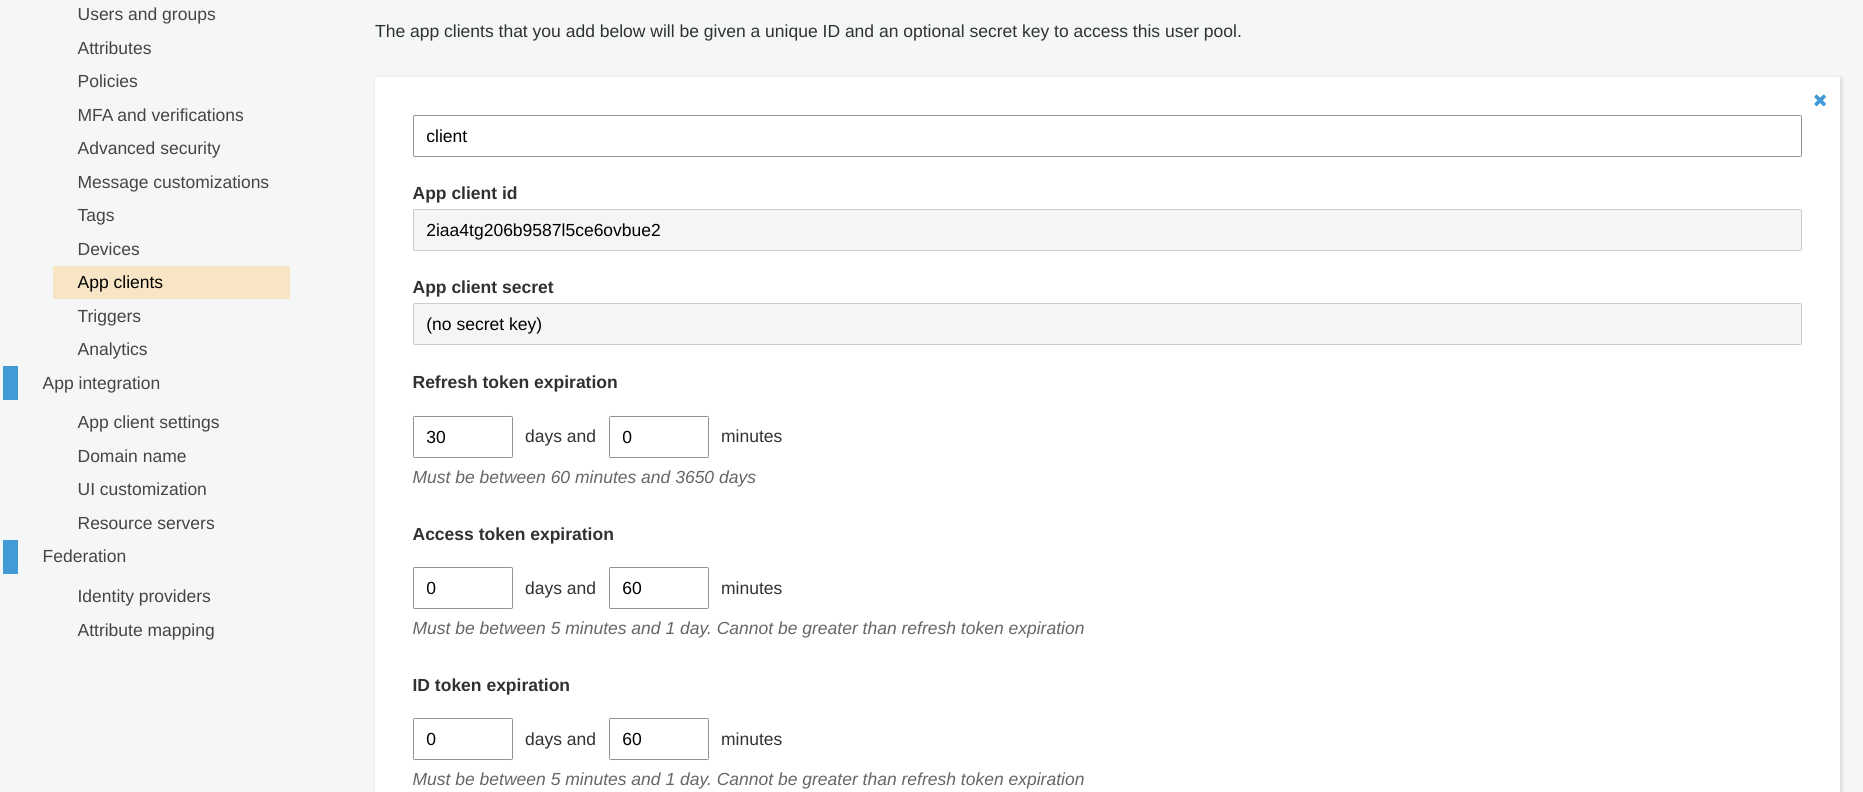
In a separate page, there are a couple of important parameters for app clients. Under the General settings/App clients you can set the token expiration
times and whether the app client has a secret.

What's a good setting here?
Keep the access token expiration limited. The client uses these tokens for the calls it makes to the backend and while you can revoke them it's a pain to do
for every request. Better to have a short expiration and have the client regularly use the refresh_token instead.
The refresh token expiration should be the maximum duration the client can be signed in. The default is 30 days, so the users need to relogin every month. It might be good for most apps, but especially for internal applications you can reduce this to 1 day. Hopefully, users are using password managers so a login takes only a few seconds.
Don't use a client secret if you want the frontend to take care of the full auth flow. If you have a secret then only your backend can generate the access tokens. If there is no secret then the frontend can do that too. There are valid reasons for both approach, but whatever you decide do not store or send the client secret to the frontend. My recommendation is to not generate a secret and instead use the PKCE + nonce hardening, described below.
User verification
By default, users can sign up to the user pool, but it can be turned off. But a user-initiated signup requires verification. It means that new users can not log in until they verified their email addresses or phone numbers, or an admin manually sets them as verified.

Verification is a good security measure as it prevents users from creating accounts with arbitrary addresses. But during development it's a pain. Fortunately, there is a Lambda trigger that can auto-verify new users (or even verify them based on custom logic).
It requires the usual amount of boilerplate as for all Lambda functions, then the user pool config. Find the full code in the GitHub repository:
data "archive_file" "auto_confirm_lambda_code" {
	# ...
  source {
    content  = <<EOF
module.exports.handler = async (event) => {
	event.response.autoConfirmUser = true;
	return event;
};
EOF
    filename = "index.js"
  }
}

resource "aws_lambda_function" "auto_confirm" {
  filename         = data.archive_file.auto_confirm_lambda_code.output_path
	# ...
}

resource "aws_cognito_user_pool" "pool" {
  name = "test-${random_id.id.hex}"
  lambda_config {
    pre_sign_up = aws_lambda_function.auto_confirm.arn
  }
}
Frontend code
We've configured an authorization code flow that requires two calls:
- when the user is not signed in, a redirect to the LOGIN endpoint
- the login endpoint redirects to the webapp with a code, which the app needs to call the TOKEN endpoint
The result of this are two tokens:
- an
access_token - and a
refresh_token
The access_token is used to make calls to the backend. The refresh_token is longer-lived and can be used to get new access_tokens.
So, the frontend needs to distinguish between the cases where the user opened the page and when Cognito redirected with the authorization code. The latter is
when a code query parameter is present.
const searchParams = new URL(location).searchParams;

if (searchParams.get("code") !== null) {
	// remove the query parameters
	window.history.replaceState({}, document.title, "/");
	// logged in
	// ...
}else {
	// redirect to LOGIN
	// ...
}
The HTML5 History API provides a way to change the URL without reloading the page. It's a best practice to remove the auth-related query parameters when they are not needed anymore. Of course, you might want to keep the other ones.
Redirect to login
Let's see first the else part! Here, the user needs to sign in, so the webapp needs to do a redirect to the LOGIN endpoint. It needs to pass a couple of
parameters:
response_type=code: This defines the authorization code flowclient_id: The Cognito app client IDredirect_uri: Where Cognito should redirect the user. Must match the one configured for the app client
There are also some security-related optional parameters that should be set:
state: A random identifier that Cognito will return after login. Used against CSRF attackscode_challenge_method=S256code_challenge: A random identifier used to secure the redirect that you'll need to also send in the next part. Here, it is hashed and encoded in Base64URL. This mechanism is called PKCE.
Since the state and the code_challenge are needed after the redirect the webapp needs to store them temporarily. The sessionStorage is a good
storage here as these are short-lived information and used only once.
// cognitoLoginUrl = https://${aws_cognito_user_pool_domain.domain.domain}.auth.${data.aws_region.current.name}.amazoncognito.com
// clientId = aws_cognito_user_pool_client.client.id

const searchParams = new URL(location).searchParams;

if (searchParams.get("code") !== null) {
	// logged in
	// ...
}else {
	// generate nonce and PKCE
	const state = await generateNonce();
	const codeVerifier = await generateNonce();
	sessionStorage.setItem(`codeVerifier-${state}`, codeVerifier);
	const codeChallenge = base64URLEncode(await sha256(codeVerifier));
	// redirect to login
	window.location = `${cognitoLoginUrl}/login?response_type=code&client_id=${clientId}&state=${state}&code_challenge_method=S256&code_challenge=${codeChallenge}&redirect_uri=${window.location.origin}`;
}
The util functions are in the GitHub repository.
Exchange the auth code
The other part is when the user is signed in and Cognito redirects to the webapp. It passes a code and the state query parameters.
To get the tokens, the webapp needs to make a a POST request with several parameters in the request body:
grant_type=authorization_code: Identifies the flowclient_id: The Cognito app client IDredirect_uri: The same URI that was sent in the redirectcode: The authorization code from the query paramcode_verifier: The raw value that was sent as thecode_challenge
// cognitoLoginUrl = https://${aws_cognito_user_pool_domain.domain.domain}.auth.${data.aws_region.current.name}.amazoncognito.com
// clientId = aws_cognito_user_pool_client.client.id

const searchParams = new URL(location).searchParams;

if (searchParams.get("code") !== null) {
	// logged in
	// remove ?code from the URL
	window.history.replaceState({}, document.title, "/");

	// get state and PKCE
	const state = searchParams.get("state");
	const codeVerifier = sessionStorage.getItem(`codeVerifier-${state}`);
	sessionStorage.removeItem(`codeVerifier-${state}`);
	if (codeVerifier === null) {
		throw new Error("Unexpected code");
	}

	// exchange code for tokens
	const res = await fetch(`${cognitoLoginUrl}/oauth2/token`, {
		method: "POST",
		headers: new Headers({"content-type": "application/x-www-form-urlencoded"}),
		body: Object.entries({
			"grant_type": "authorization_code",
			"client_id": clientId,
			"redirect_uri": window.location.origin,
			"code": searchParams.get("code"),
			"code_verifier": codeVerifier,
		}).map(([k, v]) => `${k}=${v}`).join("&"),
	});
	if (!res.ok) {
		throw new Error(res);
	}
	const tokens = await res.json();
	/*
	tokens = {
		access_token: "..."
		expires_in: 3600
		id_token: "..."
		refresh_token: "..."
		token_type: "Bearer"
	}
	*/
}else {
	// redirect to LOGIN
}
Notice that the sessionStorage contains both the state and the codeVerifier. In case the state is not found then the code should
not be used.
The result of this call is a set of tokens that are ready to use to send calls to the backend. How you implement these calls is up to you, but the usual way is
to add an Authorization: Bearer <access_token> header to the requests:
const apiRes = await fetch("/api/user", {
	headers: new Headers({"Authorization": `Bearer ${tokens.access_token}`}),
});
Backend
The backend gets the access_token and it needs to check it before it can use it.
These checks are extremely important. The access_token is a JWT that anybody can create. Not checking some part of it makes some attacks possible.
You can see what's inside a JWT by decoding it. A nice visualization is available at jwt.io.
Here's a decoded access_token:
{
	"header": {
		"kid": "5e+/ue3bRsyzXBImw8lENbF3k6ncR4rg/c1Jq3lycsI=",
		"alg": "RS256"
	},
	"payload": {
		"sub": "89b1d77d-6d28-44fd-8fc2-ef4c9f58b31c",
		"iss": "https://cognito-idp.eu-central-1.amazonaws.com/eu-central-1_rUmbW30Bq",
		"version": 2,
		"client_id": "26c2b7ml4cqb8tc7b0v09nu18r",
		"origin_jti": "ec6f5817-5ecf-466c-81b2-445cca4d5029",
		"event_id": "329daf9a-66b1-426c-aa1b-3f8592b8b239",
		"token_use": "access",
		"scope": "openid",
		"auth_time": 1628068595,
		"exp": 1628072195,
		"iat": 1628068595,
		"jti": "0191ed2c-3c66-4617-9f65-14c717babb5f",
		"username": "test"
	},
	"signature": "..."
}
The important parts are:
- signature: The backend needs to check it to see if the token is not modified/forged
exp: The token can be expirediss: Who issued the tokentoken_use: Access tokens have this asaccessclient_id: The Cognito app client IDsub: The ID of the Cognito userkid: The Key ID which we'll need to verify the signature
Check the signature
To check the signature we first need to get the public key that was used to sign it. This key is stored by Cognito for the user pool, so we need to fetch it.
Cognito makes its OpenID configuration available at a well-known URL:
https://cognito-idp.<region>.amazonaws.com/<user pool id>/.well-known/openid-configurationThis contains information about the user pool:
{
	"authorization_endpoint": "https://test-86d15eefe12c91fa.auth.eu-central-1.amazoncognito.com/oauth2/authorize",
	"id_token_signing_alg_values_supported": ["RS256"],
	"issuer": "https://cognito-idp.eu-central-1.amazonaws.com/eu-central-1_rUmbW30Bq",
	"jwks_uri": "https://cognito-idp.eu-central-1.amazonaws.com/eu-central-1_rUmbW30Bq/.well-known/jwks.json",
	"response_types_supported": ["code","token"],
	"scopes_supported": ["openid","email","phone","profile"],
	"subject_types_supported": ["public"],
	"token_endpoint": "https://test-86d15eefe12c91fa.auth.eu-central-1.amazoncognito.com/oauth2/token",
	"token_endpoint_auth_methods_supported": ["client_secret_basic","client_secret_post"],
	"userinfo_endpoint": "https://test-86d15eefe12c91fa.auth.eu-central-1.amazoncognito.com/oauth2/userInfo"
}
The important parts are:
issuer: The ID of the user pooljwks_uri: This is a link to the keys used for signatureuserinfo_endpoint: Returns info about the key, such as if it's revoken
The JWKs need a separate call:
{
	"keys": [
		{
			"alg": "RS256",
			"e": "AQAB",
			"kid": "wRJTVrR5MeeeotjEbpvS8yawJaFVb/cSc5i69eI/mzQ=",
			"kty": "RSA",
			"n": "sjroIr-E8sXmOOkLqGUp40W1nEVYoIoOiEb7uIAPLMJuigdunbSeZSUQDs5IelhrQt0WzXRwpG8NTEYYiHObnH-nJUR47LudCkRyv_rItgBtUQuODTcZIPBLHAY9O8W3qt1Za2EHyq2UZN3VQCaZP1EEyIKdsiCPOCcIS-CTNU3d-F2uk-FJLOa-OycR9xuJHb7gQikJ12G1P-4MUFSraf-KtH22weI_kBU1nWxeYqZh_I1b3KMxXqMSaVRF1wztGhxQFb3HisJXd6G1pJHt4HdK3wHiJW6CVqYEbKGPu9rHLdcgdKD1gizUbNE3N-I5QnjVnW7HV3ntiOAC0Pbp4Q",
			"use": "sig"
		},
		{
			"alg": "RS256",
			"e": "AQAB",
			"kid": "5e+/ue3bRsyzXBImw8lENbF3k6ncR4rg/c1Jq3lycsI=",
			"kty": "RSA",
			"n": "s7Ugq9wPGNlZ1EgjPP3zkNBb4-1MQsrbmAwdDj2WecgUG1uiSlD_7PdmtXIu-xydBfSvmNb_tE5Qzvhiqad3Z9iv5awn9AOq-X8VEL_kG0mYLE0eqk1z4tTHfZMTVX-QUBlCQmQheQz908J6Ky99ZDAHuPfI7Euw7QUrK-qv8haiwbeMNCIa27Hoph7-GQRkV4j0QUAer42zBgSsQjl32buJ818ZRCQY8FZxy2DQrnb_tJEyQkCbzVuH04iMLuln4fr-HO0lzodseD1c-w07hNXMBnBtcrYvUcGCLGRtYbYO5qR8lx2DKUut2KTwNd8uiaczs-qGwHb0jWmg0V4e2w",
			"use": "sig"
		}
	]
}
Since this configuration won't change the results can be cached using the async initializer pattern:
const getOpenIdConfig = (() => {
	let prom = undefined;
	return () => prom = (prom || (async () => {
		const openIdRes = await fetch(`https://cognito-idp.${process.env.AWS_REGION}.amazonaws.com/${process.env.USER_POOL_ID}/.well-known/openid-configuration`);
		if (!openIdRes.ok) {
			throw new Error(openIdRes);
		}
		const openIdJson = await openIdRes.json();
		const res = await fetch(openIdJson.jwks_uri);
		if (!res.ok) {
			throw new Error(res);
		}
		const jwks = await res.json();
		return {
			openIdJson,
			jwks,
		};
	})());
})();The above example uses node-fetch, and we'll also need some other libraries:
npm i node-fetch jsonwebtoken jwk-to-pemNotice the kid in the JWKs JSON. One of them is the same as the kid in the key. To check the signature, find the relevant key, convert to pem and
use jwt.verify:
const openIdConfig = await getOpenIdConfig();

// get the jwk used for the signature
const decoded = jwt.decode(auth_token, {complete: true});
const jwk = openIdConfig.jwks.keys.find(({kid}) => kid === decoded.header.kid);
const pem = jwkToPem(jwk);

const token_use = decoded.payload.token_use;
if (token_use === "access") {
	// verify signature, alg, exp, iss
	await util.promisify(jwt.verify.bind(jwt))(auth_token, pem, { algorithms: ["RS256"], issuer: openIdConfig.openIdJson.issuer});

	// verify client id
	if (decoded.payload.client_id !== process.env.CLIENT_ID) {
		throw new Error(`ClientId must be ${process.env.CLIENT_ID}, got ${decoded.payload.client_id}`);
	}
}else {
	throw new Error(`token_use must be "access", got ${token_use}`);
}

// the cognito user id
const userId = decoded.payload.sub;
This also verifies the token_use, the alg, the iss and the client_id.
Check revocation
Cognito supports token revocation but there is nothing in the token that changes if it's revoken. If you don't check it against a Cognito API then the
access_token will be considered valid even if it's not.
You might not want to implement revocation checking. This requires a network call for every single check and that is an expensive operation. If you use
short-lived access_tokens and force regular refreshing then a revoken token will be expired soon. But in some cases you might want to check if a token is
revoken or not for every request. Just know the tradeoffs.
To see if a token is still valid, use the USERINFO endpoint. It gets the token and returns an error if it's revoken:
const openIdRes = await fetch(openIdConfig.openIdJson.userinfo_endpoint, {
	headers: new fetch.Headers({"Authorization": `Bearer ${auth_token}`}),
});
if (!openIdRes.ok) {
	throw new Error(JSON.stringify(await openIdRes.json()));
}
Conclusion
Cognito user pools offer a relatively simple way to add login functionality to a webapp. With this, you can forget about passwords, MFA devices, account recovery, and a lot of other hard-to-implement things. Instead, you can concentrate on the OAuth flow implementation.


