Git Tips and Tricks
A collection of helpful commands to tame Git


There are so many commands and options in Git, and it continues to evolve to this day. This complexity makes it challenging to know every detail and edge case. On the other hand, this makes Git a gold mine of new tricks to learn that you can use to improve your daily workflow.
Inspired by Scott Chacon's FOSDEM 2024 talk on Git Tips and Tricks, here are my current favorite Git Tips.
Code archeology
Track the evolution of a code block (git log -L)
Understanding the history of a specific piece of code is very important to understand the rationale behind certain changes. git log provides a view of all commits and changes, however looking at everything to find changes that affect a particular function can be tiresome.
This is where the -L flag can help.
git log -L 20,40:path_to_file`By defining a line range, git log -L allows you to narrow down the history to the evolution of a specific code block. The example above focuses on the changes made between lines 20 and 40 of a particular file.
Note that it doesn't use the regular pathspec syntax; instead, it requires a colon between the line range and the path to the file. Also, it does not track the movement of code within a file, such as when a function is relocated.
git log -L can also accept regular expressions in place of line numbers:
git log -L ``'/void myMethod/'``,``'/}/'``:path_to_file`One has to be careful with these regexes to ensure they match what is intended. Personally for me just looking up the line numbers is much easier.
Filter for matching changes (git log -S and git log -G)
The -S and -G options of git log are used to search the commit history based on changes in content.
git log -S string is used to find commits where the number of occurrences of the specified string changes within a file. This is also known as the "pickaxe" search. This is useful when you are interested when a given text was added or removed from the project.
On the other hand, it will not find commits that just move code around within a single file. This is typically not a problem, but for larger files it can accidentally hide meaningful commits. For that purpose you can use git log -G regex which searches for commits where the changes match the specified regular expression.
Combine these commands with -p to also show the changes of these commits.
Examples:
git log -S TODO     # list commits that added or removed a TODO
git log -G myvar -p # show changes that affected myvar
Ignore noise with git blame (git blame -L -w -C -C -C)
git blame attributes each line in a source file to the last modifying commit, identifying the most recent authors. However, by default its output may contain noise, potentially leading to misattributed lines. Luckily, there are many flags to tweak how it works.
First, like with git log, the -L option allows you to narrow the output to a specific line range within a file. Unfortunately, the syntax is a bit different here as specifying the line range in git blame does not require a colon.
The -w option in git blame is to ignore whitespace changes. This can be particularly useful unless you're working with indentation-sensitive languages like Python or YAML, where such changes are more significant.
With -M and -C, git blame can filter out noise related to code relocation and duplication:
-M: Ignore code that was copied or moved within the same file.-C: Same as-Mbut also ignore lines that were moved or copied from other files that were modified by the same commit.-C -C: Extends this by also considering the commits that initially created the other files where the content is copied or moved.-C -C -C: Extends this even further to consider all commits to detect the copied or moved lines.
Finally, with --ignore-rev and --ignore-revs-file it is possible to specify commits to be completely excluded from git blame. This can be useful to ignore large-scale refactoring commits, such as formatting changes.
git blame is also often used by code editors like IntelliJ IDEA. Make sure to check how it is configured: Investigate changes in Git repository.
Show differences per word, not per line (git log -p --word-diff and git diff --word-diff)
By default, git diff and git log -p display changes line by line. This can sometimes make it hard to find modifications, for example in longer lines where only minor changes occur.
To address this, the --word-diff option offers a more granular view, highlighting differences at the word level rather than by the entire line.

Branch management
Sort branches chronologically (branch.sort)
By default, git branch prints the list of branches in alphabetical order.
» git branch
  feature/MYPROJECT-13
  feature/MYPROJECT-23
* feature/MYPROJECT-32
  feature/MYPROJECT-4
  feature/MYPROJECT-6
  master
Finding the branches you were working most recently can be cumbersome, especially with multiple collaborators on the same repository. The example above shows that alphabetical ordering does not even consider numeric values, so if you are using issue IDs in the branch, the overall list looks a bit random, displaying the branch for the last issue in the middle.
This can be changed with the branch.sort config option.
git config --global branch.``sort` `-committerdate`Using -committerdate will make the most recent branches appear first, making it very easy to navigate across branches.
* feature/MYPROJECT-32
  master
  feature/MYPROJECT-28
  feature/MYPROJECT-23
  feature/MYPROJECT-13
  feature/MYPROJECT-6
  feature/MYPROJECT-5
  feature/MYPROJECT-4
Use safer alternatives to git checkout (git switch and git restore)
Git version 2.23 introduced two commands designed to address usability critiques without adding new capabilities: switch and restore. These are safer alternatives to the traditional git checkout.
The git switch command is dedicated solely to switching branches. Unlike git checkout, which can also manipulate files and potentially lead to accidental loss of local changes, git switch is limited to branch operations only. This specialization makes it a safer option for changing branches as it is guaranteed to do nothing else.
Similarly, git restore is a specialized version of git checkout that focuses on restoring files to their previously committed states.
These new commands simplify the learning curve by being more descriptive and reducing the potential for mistakes, therefore I would recommend newcomers to use these primarily instead of git checkout. Sadly, I have used checkout for too many years now and it is just baked into my muscle memory, making it harder for me to make the switch.
Staging
Stash untracked and ignored files (git stash --all)
While you can usually discard unwanted changes using git checkout . (or restore), these commands do not affect untracked or ignored files. In many scenarios, especially when you're experimenting or configuring new tools, you might end up with changes spread across tracked, untracked, and ignored files.
This is where git stash --all becomes useful, as it is a more inclusive command stashing everything and completely cleaning your working directory.
Stage parts of a file for more focused commits (git add -p and git-reset -p)
Making concise, focused commits can significantly enhance code review efficiency and maintainability. git add -p (patch) and git reset -p offer the flexibility to stage parts of the changes made to a file, so one can achieve more granular commits with it.
For an example imagine you're working on a specific ticket that requires modifications to a particular file. While making necessary changes, you notice some minor, unrelated issues --- perhaps some formatting errors or a redundant code line. These issues are minor enough so you don't want to create a separate ticket and decide to address them following the "boy scout rule", leaving the code cleaner than you found it.
At the same time, you also implement the changes needed to resolve your ticket within the same file. But adding everything to the same commit might make the commit bulky and harder to review. More importantly, if issues arise later, dissecting (or reverting) the meaningful changes from the minor fixes could become challenging.
Here's where git add -p can help, which allows you to selectively stage changes and decide what should be included in the next commit. So, in the scenario above, you could use git add -p to stage only the lines involved in the boy scout changes and commit them separately.
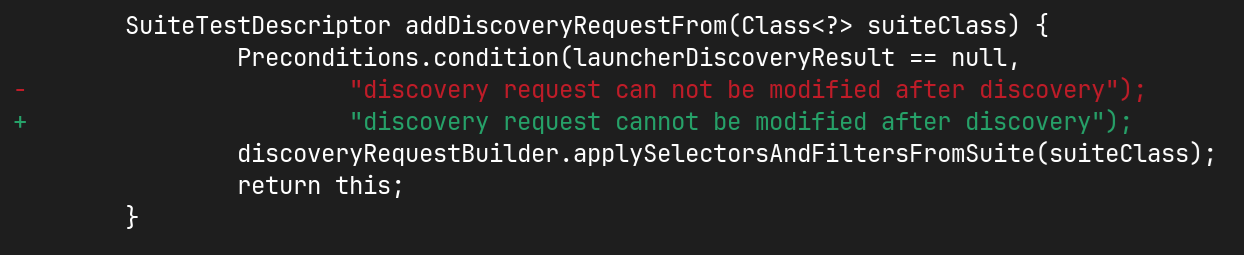
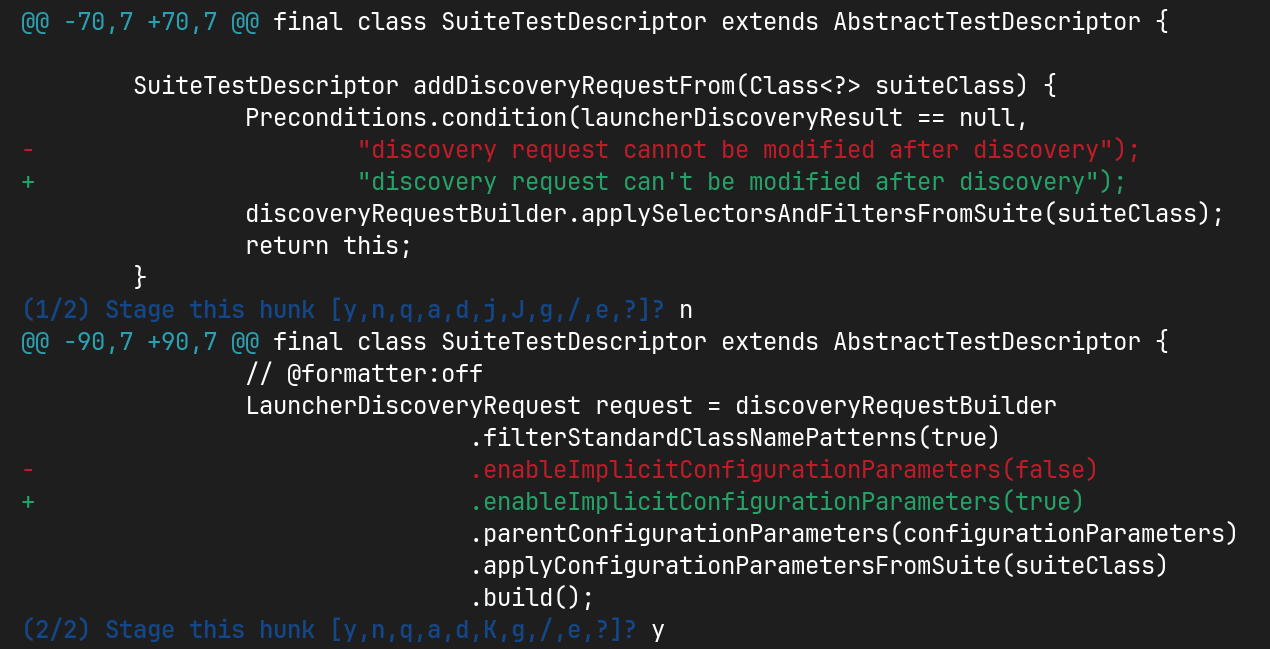
In the following example I've updated two lines in a file and used git add -p filename to add only one of them:
Related to add, if you decide that some changes do not need to be committed at all or should be revised, git reset -p allows you to selectively unstage changes, giving you further control over what goes into each commit.
Rewriting history
Use git push --force-with-lease, a safer alternative to --force
git push --force is often viewed as a double-edged sword. While powerful, using force push can overwrite changes in the remote repository without warning, which can lead to lost work if not used carefully. Yet, for PR workflows it's frequently used to clean the commit after the reviews, before merging.
To address this risk, there's a safer alternative: git push --force-with-lease.
--force-with-lease does the same thing as --force, except it prevents accidental overwrites by checking that your local copy is up-to-date with the upstream version. When there are new changes on the remote, you have to pull these changes before you can perform the force push.
If you only perform force pushes against your own PR branches, then most likely 99% of the time you are fine with using --force. How, I must admit that I still managed to lose some data this way when I edited the PR from two different locations (hello browser based editing). Also it might really save the day once you have to force push to a long living branch and you have the safer flag in your muscle memory.
If you are worried about the length of this flag, rest assured there are ways to manage it. Personally I rely heavily on shell history to avoid typing too much, but it is also easy to set up git aliases to have shorter commands.
Note: if you are using IDEA to push commits, then you are already using this flag.
Undo mistakes (git reflog)
Mistakes are inevitable. Fortunately, Git provides a powerful safety net called git reflog.
reflog is a ledger of the recent changes to the local repository's refs. Every time you perform an action that moves a reference, the action and the reference are logged. Even if a reference is no longer part of the commit history (e.g. due to a destructive action such as rebasing or branch deletion) it is still stored and accessible until the references are cleaned up by Git.
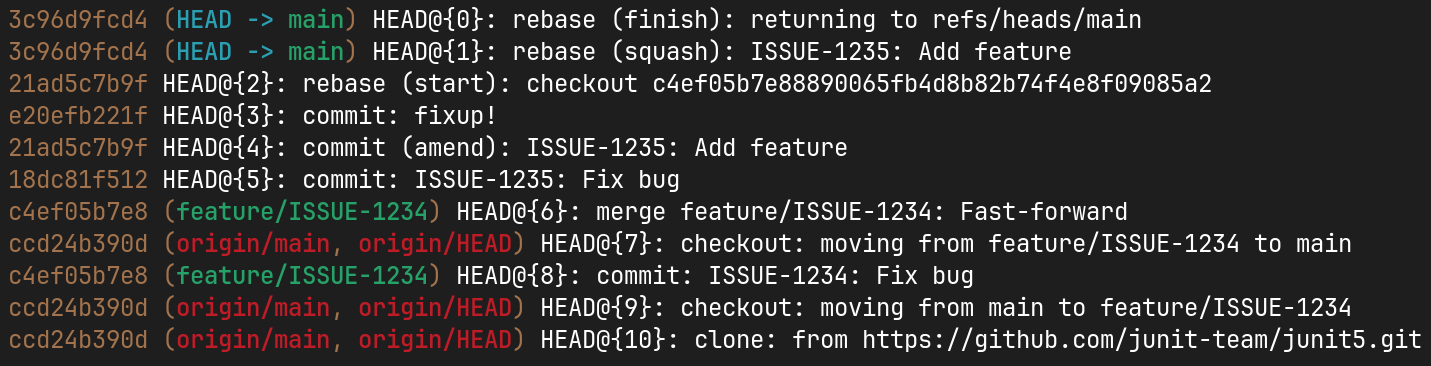
Last time I had to use this was when I accidentally rebased to a wrong branch. As you can imagine, this destroyed my branch, but luckily I could get back to the previous state using reflog.
To use it, first run git reflog and identify the right entry, e.g. based on commit hash, action. Commit messages are also visible in the log, making it easier to navigate.
Then you can reset to the commit using git reset <sha>, or you can check out the commit to a detached head.
In some circumstances, you might not need to use the reflog at all. For example, suppose you initially pushed a commit to a Pull Request on Bitbucket but later modified this commit by amending it and pushing the modified contents. The Pull Request history shows all deleted and added commits:

You can click on the ID to view the commit in Bitbucket. Also, until Git performs a cleanup of dangling references, you can still use the old commit's ID to access its contents locally.
Bonus
Conditional global configuration
Git supports both global and per-repository configuration options. Managing these can be tedious. Suppose that you frequently contribute to open source, and for that, you'd like to use a different e-mail address than for your regular project work. In this case the per repository configuration needs to be applied each time after cloning a new open source repository, which is easily forgotten.
Luckily, git config supports includeIf, which allows you to include additional configuration files conditionally.
To make the open-source contribution easier, change .gitconfig to not only define the user properties, but also to include a secondary config file conditionally:
[user]
name = Dávid Csákvári
email = work@email

# …

[includeIf "gitdir:~/projects_oss/"]
path = ~/.oss_gitconfig.inc
Then, create the ~/.oss_gitconfig.inc file with the open-source specific settings:
[user]
name = Dávid Csákvári
email = personal@email
After this change, repositories located outside the projects_oss directory will continue to use the default configuration. However, all repositories within that folder will automatically apply the special user settings without having to think about it after cloning each repository.
Conclusion
I hope you found some interesting bits in this post that you can use to improve your Git workflow. Even if you typically use graphical tools or other interfaces for Git, it's important to ensure that these tools adhere to the same flags and configurations you expect when working directly with the command line interface. When in doubt about a particular git command, make sure to first check its man pages, e.g. man git-reflog.