Walkthrough for a TDD Kata in Eclipse
Important features, plugins and shortcuts for Eclipse, and a walkthrough for a TDD Kata.


I always liked the idea of Test Driven Development. Previously I gave it a try in different settings, but I wasn't sure where to start it with Eclipse and how to do it efficiently. So I decided to work through a TDD Kata using the latest version of Eclipse, Mars.
Because it's based on quick iterations, the application of this technique requires solid knowledge of the tools used for development. For example it's essential to easily change between test and production code or run the tests many times a minute. If one has to constantly grab the mouse and browse the menus for such actions, the process can become unbearably slow and tiresome.
Anyway, knowing the ins and the outs of the tools related to the job at hand is beneficial not just for TDD, so I decided to work through a TDD Kata to see how my current workflow could be improved.
I did the exercise a couple of times, and in this post I'd like to present a brief walkthrough for the Kata in Eclipse and summarize the things I learned from it.
Customizations and related Eclipse features
Before diving into the Kata, below are the customizations and shortcuts that I think are needed for an enjoyable TDD flow.
MoreUnit
MoreUnit is an Eclipse plug-in that adds important shortcuts to allow easy navigation and creation of tests. This plug-in is an absolutely must have.
Favorites
Static imports are generally used in tests to improve readability and provide a compact DSL-like experience.
With Favorites the IDE can give suggestions for static members even if the corresponding import is missing. For example, after typing assertEquals and triggering the autocomplete Eclipse will automatically add org.junit.Assert.assertEquals as a static import.
Favorites for static imports can be defined in the preferences under the Window > Preferences > Java > Editor > Content Assist > Favorites. Here is my list of favorites:
org.hamcrest.Matchers.*
org.hamcrest.CoreMatchers.*
org.junit.*
org.junit.Assert.*
This can greatly speed things up, because certain types of static imports will come up in almost every test, and this way you don't have to remember the related class names just phrases like assertThat and equalTo.
Type Filters
Typing List and triggering the autocomplete usually brings up some totally irrelevant suggestions. When developing a web application probably the last thing you need is java.awt.List or something from the javax.swing package.
Luckily the autocompletion list can be filtered in Window > Preferences > Java > Appearance > Type Filters.
Eclipse orders the suggestions based on their usage, so if you select java.util.List, the next time that will be the first option presented even without the use the Type Filter. However, I still think it's better to remove these packages from the suggestions if you don't need them.
Templates
Under Window > Preferences > Java > Templates there is a list of predefined code templates that can save you from a lot of typing. Related to tests, there is a test method template bound to the test keyword by default. Typing test and hitting Ctrl+Space gives an easy option for generating blank test cases.
Useful shortcuts
Below are the list of shortcuts I found useful during the Kata.
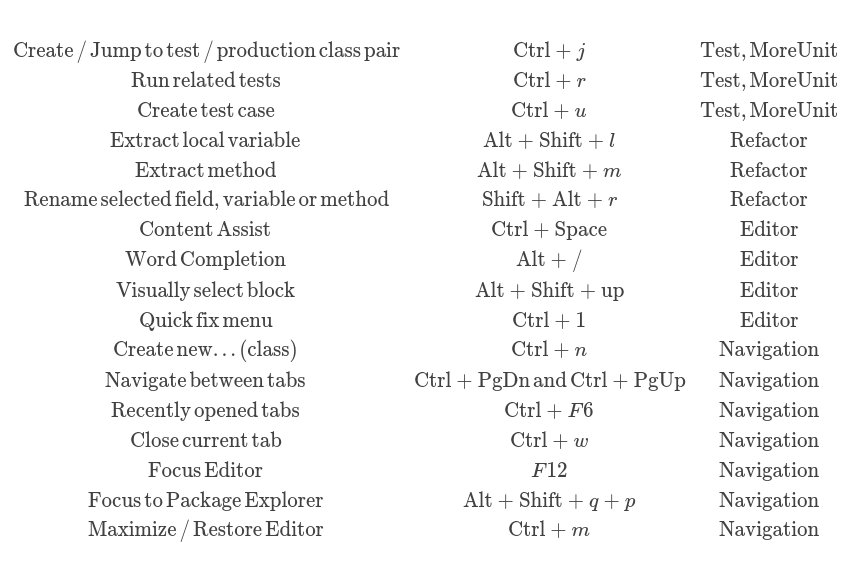
The only reason I mention Content Assist in the list is because it has a less popular cousin, the Word Completion. While the former one looks for a lot of sources to provide suggestions, the latter one just looks for the words in the edited file and completes based on that, so it's simpler and faster.
There are a lot of ways to navigate between recently edited files, find the most convenient for you. For example:
- When developing a test / production class pair, switch between them using Ctrl+j, provided by MoreUnit.
- Switch between tabs with Ctrl+PgDn / Ctrl+PgUp. For this, you have to keep an eye on the order of the tabs.
- Open the recently opened tabs with Ctrl+F6. It presents a list of recent tabs ordered by their last usage and opens the selected tab on release. So pressing Ctrl+F6 will open the previous one, while pressing Ctrl+F6+F6 opens the editor before that.
I rarely put my Editor to full screen as I needed the feedback from the JUnit reporter, and I also like to keep a Package Explorer on the left hand side of the IDE, linked with the Editor. Because the focus was almost always on the Editor, I did not use shortcuts to Focus Editor or Package Explorer, but in more real life tasks these can come in handy.
Don't forget to customize the shortcuts if you feel that the default ones are uncomfortable for you in the General > Keys section. For example, I always bind Rerun JUnit Test to Shift+Alt+x t, because with this I can easily rerun integration tests when I am editing related files.
The Kata
The necessary setup for the Kata in this case is to create a Maven project and add JUnit as a dependency to the pom file.
My goal was to find potentially time consuming repetitive tasks, and try to finish the exercise without using a mouse.
The next section contains a detailed walkthrough of the first subtask of the Kata. It describes how elementary operations can be carried out with Eclipse and what shortcuts I found useful for them.
The subsequent sections contains the less detailed description of how I finished the rest of the Kata.
Simple String Calculator
The first goal is to create the Calculator that can receive a String with a comma delimited list of numbers and return the sum of those numbers. For now, the input string can contain 0, 1 or 2 numbers. For example, if the input is "1,2", the result is 3, or for an empty string the result should be 0.
-
Step 1. To create a new test class press Ctrl+n and select the Class wizard. Type CalculatorTest for the name then press Alt-k to define a package, and press Alt-d to change the folder to /src/test/java. Note: if there is an open file, the wizard populates the folder and the package based on its properties, which greatly helps creating new classes in random places. Try to use this method to create classes rather than browsing for the package in the Package or Project Explorer.
-
Step 2. Create the production class simply by pressing Ctrl+j. The package and the name of the class is populated automatically. Note: In the first step there is an option to create the production class first. Pressing Ctrl+j on it will create the corresponding test class, so it works both ways. Use this to create pairs of test/production classes.
-
Step 3. Navigate back to the test class by pressing Ctrl+j again.
-
Step 4. Type test then hit Ctrl+Space, and select JUnit test method to insert a blank test case.
-
Step 5. Fill the method body by writing the trivial test case for the calculator that checks for the simplest case.
@Test
public void test_empty() throws Exception {
	Calculator calculator = new Calculator();
	int result = calculator.add("");
	assertThat(result, equalTo(0));
}-
Step 6. Press Ctrl+r to run the test. It fails, as it does not compile. Go to the error then press Ctrl+1 and in the Quick Fix menu, select "Create method...". Note: Eclipse can compile and run the test even if there is a compile error in one or more test methods. In that case it marks those tests as failed. Note 2: To easily check the compile error, just navigate to the underlined text, and see the error message on the status bar.
-
Step 7. Leave the generated implementation as it is sufficient to pass the test. Run the related tests with Ctrl+r, see it pass. Note: Make sure to tick "Always save resources" before running the tests. Save with Ctrl+r rather than Ctrl+s.
public int add(String input) {
	// TODO Auto-generated method stub
	return 0;
}-
Step 8. Now for the refactoring, just remove the IDE generated comment. At this point it is simply not possible to polish the one-liner solution further.
-
Step 9. Repeat steps 3-8 to add support for inputs that contain exactly one number. Create a new test case for it. Now, there is at least 3 convenient ways to do it:
- use the test code template again in the test file
- navigate into a production method then press Ctrl+u
- navigate into a test method, then press Ctrl+u
Write the test case as before, then run the test suite with Ctrl+r to see it fail. Change the production code to pass the test, then run the tests again. Aim for a minimal effort implementation. I added simple if-else statement to support the new functionality, and skipped the refactoring phase because that probably can't be made any better without knowing the further requirements.
public int add(String input) {
	if (input.isEmpty()) {
		return 0;
	} else {
		return Integer.parseInt(input);
	}
}- Step 10. Improve the calculator again to support two numbers in the input. I just added a third branch to my if-else construct for the case if there is a comma in the input.
public int add(String input) {
	if (input.isEmpty()) {
		return 0;
	} else if (input.indexOf(",") != -1) {
		String[] numbers = input.split(",");
		return Integer.parseInt(numbers[0])
			+ Integer.parseInt(numbers[1]);
	} else {
		return Integer.parseInt(input);
	}
}
This could be done more generally, but by choosing the simplest way and introducing a new execution branch I can extend the functionality in the easiest way without attempting to produce the ultimate solution in one go. Running the tests proves that the functionalities are intact. In fear of overengineering I almost convinced myself to skip refactoring the solution when I saw a code smell. The comma used to parse the string is a constant, but it's copy pasted in the code.
private static final String DELIMITER = ",";

public int add(String input) {
	if (input.isEmpty()) {
		return 0;
	} else if (input.indexOf(DELIMITER) != -1) {
		String[] numbers = input.split(DELIMITER);
		return Integer.parseInt(numbers[0])
				+ Integer.parseInt(numbers[1]);
	} else {
		return Integer.parseInt(input);
	}
}
After refactoring, it's important to rerun the tests to see everything is OK.
Handling unlimited numbers
The second task is to improve the calculator to handle unknown amount of numbers in the input string.
I added a new test that exercises the calculator with three numbers. Don't aim for the full coverage of the specification, just provide some relevant tests as working examples for the features. The more complex the tests are, the harder they are to maintain.
After seeing my test fail, I changed the implementation of the second branch to add the values of all numbers.
private static final String DELIMITER = ",";

public int add(String input) {
	if (input.isEmpty()) {
		return 0;
	} else if (input.indexOf(DELIMITER) != -1) {
		String[] numbers = input.split(DELIMITER);
		int sum = 0;
		for (String number : numbers) {
			sum += Integer.parseInt(number);
		}
		return sum;
	} else {
		return Integer.parseInt(input);
	}
}
The test suite confirmed that the calculator is still what it needs to be.
Inspecting the three branches it is obvious that the second one holds the implementation of the general solution, while the other two contains guards for special cases. The third branch is doing what the second branch would do if there is only one number in the list, so this two can be merged.
private static final String DELIMITER = ",";

public int add(String input) {
	if (input.isEmpty()) {
		return 0;
	} else {
		String[] numbers = input.split(DELIMITER);
		int sum = 0;
		for (String number : numbers) {
			sum += Integer.parseInt(number);
		}
		return sum;
	}
}
Running the tests verifies that all expectations are matched. After this success, driven by a wild thought I quickly removed the first branch without thinking. Running the test suite immediately reminds me that splitting an empty string results in an array of strings that contain only one empty string, and that can not be parsed as a number. I quickly rolled back to the last working calculator. For a last cleanup I changed the for-loop to a Stream-based solution as I think it's more readable, so the final version looks like the following.
private static final String DELIMITER = ",";

public int add(String input) {
	if (input.isEmpty()) {
		return 0;
	} else {
		return Arrays.stream(input.split(DELIMITER))
			.mapToInt(Integer::parseInt)
			.sum();
	}
}
Handling different delimiters
The next task is to upgrade the calculator to handle new lines and custom strings as delimiters.
The first job is to support new lines and commas as separator characters. In the current state of the calculator this improvement can be done easily. I just added a new test case for the new behaviour and updated the regular expression to match new line characters too.
Next job is to support input strings that optionally specify an arbitrary separator. Apart from supporting all previous use-cases, the user of the calculator can specify the custom separator with the following syntax: "//[delimiter]\n[numbers]", for example "//;\n1;2".
First, I created the test that specifies the new behaviour. Then I realized that in order to be able to support this functionality, my current solution needs some refactoring.
The problem with the current version is that it does not separate the input processing from the calculation logic. The test I wrote acts as an acceptance test for the whole calculator, but I needed to develop one tiny piece in the middle of it. Previously this was not a problem, as this part was really simple (it used a constant regexp), but with the new requirement it's going to get a little more complicated.
So I decided to create two helper methods in the Calculator class in TDD fashion:
- getDelimiter(String input) : String - calculates the delimiter string based on the full input,
- getNumberList(String input) : String - returns the list-of-numbers part of the input string.
In the scope of the refactor all I needed was to support all existing functionalities in the new structure. So the getDelimiter I ended up with just returns the DELIMITER constant, and the getNumberList returns the whole input. The final step of the refactoring was to wire the helper methods up in the add method.
private static final String DELIMITER = ",|\n";

public int add(String input) {
	if (input.isEmpty()) {
		return 0;
	} else {
		return Arrays.stream(getNumberList(input).split(getDelimiter(input)))
			.mapToInt(Integer::parseInt)
			.sum();
	}
}

String getDelimiter(String input) {
	return DELIMITER;
}

String getNumberList(String input) {
	return input;
}
After the tests confirmed that I didn't break the calculator, I could start implementing the new functionality, and for that I just needed to slightly modify the new helper methods (and of course write some test cases before that).
Validation
In the last part of the Kata, the calculator gets some validation to guard against negative numbers.
I followed the strategy from the previous section:
- I wrote the test for the feature that exercises the calculator with an invalid input. ("-1,2")
- I decided to create a helper method for the validation instead of adding it to an existing method to make it easier to develop. For this I wrote an other test that exercises the not yet existing validate method that takes the whole input String and throws an Exception if there is a negative number in it.
@Rule
public ExpectedException exception = ExpectedException.none();

@Test
public void test_validate_invalid_input() throws Exception {
	exception.expect(CalculatorException.class);
	exception.expectMessage("[-1]");
	Calculator calculator = new Calculator();
	calculator.validate("-1,2");
}- I created the helper method.
void validate(String input) {
	List<Integer> negatives = Arrays.stream(getNumberList(input).split(getDelimiter(input)))
			.mapToInt(Integer::parseInt)
			.filter(i -> i<0)
			.boxed()
			.collect(Collectors.toList());
	if(!negatives.isEmpty()) {
		throw new CalculatorException(negatives);
	}
}- After the test passed for the validate method I wired it up to the add method.
- Finally, when I saw that all the tests are green I decided to do some cleanup and extract the string-to-stream logic to a helper method, as it appeared twice in the code.
Summary
I've found TDD on Mars. The overall experience with the tooling was pleasant, on the final try I was able to work it through without constantly looking for the mouse.
TDD is really fun, but it needs a lot of practice and discipline to do it right. I learned that for me the hardest part was to decide when and what to refactor, because it's part of every iteration and at first I felt wrong when I did almost nothing to it.
To avoid overengineering, it's important to set up rules on refactoring. I did not refactor unless
- there was a code smell (for example duplicated code), or
- the structure blocked the development of the next feature.
In both cases it's important to consider possible further implications of the refactoring (or the absence of it) and the required effort to do it. Aim for easy wins and keep it simple.
The other important thing that I've learned about TDD is that the actual development and the refactoring happens separately. It means that there is only one thing to keep in mind. There is only one goal to achieve at once. See Martin Fowler's great presentation in the topic.
Note: Credit for the headline image background photography: ESA/DLR/FU Berlin (G.Neukum)