Managing EC2 servers at scale: Ansible and RunCommand
Ansible vs SSM RunCommand: which one to use to manage a fleet of servers


Background
I still remember the first time I had to deploy a changeset to a production server. It was at my first job roughly ten years ago, and I wasn't usually doing operations. I had a colleague who did the deployments, but he was missing that day. I was handed a paper with a list with ~25 bullet points, each describing a manual task I had to do. Fortunately, I am quite good at following a process, so everything went smoothly.
It was much later when I learned that with each manual step a process gets exponentially fragile. For 1-server deployments I can manage a shell-script that applies the latest changes, but a fleet requires an entirely different mindset and tooling.
I recently did a course on Ansible, during which I had a feeling that I've already heard about this problem. The EC2 Systems Manager RunCommand is a similar service that offers a solution to this specific issue.
I was intrigued enough to assemble a test environment to test them side-by-side. I describe the setup and what I learned below.
To follow along, deploy this CloudFormation template. The only
thing you'll need is a KeyPair to log in to the instances with Ansible. In the samples below, you'll need to replace <privatekey> with the
path to the private key, and for the shell scripts, you need to provide it as the first parameter.
The template spins up 2-2 instances, one fleet for the Ansible tests, and another one for RunCommand.
Ansible
Ansible augments what you're doing manually: SSH into a machine, run some command, inspect the output. But instead of doing it one server at a time, it supports parallelization. Also instead of running ad-hoc commands one-by-one, it supports running a playbook which is a yaml-formatted file describing the process.
It provides an easy-to-read and very fast way of running commands on multiple servers.
Address a pool of servers dynamically
Ansible uses an inventory file (ansible.cfg) that describes what instances you manage. This is enough for a static deployment of fixed servers, but
it does not cover the dynamic nature of the cloud. For example, AutoScaling can add/remove instances at any time.
Instead of a static file describing the instances, it also supports a Python script that can generate the list on-the-fly. Even better, it supports a comma-separated list of servers directly from the CLI.
With some AWS CLI magic, you can collect the IPs of the servers for a given tag:
ansible -i "$( \
	aws ec2 describe-instances \
		--filter "Name=tag:Group,Values=ansible-test" \
		--query "Reservations[].Instances[].NetworkInterfaces[].PrivateIpAddresses[].Association.PublicIp" --no-paginate | \
	jq -r '. |
	map("ec2-user@"+.) |
	join(",")'
)"
How does it work?
The ec2 describe-instances returns a lot of information regarding your instances. To make it more developer-friendly, the list can be filtered and
queried. The former specifies the servers to be included, while the latter transforms the response to leave out unnecessary data.
The Name=tag:Group,Values=ansible-test filter includes only the instances that has the ansible-test as their Group tag. Then the
Reservations[].Instances[].NetworkInterfaces[].PrivateIpAddresses[].Association.PublicIp gives back only their public IPs.
Then some jq magic (which is a must-have if you work with the AWS CLI) prepends the username before the IPs and join them with a comma.
The end result will be something like this:
ansible -i "ec2-user@18.203.230.107,ec2-user@34.245.180.131"SSH
Ansible uses SSH to log in to each server. Because of this, you (or the control node) needs SSH access to the managed servers. As this is usually done using a keyfile, it provides a secure way of logging in.
If you want to tighten security even more, it naturally supports bastion hosts.
Tests
Let's run some experiments!
Pinging the fleet
Let's start with the mother of all troubleshooting techniques, the ping.
ansible \
	-i "$(aws ec2 describe-instances --filter "Name=tag:Group,Values=ansible-test" --query "Reservations[].Instances[].NetworkInterfaces[].PrivateIpAddresses[].Association.PublicIp" --no-paginate | jq -r '. | map("ec2-user@"+.) | join(",")')" \
	--private-key <privatekey> \
	--ssh-common-args='-o StrictHostKeyChecking=no' \
	-m ping all
To see it in action, use this script.
The -o StrictHostKeyChecking=no is required if this is the first time you SSH into the instance. Remember the warning The authenticity of host ... can not be established and you need to type yes to finally connect? It makes that go away.
ec2-user@34.245.180.131 | SUCCESS => {
    "changed": false,
    "ping": "pong"
}
ec2-user@18.203.230.107 | SUCCESS => {
    "changed": false,
    "ping": "pong"
}
Installing Apache
Something that more resembles a real-world scenario is an Apache installation with a website. A playbook for that:
- name: Install apache
  yum: pkg=httpd state=latest

- name: place index.html
  copy: src=index.html dest=/var/www/html/index.html
  notify: restart apache

- name: start apache
  service: name=httpd state=started

- name: run apache on system boot
  service: name=httpd enabled=yes
This installs the httpd package, copies the index.html file to the instance, starts the server, then finally registers it as a service.
To run this, instead of the -m ping all, define the playbook yaml.
ansible-playbook \
	-i "$(aws ec2 describe-instances --filter "Name=tag:Group,Values=ansible-test" --query "Reservations[].Instances[].NetworkInterfaces[].PrivateIpAddresses[].Association.PublicIp" --no-paginate | jq -r '. | map("ec2-user@"+.) | join(",")')" \
	--private-key <privatekey> \
	--ssh-common-args='-o StrictHostKeyChecking=no' \
	server.yml
Use this script to try it out.
After it is run, an Apache is set up on both the servers, and can be accessed:
curl $(aws ec2 describe-instances --filter "Name=tag:Group,Values=ansible-test" --query "Reservations[].Instances[].NetworkInterfaces[].PrivateIpAddresses[].Association.PublicIp" --no-paginate | \
jq -r '. | limit(1; .[])')
Hello world!SSM RunCommand
RunCommand requires (1) the SSM agent to be installed and (2) some permissions to be assigned to the instance. If you use an Amazon-provided AMI, (1) is already
taken care of. To attach the permissions to the instance, create a role
for the instance and attach the arn:aws:iam::aws:policy/service-role/AmazonEC2RoleforSSM AWS-managed policy. It contains all the permissions SSM needs,
including running commands.
If everything is set up successfully, the instances will show up under the Managed Instances in the Systems Manager console:
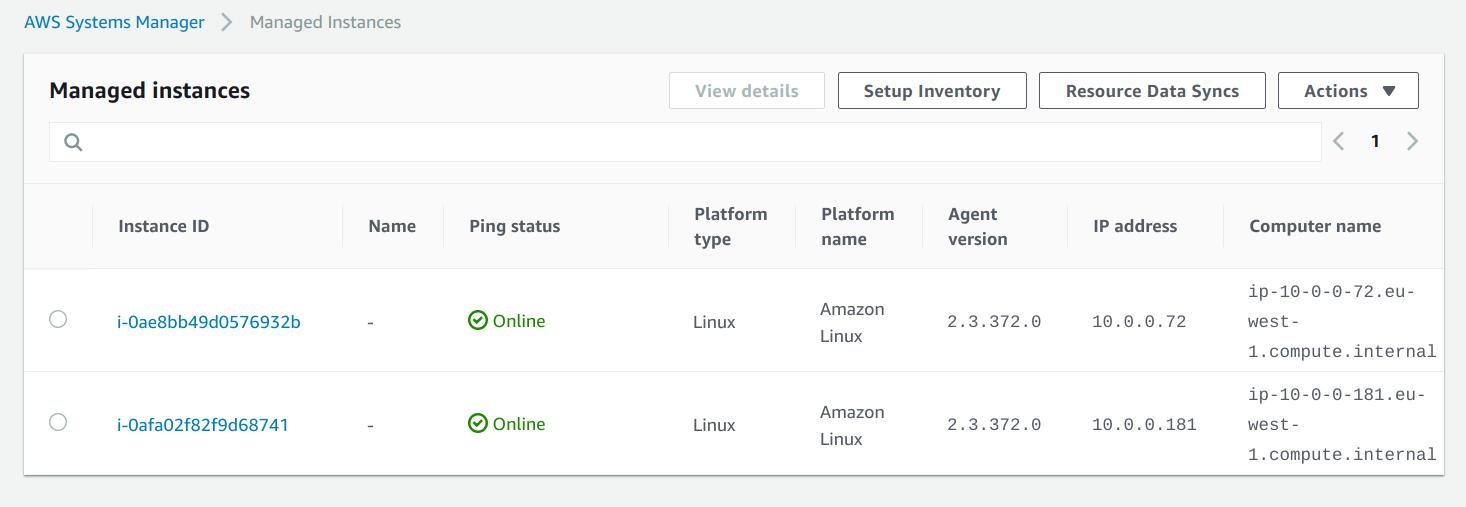
Notice that there is no inbound port 22 allowed to the instances. This means that you don't even need SSH to manage the servers.
To follow along, here is the script.
Sending commands to the instances
To send a shell command, you can use the AWS-RunShellScript command document. You can set what is run, along with a filter and a query, similar to what
we've used in the Ansible part.
command_id=$(aws ssm send-command \
	--targets Key=tag:Group,Values=runcommand-test \
	--document-name "AWS-RunShellScript" \
	--comment "uname" \
	--parameters commands=uname \
	--output text \
	--query "Command.CommandId" \
)
The --query "Command.CommandId" transforms the output to only include the id of the command. We'll need that to check the status and the output later.
Checking the status
Unlike Ansible, RunCommand is fully asynchronous. When you send a command you get a CommandId which you can use to check the status.
To wait for the completion of a command:
while [ \
	$(aws ssm list-commands \
		--command-id "$command_id"  \
		| jq -r '.Commands[0].Status') != "Success" \
] ; do sleep 1000; done
This does not handle failure cases, so it is far from being a production-ready solution. But it shows the fundamental approach.
When the status is Success, get the output:
aws ssm list-command-invocations \
	--command-id "$command_id" \
	--details | \
	jq '.CommandInvocations |
	map({InstanceId: .InstanceId, Output: .CommandPlugins[0].Output})'
[
{
"InstanceId": "i-0ae8bb49d0576932b",
"Output": "Linux\n"
},
{
"InstanceId": "i-0afa02f82f9d68741",
"Output": "Linux\n"
}
]Comparison
What I liked in Ansible
Ansible is a dream to work with, especially compared to SSM RunCommand. It is fast, synchronous, and the playbook syntax is surprisingly easy to write. The documentation is also decent, I could find everything I needed with a relatively short amount of searching.
Since it is based on SSH, there were no cryptic errors and product-specific problems. Security-wise it should be as secure as any other server-management solutions. If you use key-based authentication (as opposed to password-based) it should be practically unbreakable and by relaying through a bastion host it could be further hardened.
As opposed to RunCommand, the instances need no further permissions.
The file uploading is usually a pain point to handle correctly, but with Ansible it was a breeze. There are also plugins to customize the contents to each server.
What I liked in RunCommand
From the ops perspective, RunCommand is the better one as it is integrated into the ecosystem. As it does not require any route to the host itself, a production server can have only the ports opened to perform its purpose.
It is also more integrated with other AWS services, like IAM policies and CloudTrail. You can create multiple documents for each task and fine-tune who can run which. And everything will be logged automatically.
Conclusion
If I had to choose between the two, I'll definitely go for Ansible. It is a solution that is easy to use, and you can hit the ground running with it. With its playbook (and role) syntax, you can define complex workflows.
For the longer term, RunCommand has a lot of advantages, especially because it is deeply integrated with AWS. But as it is hardly usable without tooling, it requires more time to setup. Especially due to its asynchronous nature, it is a lot slower to run a sequence of commands than any other solution.