Let's build a simple MQTT echo on AWS IoT Core
An end-to-end IoT solution

Building on AWS IoT Core
In the course of this article we'll build a stack on AWS IoT Core that implements a simple echo functionality. Whenever a device sends a message via MQTT the backend replies to it with another message.
By the end of the article, we'll have a client application that sends messages to AWS IoT Core via MQTT:
$ ./run.sh
Connected, send some messages by typing in the terminal (press enter to send)
Hello world!
[Message received]: {
  "reported": {
    "value": "Hello world!"
  }
}
Then a few seconds later, the backend publishes the echo (notice the desired.value):
[Message received]: {
  "desired": {
    "value": "Echo: Hello world!"
  },
  "reported": {
    "value": "Hello world!"
  }
}
The functionality here is simple, but we'll cover a lot of concepts while we're building it:
- IoT certificates and policies
- The device shadows service
- Topic rules that call a Lambda function
- MQTT.js and how to connect, publish, and subscribe to topics with it
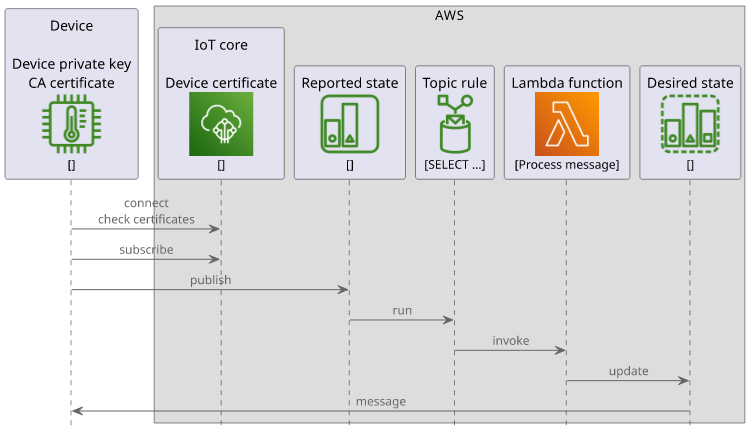
Let's start!
Certificate and thing
IoT security is based on certificates. The device has a private key, often concealed in a secure element, and its certificate is added to AWS IoT. This way when the device connects AWS can trust it and allow the connection. There are no passwords or tokens involved, which makes the process more secure. Especially with tamper-resistant hardware and locked-down policies (which we'll talk about in a minute) this setup is the gold standard for IoT security.
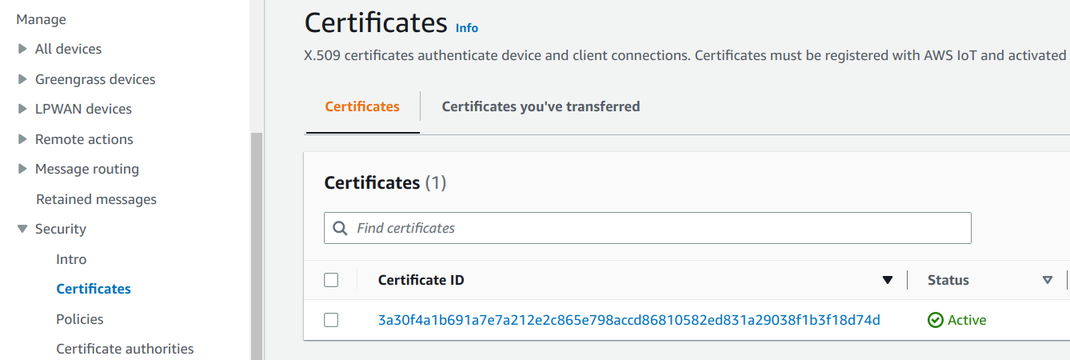
The certificate is connected to a thing which is AWS's concept of a connected device. Naming it this way makes it very hard to Google for it.

Then the certificate has policies that are similar to IAM policies but for MQTT. With a policy you can define conditions for the MQTT connection and which topics are accessible for subscribing and publishing for the device.

This forms the full MQTT security circle: the device has a private key that AWS trusts and allows the actions defined in the policy.
Device shadow
MQTT is like a blank canvas: topics and the message format are not defined nor enforced, it's up to the application. This is good in many cases but AWS offers an opt-in structured way of handling device state. This is the shadows service.
Each thing has a dedicated space where it can publish its state and subscribe to updates called a shadow. Then each space has its MQTT topics for changing and retrieving data. Devices and backend processes can use these dedicated topcs to interact with the shadows.
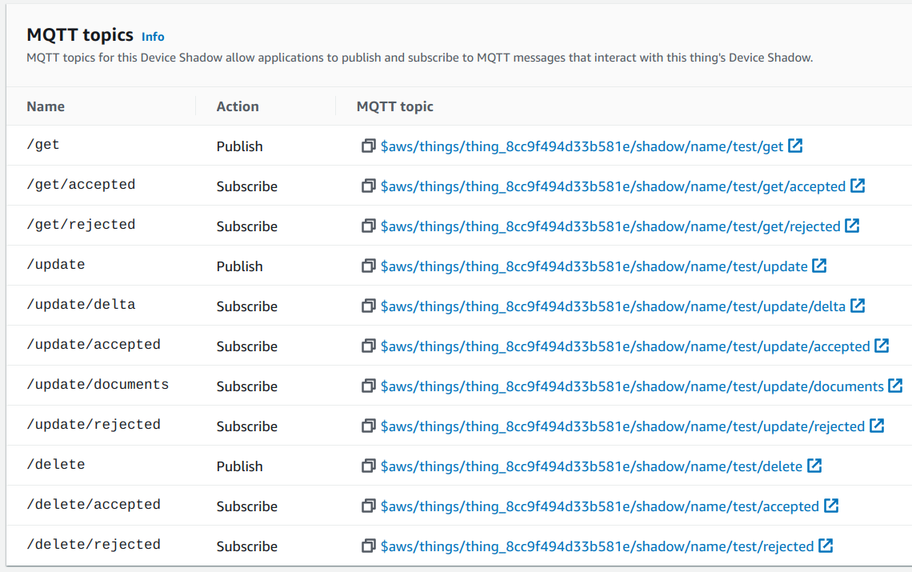
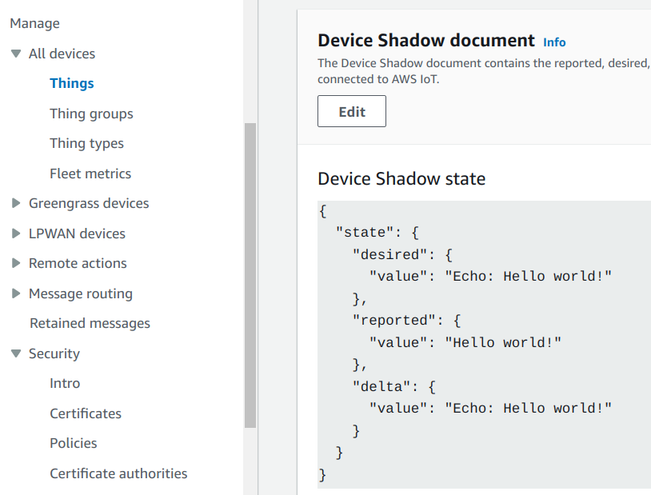
Moreover, shadows define a message structure with a reported and a desired states. The former is the output of the device, while the latter is the
input. The device only writes to its reported states while the cloud (or other devices) write to the desired one.
Topic rule
A topic rule is a listener for MQTT topics. When a message is published to a matching topic the rule runs and if it matches the event then it runs an action. Topic rules form the basis of handling data in the cloud coming from connected devices.
An action can be a lot of things: writing the message to a database, call an HTTP endpoint, run a Lambda function. The most versatile is to call a Lambda as that can then interact with all other services inside or outside AWS.
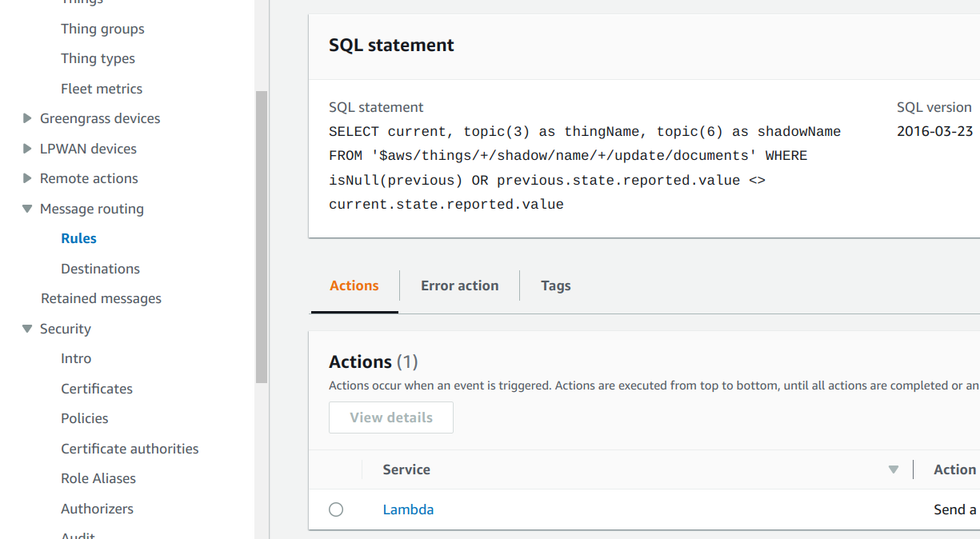
Since a topic rule listens for messages in MQTT topics, it can integrate with device shadows easily. A change to a shadow publishes a message in a specific
topic, then a topic rule that matches that topic will process the message. In the above SQL, the $aws/things/+/shadow/name/+/update/documents topic filter
gets all updates for named shadows.
Finally, the Lambda function implements the core logic of the solution: it echoes the message back to the desired state:
import { IoTDataPlaneClient, UpdateThingShadowCommand } from "@aws-sdk/client-iot-data-plane";

export const handler = async (event) => {
	const {thingName, shadowName, current} = event;
	return new IoTDataPlaneClient().send(new UpdateThingShadowCommand({
		shadowName,
		thingName,
		payload: Buffer.from(JSON.stringify({
			state: {
				desired: {
					value: "Echo: " + current.state.reported.value,
				}
			}
		}))
	}));
};
Connecting with MQTT.js
Now that the backend-side is ready, let's move on to the client! We'll use the MQTT.js library to connect to MQTT and send/receive messages.
The client needs a couple of arguments for the connection. The most important is the IoT endpoint which is the domain to connect. You can view it on the Console:
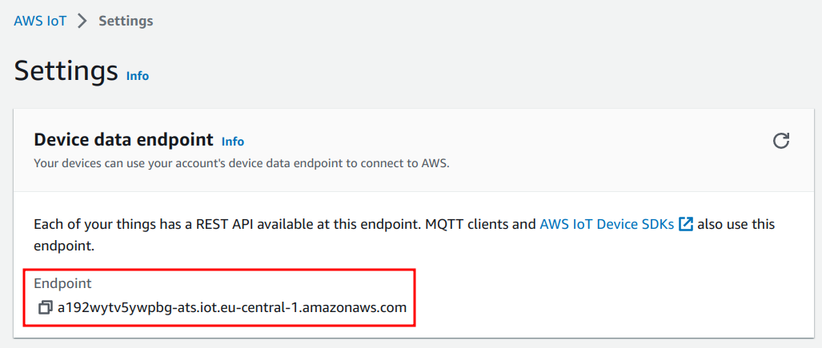
Or get is using the AWS CLI:
aws iot describe-endpoint --endpoint-type iot:Data-ATSOr with Terraform:
data "aws_iot_endpoint" "iot_endpoint" {
	endpoint_type = "iot:Data-ATS"
}
The next required part is the thing name. This is required by IoT Core as it locates the thing that is connecting based on the client ID defined for the MQTT connection.
Then it needs the device certificate and the private key. In a real-world scenario it's the other way around: the device has access to the private key and the certificate through the secure element. But since we are emulating a device here, these are inputs.
Finally, it needs the CA certificate of the AWS endpoint. This is to validate the server certificate presented by AWS. The CA is then embedded in the device code forming the trust anchor.
In our case, it is downloaded by Terraform from AWS:
data "http" "root_ca" {
	url = "https://www.amazontrust.com/repository/AmazonRootCA1.pem"
}
Arguments
To pass all these information from Terraform to the client code, we'll need a couple of outputs:
output "ca" {
	value = data.http.root_ca.response_body
}

output "iot_endpoint" {
	value = data.aws_iot_endpoint.iot_endpoint.endpoint_address
}

output "thing_name" {
	value = aws_iot_thing.thing.name
}

output "cert" {
	value = tls_self_signed_cert.cert.cert_pem
}

output "key" {
	value = tls_private_key.key.private_key_pem
	sensitive = true
}
Then pass it to the client:
CA=$(terraform output -raw ca) \
	IOT_ENDPOINT=$(terraform output -raw iot_endpoint) \
	CERT=$(terraform output -raw cert) \
	KEY=$(terraform output -raw key) \
	THING_NAME=$(terraform output -raw thing_name) \
	node index.js
And in the client code extract from the environment:
const {IOT_ENDPOINT, CA, CERT, KEY, THING_NAME} = process.env;Connecting to the MQTT endpoint
The connection needs all these arguments:
import {connect} from "mqtt";

const opt = {
	host: IOT_ENDPOINT,
	protocol: "mqtt",
	clientId: THING_NAME,
	clean: true,
	key: KEY,
	cert: CERT,
	ca: CA,
	reconnectPeriod: 0,
};

const client  = connect(opt);

client.on("error", (e) => {
	console.log(e);
	process.exit(-1);
});

client.on("connect", () => {
	// connected
});
The error event is fired when there is a problem with the connection. If it is successful, the connect event is fired.
Publishing messages
To publish a message to a topic use the publish method of the client:
client.publish(
	`$aws/things/${THING_NAME}/shadow/name/test/update`,
	JSON.stringify({state: {reported: {value: data}}})
);
The first argument is the topic name, which is the update topic for the test shadow. Then the second argument is the payload with a state.reported,
as required by the shadows service.
Sending this message triggers the topic rule that in turn publishes another message.
Subscribing to topics
Subscriptions require two things: the subscription itself and a message handler.
To subscribe to a topic, use the subscribe method:
client.subscribe(`$aws/things/${THING_NAME}/shadow/name/test/update/documents`, (err) => {
	if (err) {
		// error
	}else {
		// subscribed
	}
);
Messages are coming through a different channel. To add a listener for new ones, use the message event of the client:
client.on("message", (topic, message) => {
	console.log("[Message received]: " + JSON.stringify(JSON.parse(message.toString()).current.state, undefined, 2));
});
This separation makes it tricky to match the message to a subscription and MQTT.js does not support that.
Conclusion
IoT Core is a powerful platform to provide a backend for connected devices. It provides secure connectivity with the use of certificates and policies, an MQTT broker that handles communications, and topic rules to integrate messages with the rest of the platform.


