Intro to AppSheet
Creating a no-code app from Google Sheets

AppSheet is a no-code platform on Google Cloud to create desktop and mobile apps that are based on Google Sheets or other data sources.
It can be good for rapid prototyping and for citizen developers: people with no previous programming experience who want to turn their ideas into reality. In particular, AppSheet shines the best for workflows that can easily be modeled with spreadsheet tables, and you need a simple CRUD app to view and manage the rows. Also, if your content is already on Google Drive, AppSheet might provide an easy way to automate some of your processes.
Creating an app in AppSheet starts with the data you'd like to manage, typically some Google Sheets. Once you import them to AppSheet, you'll get a data model where you can refine the semantic meaning of each column. Based on this data you can define the UX of the app by adding views and menu items. Finally custom behaviors can be specified to perform actions based on user interaction or events.
The result is a mobile application that has two-way data synchronization with the backing data sources, so the app is an additional view to manage the same data.
So far I was playing around with AppSheet just a bit to create a to do management application. This post is about my first experiences.
It all starts with the data
According to the documentation, AppSheet can work with many kinds of data sources, but – maybe as the name also suggests – it's best integrated with Google Sheets.
To do anything with AppSheet, a data source is needed. For starters I created a Google Sheet with a single Worksheet called "Tasks":

To make an app from it, go to Tools → AppSheet.
After a few seconds, you should be greeted a simple app presenting this data in AppSheet's editor:
Tip: if you have problems with authorization, check the following links to see if AppSheet has access to your Google Documents:
Also, these links might come in handy if you want to revoke access to AppSheet later.
When you import a sheet the semantic meaning for each column has to be defined. This includes data type, constraints and if a column acts as a foreign key to another sheet. In this example I did not have to do it by hand, because it uses Google ML to discover sheet and come up with an initial schema.
For best results it is recommended to clean up the sheets before importing them and treat them as you'd treat relational databases:
- Column names and sheet names should match up.
- Cells in a column should have the same data type.
- Normalize data to remove redundancy by creating additional sheets (more tables)
- Always have an ID column.
- Also, remove formulas as they won't work on AppSheet.
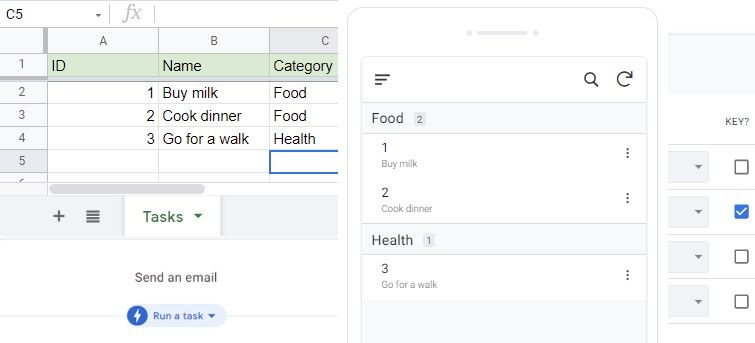
Feel free to try your app at this point: you can view and edit data: AppSheet's unified view allows to develop and view your app simultaneously. Whatever change you'll make in the data, it will be reflected in the original Sheet and vice-versa.
Fine-tune the schema
After the initial schema is generated, it's possible to fine-tune it in the Data menu. However, if you do bigger changes or cleanups on your data source, it might be easier to simply drop the previous schema, and reimport it to let Google ML discover the source again. In my experience this process is a trial and error: I reimported my data quite some times, and only added the final changes to the schema to set what the automatisms could not figure out.
The data source is a bit redundant at this point, for each row we store the category name. So, let's create second sheet for the categories.
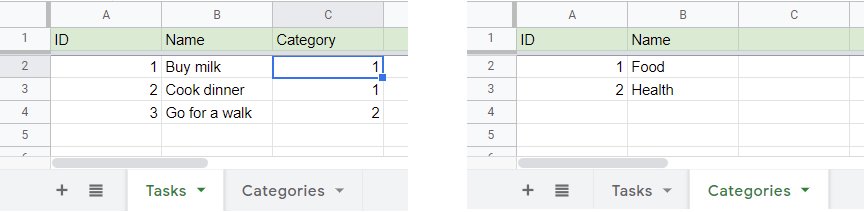
Reimport the sheets to AppSheet to make sure we have a good starting schema for our data.
After this change the app does not show the categories correctly, it just displays their IDs.

Fix this by modifying the schema of the Tasks table so that the Category column is a Ref pointing to the Categories table.
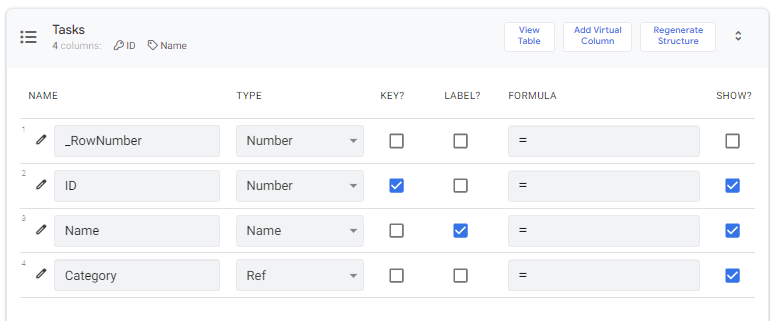
As you can already see, there are many options to fine-tune each column. Also, each table can be configured which CRUD options to support, so it's also possible to create a read-only view of some data, or only prohibit delete operations.

Add views
Once the data is set up, presentation can be customized in the UX menu.
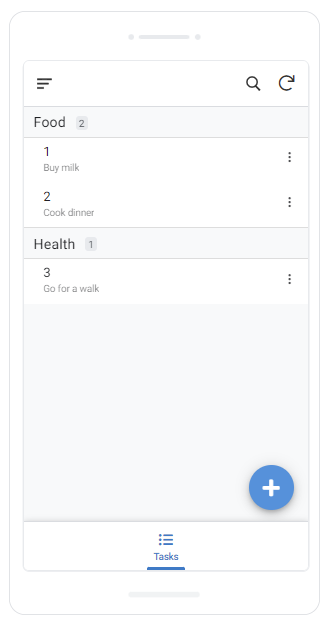
Currently we have one Primary View to display the list of Tasks. It also allows to add new items, and to view, delete, and edit a given item.
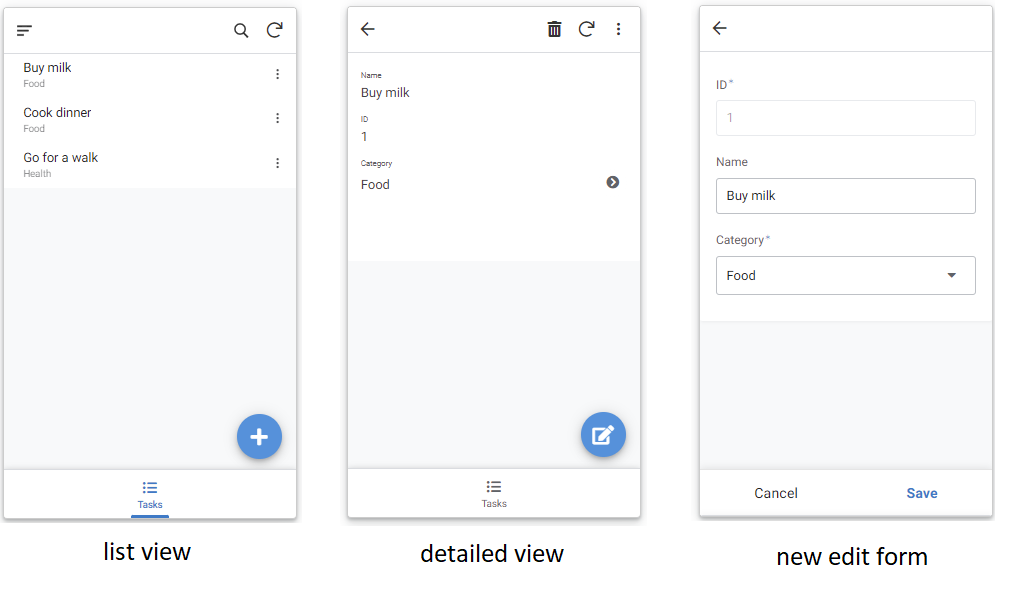
Primary Views are main menu items in the app, accessible from the navigation bar at the bottom or in the side menu bar.
They can be simple lists as in this example, but other widgets are also supported like charts, maps and card views.
Lists are always backed by a table, listing all their entries. The detailed views and editor forms are backed by a single row. This means that wizard-like workflows operating on multiple rows are not supported – however, it’s possible to create multi-page views or tabbed views for a single row.
Let's extend our app by adding a way to manage categories. For this, go to the UX menu, and click "New View". Select the Categories table as data source, choose a convenient view type, and it's ready to use.

Add custom actions
AppSheet supports Actions that the user can trigger with a button in the context of a given row from a corresponding detailed view. This can be used for example to open a website, open another view in the app, or do something with the data.
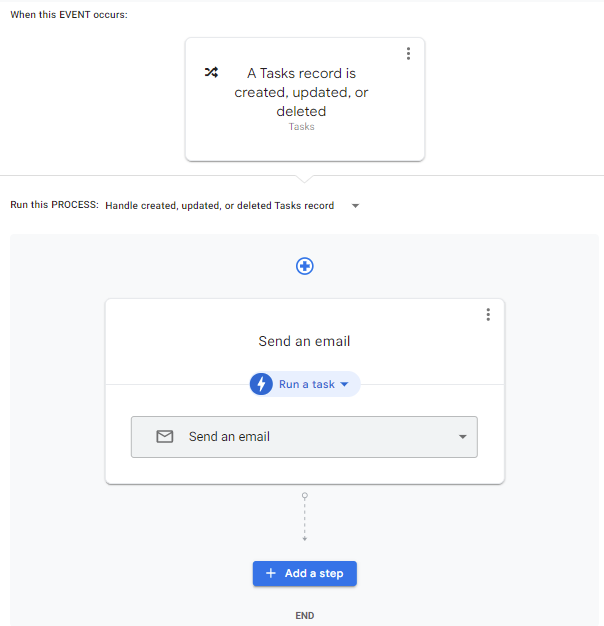
It's also possible to define Bots that can trigger based on event or scheduling. Processes created graphically. For example, you might use it to send an e-mail whenever a new row is added to a table:
Releasing it
When you start editing your app, it's in a prototype state where it can be shared with co-authors and early users.
Accessing the prototype is possible via the browser and on mobile by installing the AppSheet app (Android, iOS). From a user point of view this experience is similar to how Expo applications work.
To deploy it in production mode, a list of deployment checks need to be fulfilled (e.g. metadata, custom icon etc.) You also have to decide which tier to use: AppSheet have a free one, but it imposes some limitations, for example you can't use authentication and automation features, and offline access is not possible.
After your app is deployed, it is distributed via appsheet.com. The users can access it via browser or via the AppSheet app. In addition to this, it's also possible to generate a white-label version of the app, resulting in an artifact that you can distribute via Play Store and App Store.
Conclusion
This post was about my initial experiences with AppSheet. Based on some data, it's very easy to create a CRUD mobile or web application within a few minutes.
As a programmer, I can see its potential benefits when it comes to prototypes as it's easy to wire up a few screens, or it might be handy if your processes are already based on spreadsheets.
Sources: