How to use S3 POST signed URLs
S3 POST URLs are designed for HTML forms but they can be used from Javascript too. Learn how and why to use them

POST signed URLs
POST signed URLs enable the same use case as PUT URLs: when you want a scalable and controlled way of letting users upload files directly to S3. The main difference is the technical implementation of how these URLs work. While PUT URLs provide a destination to upload files without any other required parts, POST URLs are made for forms that can send multiple fields.
But that does not mean POST URLs have to be used in HTML <form>s. With modern Javascript APIs, it is possible to completely replace PUT signed URLs
with POST ones without any change in functionality. And POST URLs provide greater configurability.
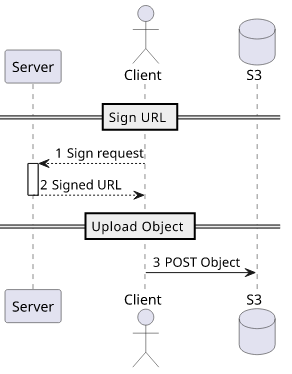
The process consists of 2 steps, first the backend signs a URL and sends it to the client then the client uploads directly to S3.

In the case of the JS SDK, the function that returns the signed URL is s3.createPresignedPost. It returns an object with a url property
and a fields object with the required form fields:
{
	url: ...,
	fields: {
		field1: "value1",
		...
	}
}
When used with Express, this code generates and returns a signed URL the clients can use to upload files:
app.get("/sign_post", (req, res) => {
	const userid = getUserid(); // some kind of auth

	// check if the user is allowed to upload files

	const data = s3.createPresignedPost({
		Bucket: process.env.BUCKETNAME,
		Fields: {
			key: getRandomFilename(), // totally random
		},
		Conditions: [
			["content-length-range", 	0, 1000000], // content length restrictions: 0-1MB
			["starts-with", "$Content-Type", "image/"], // content type restriction
			["eq", "$x-amz-meta-userid", userid], // tag with userid <= the user can see this!
		]
	});

	data.fields["x-amz-meta-userid"] = userid; // Don't forget to add this field too
	res.json(data);
});Parameters
Bucket
No surprise here, this is the bucket the file will be uploaded to.
s3.createPresignedPost({
	Bucket: process.env.BUCKETNAME,
	...
});
Make sure to give the necessary permissions to put objects into this bucket to the backend.
And since browsers are subject to CORS, you need to set a CORS policy for the bucket:
aws s3api put-bucket-cors \
	--bucket $BUCKETNAME \
	--cors-configuration '{"CORSRules": [{"AllowedOrigins": ["*"], "AllowedMethods": ["POST"], "AllowedHeaders": ["*"]}]}'
Key
The name of the object. As with all upload URLs, make it random and do not let the client to influence it:
const getRandomFilename = () =>	require("crypto").randomBytes(16).toString("hex");

s3.createPresignedPost({
	...
	Fields: {
		key: getRandomFilename(), // totally random
	},
	...
})
Content length
Unlike for PUT URLs, you can set the acceptable content length. The range is in bytes, so if for example you want to only allow files less than 1 megabytes, use this:
s3.createPresignedPost({
	...
	Conditions: [
		["content-length-range", 	0, 1000000],
		...
	]
});
Content type
The content type of the uploaded file. It can be set to a fixed value but also to a prefix:
s3.createPresignedPost({
	...
	Conditions: [
		["eq", "$Content-Type", "image/jpeg"],
		// or prefix:
		["starts-with", "$Content-Type", "image/"],
		...
	]
});
Prefixing is especially important when the clients can upload different types of the same category, like any image.
Metadata
You can also require a given key-value metadata to be set for the object. These can be arbitrary values, for example you can associate a user id with each uploaded file using it.
If you require a specific value to be present then add that to the field object so that the clients know what to set.
const data = s3.createPresignedPost({
	...
	Conditions: [
		["eq", "$x-amz-meta-userid", userid],
	]
});

data.fields["x-amz-meta-userid"] = userid;
The metadata can be queried for the key:
aws s3api head-object --bucket $BUCKETNAME --key $KEY

{
	...
	"Metadata": {
		"userid": "user1"
	}
}
Client-side
Since signed POSTs are mainly for forms it's a bit more involved to upload a file purely from Javascript but nothing difficult.
First, get the signed URL and the associated fields from the backend:
const data = await (await fetch("/sign_post")).json();Then construct the FormData:
const formData = new FormData();
formData.append("Content-Type", file.type);
Object.entries(data.fields).forEach(([k, v]) => {
	formData.append(k, v);
});
formData.append("file", file); // must be the last one
The Content-Type must be set if the POST policy contains a Condition for it.
One possible pitfall is that the file must be the last element. The error message says nothing about the real problem when things are after that.
Finally, send the POST to the signed URL:
await fetch(data.url, {
	method: "POST",
	body: formData,
});
Conclusion
POST URLs are direct replacements to PUT URLs and they remedy their shortcomings. The backend can put restrictions on the content length as well as it handles content types better. Also, it supports proper metadata which is something you couldn't achieve with PUT URLs.


