How to use a custom domain with CloudFront and Route53
The steps to configure a webapp with HTTPS on your domain


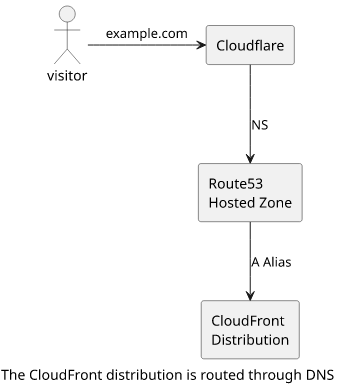
CloudFront provides a unique URL for every distribution, but that is not something you'd tell your visitors to type in their browser's search bar. With a custom domain registered, you can add that to the distribution and host your webapp on a custom domain, with HTTPS and using AWS's global distribution network.
This article partially follows the process described in the previous one but uses only AWS services instead of relying on Cloudflare to route to CloudFront.

Initial setup
In this scenario, there is a Route53 Hosted Zone created for a domain:
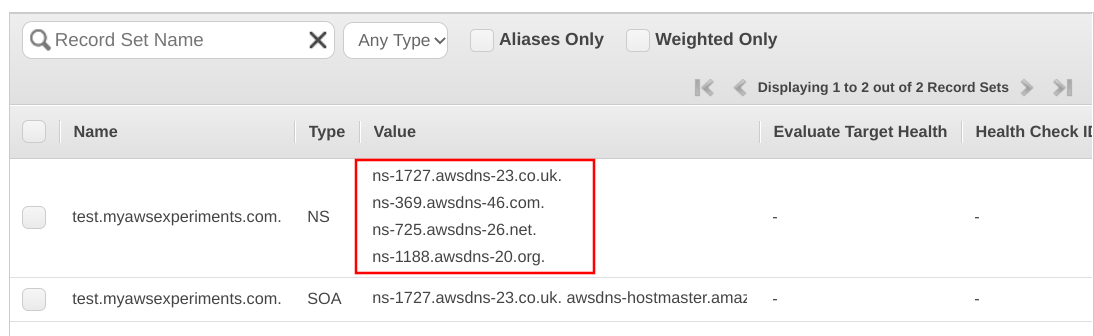
Then on the domain provider's side (Cloudflare in my case) there are NS records to delegate to the Route53 zone:
Setting up NS records to point to the Hosted Zone's nameservers make Route53 the authoritative nameserver for this domain. Whatever records the Hosted Zone has are the records resolvers will get.
You may notice that I'm not using the apex (myawsexperiments.com) domain but a subdomain (test.myawsexperiments.com). This is because Cloudflare does
not support adding NS records to the root. There is an option on the web interface but it does not work. The solution described below works the same
for the apex too if you can make the Hosted Zone the authoritative nameserver.
Apart from the initial DNS setup, there is a CloudFront distribution that we'll serve under a custom name:

Configuring the custom domain
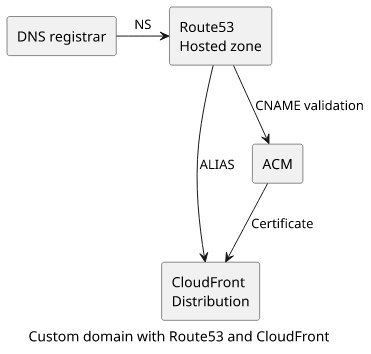
The solution involves multiple steps. First, we need to use the AWS Certificate Manager (ACM) to issue a certificate for the domain. This requires modifying the Hosted Zone by adding a validation record.
Second, with the certificate in place, we need to add it to the CloudFront distribution. And finally, add the necessary records to the Hosted Zone to point to the distribution.
Get a certificate with ACM
For a certificate to work with CloudFront, it has to be issued in the us-east-1 region independent of where the distribution is. Before you do anything, make sure to switch to this region.
When you request a certificate, ACM first asks for the domain name:

Choose DNS validation, then ACM provides the record to add to the domain. In this case, there is a button that auto-updates the Hosted Zone with the validation:
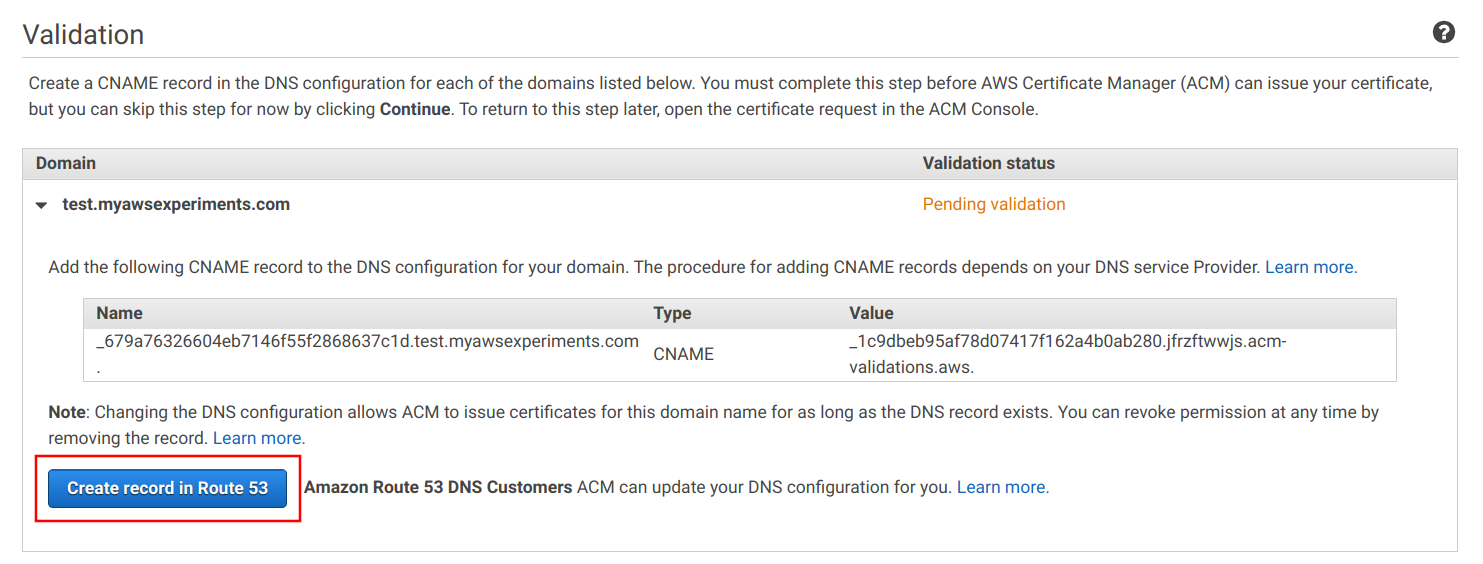
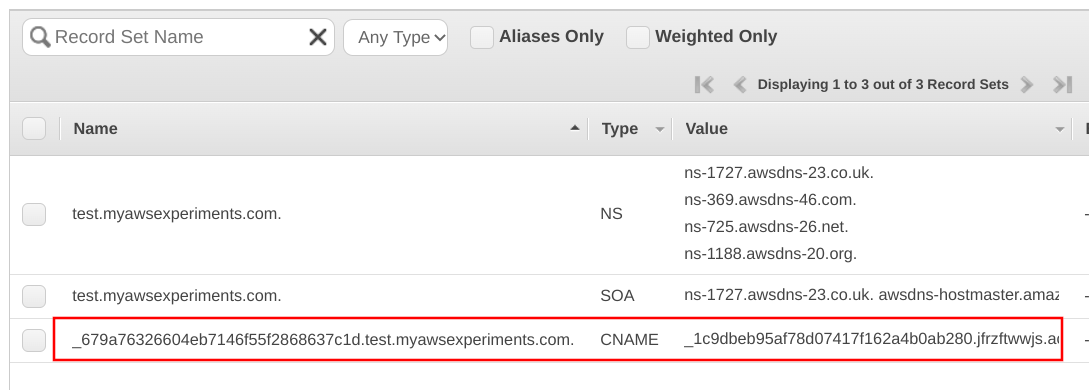
If you inspect the Hosted Zone, there is a new CNAME record created by ACM:
It takes ACM a couple of seconds to verify the domain ownership and issue the certificate. When it's done, the certificate goes into "Issued" status:

Add a custom domain to CloudFront
With a certificate issued, the next step is to add it to the distribution. First, add an Alternate Domain Name, then select "Custom SSL Certificate" and select the certificate created in the last step:
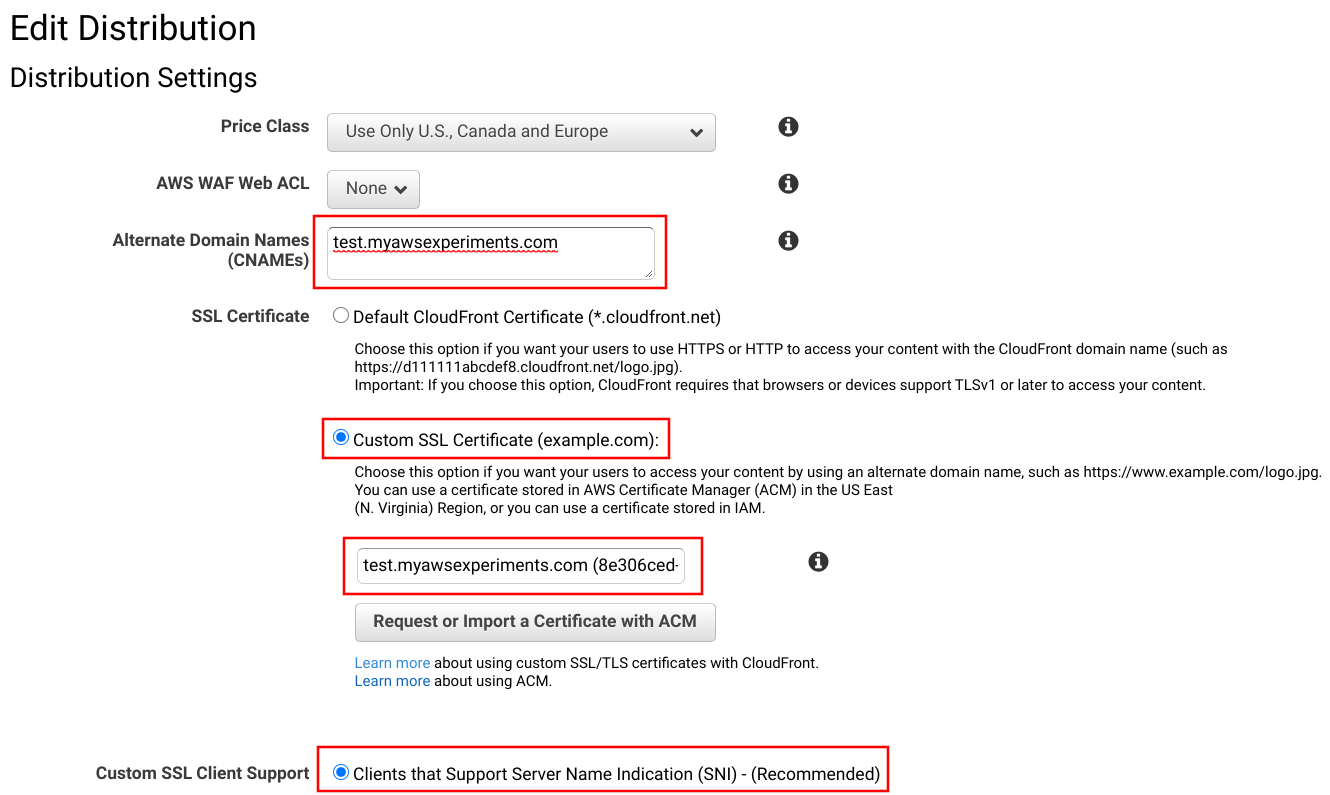
Make sure to select the SNI option and not use dedicated IPs. No clients need them and using them is extremely expensive.
Point Route53 to CloudFront
Now that the CloudFront distribution is ready to serve the traffic coming on a custom domain, the last step is to configure Route53 to send that traffic.
Add a new A record, select that it is an Alias and select the distribution's domain from the list. If the interface does not list it for various reasons, just copy-paste it from the distribution's page.
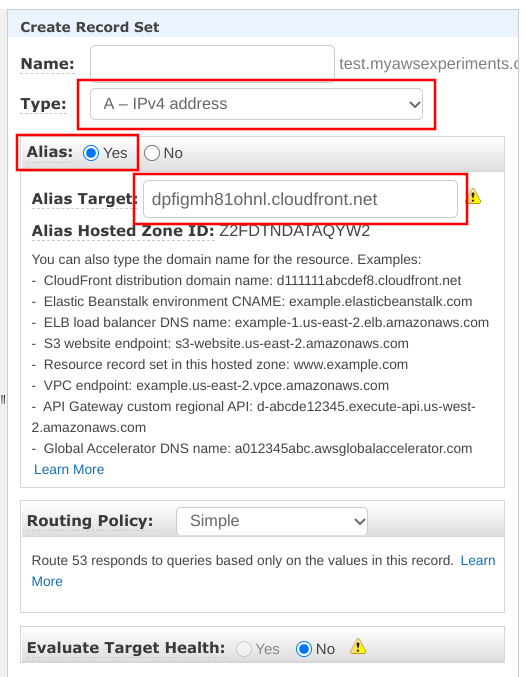
There are a couple of things happening here. An A record is added to the domain, but it does not have a fixed value instead it returns whatever happens to be the CloudFront distribution's A records when the request was made. This makes it possible to avoid hardcoding any fixed IP address and instead wire the infrastucture using logical names. This fixes a shortcoming in DNS, namely that a CNAME can not be added to the apex, but unfortunately it only works for AWS services.
Testing
When a visitor goes to the custom domain, his browser contacts Cloudflare first. Then, by getting the NS records pointing to Route53, the browser contacts the Hosted Zone. It looks up the CloudFront distribution's IP address and returns an A record. The browser then connects to CloudFront and gets the page:
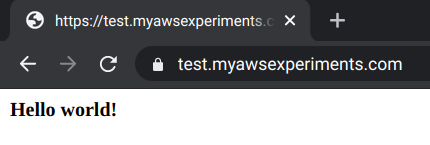
All this technical sorcery leads to a rather uninteresting result. When someone visits the domain, he'll get the website via HTTPS:
IPv6
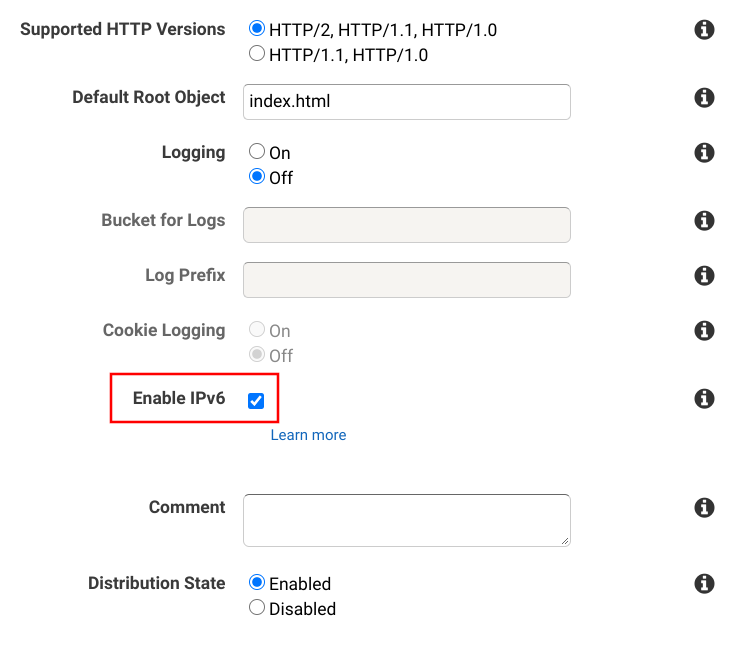
One thing this setup lacks that the original had is IPv6 support. CloudFront supports it natively, it's just a checkbox:
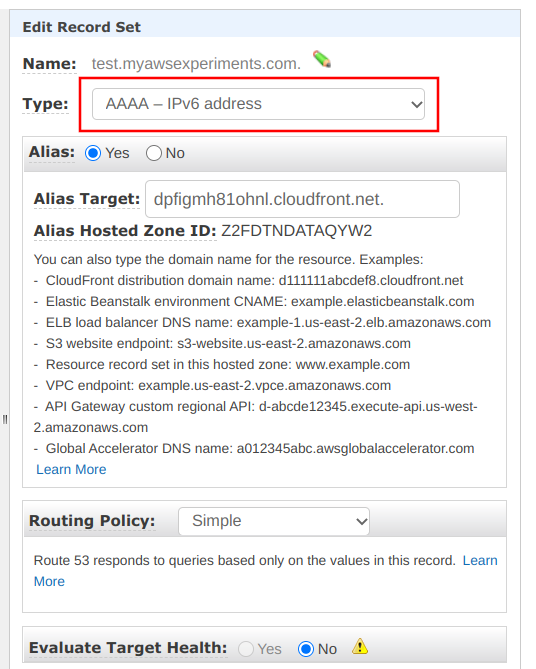
But the custom domain does not return an IPv6 address because there is no AAAA record added to the Hosted Zone. Fortunately, Route53 also supports the Alias setting for AAAA records, so IPv6 support is just a matter of a few clicks:
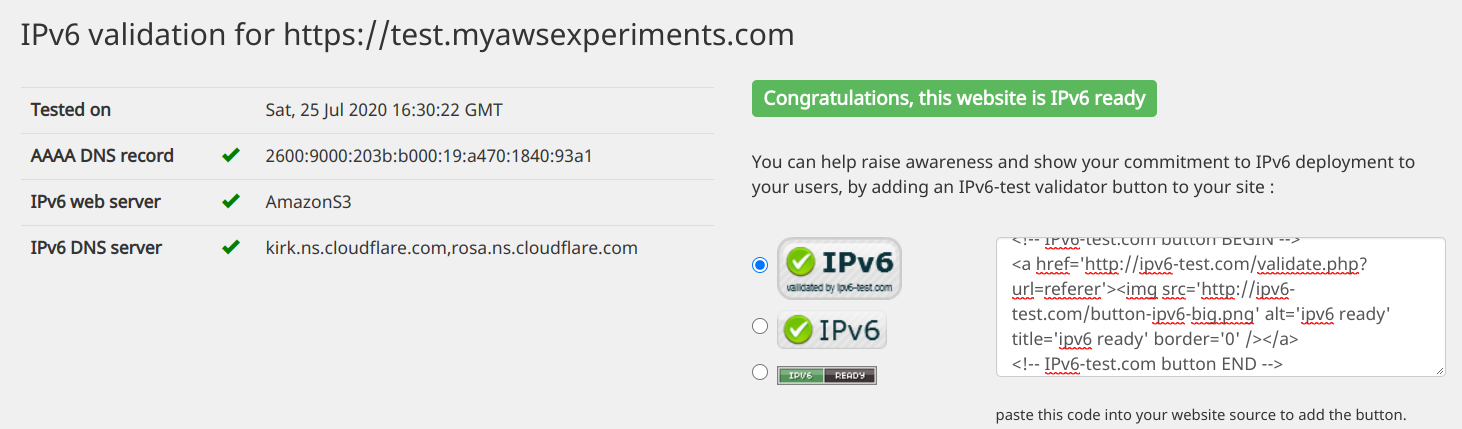
Testing the domain shows it's IPv6 ready:
Route53 records overview
The final setup with all the necessary records added looks like this:
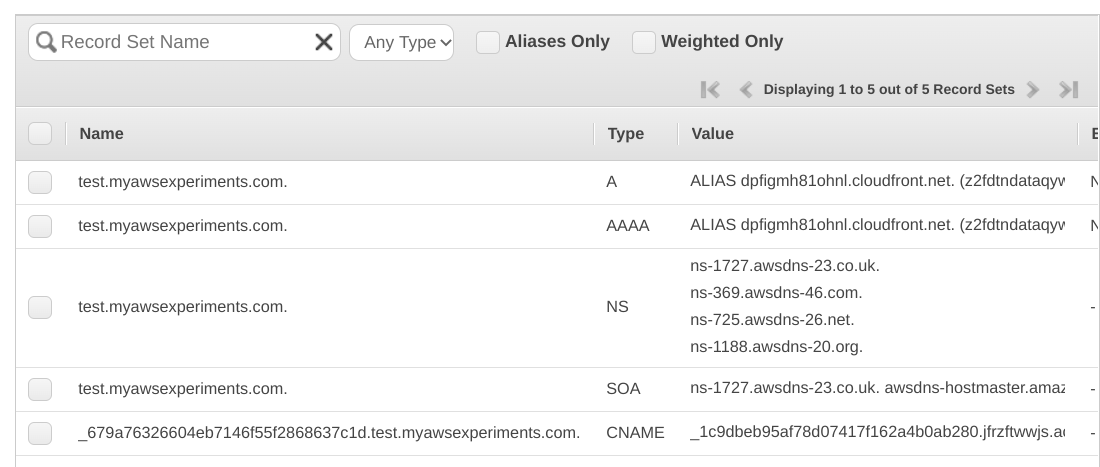
The NS and SOA records are mandatory elements and they are added when the Hosted Zone is created.
The CNAME is the validation record for ACM and it makes sure the certificate can be renewed when needed.
And finally, the A and AAAA records point to the CloudFront distribution so that visitors will be served by that. Both are ALIAS records.
Pricing
All AWS services come with pricing tables and a lot of fine print, so it's a best practice to also take some time and consider the costs. In this case, it's surprisingly cheap.
ACM is free for public certificates, which is the kind used here.
CloudFront also has no additional costs for a custom domain on top of the bandwidth and request pricing that is charged for every distribution.
The only additional cost is Route53. Every hosted zone costs $0.5 per month, and there is a cost for queries but that's significantly cheaper than CloudFront request pricing ($1 vs $0.4) and as DNS queries might be cached on multiple levels it might be cheaper still.
Overall, adding a custom domain to a CloudFront distribution incurs some additional charges but not much.