How to sign, verify, and encrypt JWTs in Node
Implementations for the two most common use-cases for tokens


JWT
JWTs (JSON Web Token) are tokens that one component can generate, sign, and optionally encrypt and pass to other components. The standard defines a broad area where they can be used, and usually a JWT is the way to go for many use-cases. When a service in a microservices architecture needs to send requests to other services, it can go to an authenticator to obtain a token that the target service trusts. Similarly, ID tokens in OAuth are JWTs. Also, they are good for stateless sessions, such as a zero-overhead shopping cart.
On a basic level, a JWT is a JSON payload with some associated metadata. Then it can be signed so that only the party with the signing key can generate them. For example, a server might store the user's ID in the payload when the user signs in and verify the signature when it receives the token later.
A more complicated use-case uses asymetric keys, so that one service can sign tokens, and all the others can verify the signature. This is the case with the OAuth ID token.
Then there is encryption. Signed tokens are encoded plain-text so that the recipient can read what is stored inside. Encryption adds a layer of secrecy to this: with encrypted tokens you can store anything without revealing the information itself. And of course, there is asymetric encryption.
In this article we'll look into the two most common use-cases for JWTs: signed and encrypted tokens. We'll discuss how to generate, decrypt, and validate them using the jose library in Node.js.

Signed JWTs
A signed JWT consists of 3 parts: a header, a payload, and a signature. All parts are Base64URL encoded, so you usually see them in this form (newlines added for clarity):
eyJhbGciOiJIUzI1NiJ9.
eyJ0aGlzIjoiaXMiLCJhIjoidGVzdCIsInN1YiI6InRlc3RzdWIiLCJpYXQiOjE2NjM4MzYzOTgsImlzcyI6Imh0dHBzOi8vZXhhbXBsZS5jb20iLCJhdWQiOiJodHRwczovL2V4YW1wbGUuY29tL3Rlc3QiLCJleHAiOjE2NjM5MjI3OTh9.
O-cDMb_PnogRDbhDxD800WZnYmqa1nqSYSv0AzWjFXE
Decoded, it looks like this:
{"alg":"HS256"}.
{"this":"is","a":"test","sub":"testsub","iat":1663836398,"iss":"https://example.com","aud":"https://example.com/test","exp":1663922798}.
??????????????????????????
The parts are separated by dots (.), and the third one is binary as is apparent from the strange characters.
Sign
The code to sign a JWT:
const signJwt = async (subject, payload, secret) => {
	return new jose.SignJWT(payload)
		.setProtectedHeader({ alg: "HS256" })
		// subject
		.setSubject(subject)
		.setIssuedAt()
		// set this per component
		.setIssuer("https://example.com")
		// set this per usage
		.setAudience("https://example.com/test")
		// change it
		.setExpirationTime("1d")
		.sign(secret)
};
Let's see the variable parts and best practices for them!
To sign a JWT, first you need to decide the algorithm (alg). For signing, HS256 (HMAC + SHA256) is a good choice and it is guaranteed to be
supported by all implementations.
Next, you need a suitable key (secret). For the HS256 that should be 256 bits which is 64 hex characters, such as
62197fc8886bd3b739dd2cc8aa109d0be93acdea64c07b8908168b80daf1dc47.
Then there are a couple of other fields:
setIssuedAt(iat) is when the token is created. It is almost always the current time.setExpirationTime(exp) is the validity of the tokensetIssuer(iss) is the component that creates the tokensetAudience(aud) is who this token is forsetSubject(sub) is the subject, such as a userID for a login token
It's a best practice to set a short expiration time. Signed tokens are valid until they are expired, so this should be as short as possible, but it highly depends on the use-case. If the token can be regenerated without user interaction, then 15 minutes is a good default.
The issuer and the audience protects against taking a token that was generated for a different purpose and use it out-of-scope. For example, a server might generate tokens for administrator tasks but also for self-management both containing the user ID, an attacker might get a less privileged token and send it for sensitive operations. By setting and verifying the issuer and the audience, you can protect from this vector.

To generate a signed token with the above code:
const payload = {"this": "is", "a": "test"};

// 128 bits => 32 characters hex
const secret = Buffer.from("62197fc8886bd3b739dd2cc8aa109d0be93acdea64c07b8908168b80daf1dc47", "hex");

const signedJwt = await signJwt("testsub", payload, secret);
The signedJwt looks like this:
eyJhbGciOiJIUzI1NiJ9.
eyJ0aGlzIjoiaXMiLCJhIjoidGVzdCIsInN1YiI6InRlc3RzdWIiLCJpYXQiOjE2NjM4MzYzOTgsImlzcyI6Imh0dHBzOi8vZXhhbXBsZS5jb20iLCJhdWQiOiJodHRwczovL2V4YW1wbGUuY29tL3Rlc3QiLCJleHAiOjE2NjM5MjI3OTh9.
O-cDMb_PnogRDbhDxD800WZnYmqa1nqSYSv0AzWjFXE
Decoded:
{"alg":"HS256"}.
{"this":"is","a":"test","sub":"testsub","iat":1663836398,"iss":"https://example.com","aud":"https://example.com/test","exp":1663922798}.
????????????????????????
You can see that all parts are readable.
Verify
Since the algorithm for the signature is HMAC the same secret is needed for the verification.
const verifyJwt = async (jwt, secret) => {
	return await jose.jwtVerify(jwt, secret, {
		issuer: "https://example.com",
		audience: "https://example.com/test",
		algorithms: ["HS256"],
	});
}
The above code verifies the issuer, the audience, and the algorithm. It is a best practice to define as many fields as possible, as each undefined part gives freedom for attackers.
To use the verifier:
const verifiedJwt = await verifyJwt(signedJwt, secret);This returns an object with the payload:
{
	payload: {
		this: 'is',
		a: 'test',
		sub: 'testsub',
		iat: 1663836398,
		iss: 'https://example.com',
		aud: 'https://example.com/test',
		exp: 1663922798
	},
	protectedHeader: { alg: 'HS256' }
}
Debug
jwt.io is a debugger site where you can paste a JWT and see what is encoded in it. It is easy-to-use and is immensely useful for debugging.
To use it, open the page and paste the token:

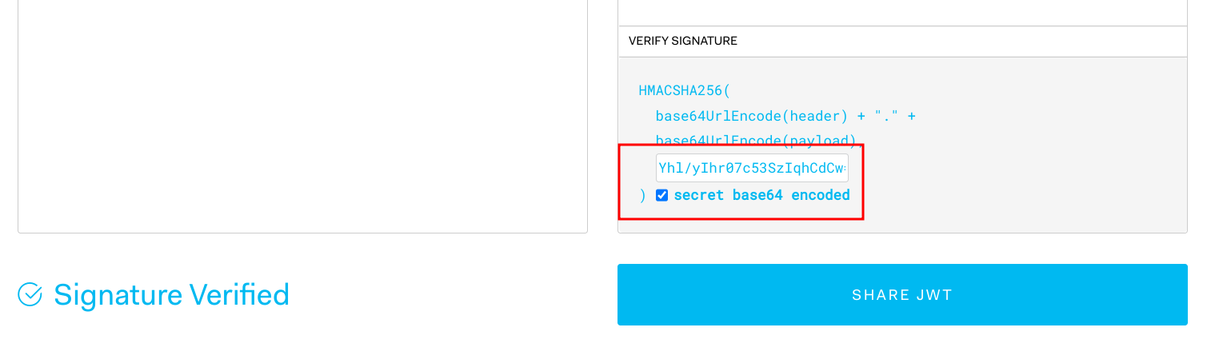
It can also verify the signature if you enter the secret. Make sure that you don't accidentally leak real secrets this way.
To make a hex secret (62197fc8886bd3b739dd2cc8aa109d0be93acdea64c07b8908168b80daf1dc47) usable with the site, you need to convert it to Base64 (Yhl/yIhr07c53SzIqhCdC+k6zepkwHuJCBaLgNrx3Ec=). There are
online tools to do that, for example this one.
When you have the secret, paste it to the secret then paste the JWT again as changing the secret overwrites the token.
Encrypted JWT
Let's turn up secrecy by one level and encrypt the token!
An encrypted token has a similar format as the non-encrypted variety, but it has more fields:
eyJhbGciOiJkaXIiLCJlbmMiOiJBMjU2R0NNIn0.
.
-3wFc0S30MSUCTN8.
cR9ezVIjrkrOR5n9JnJ1coecSCirYc1kQ3ctoqcfwsFw8w2M38TEV2M29gGuOKef_UFOA2MDmNR156Y3GBlfkAjm1fLyeDJTdc_MwAsJim6w7jF1ya_OvKEdo_aXKN76vmnfxun0tjiqN8igSRVAk_Kz_9vowXZ0aCcKUv668x76uzaFEfro.
tlusz-6xlxiFN7kVj8tK6w
The fields are:
- header
- encrypted key
- IV
- cyphertext
- authentication tag
The token, decoded:
{"alg":"dir","enc":"A256GCM"}.
.
?????????.
?????????????????????????????????????????????????????????????????????????????.
?????????
You can see that only the header is readable, all the other parts are in binary.
Encrypt
The code to generate that token:
const generateEncryptedJwt = (subject, payload, secret) => {
	return new jose.EncryptJWT(payload)
		.setProtectedHeader({ alg: "dir", enc: "A256GCM" })
		.setIssuedAt()
		.setSubject(subject)
		.setIssuer("https://example.com")
		.setAudience("https://example.com/test")
		.setExpirationTime("1d")
		.encrypt(secret);
};
Most of the parts are familiar from the previous case: the token has expiration time, issuer, audience, subject, and a payload. The new things are the enc
and the value of the alg.
The enc: "A256GCM" defines that the encryption is AES-256 in GCM mode. This is a recommended setting. Then the alg: "dir" means the secret is the
key and there is no wrapped key in the token itself. Unless there is a reason not to use it, it sounds like a good default. And because of this, the second part
of the token (the encrypted key) is empty.
The secret is the key for the AES256, so it needs to be 256 bits long (64 characters hex).
To use the function:
const payload = {"this": "is", "a": "test"};

// 256 bits => 64 characters hex
const secret = Buffer.from("62197fc8886bd3b739dd2cc8aa109d0be93acdea64c07b8908168b80daf1dc47", "hex");

const encryptedJwt = await generateEncryptedJwt("testsub", payload, secret);
This returns the encrypted token:
eyJhbGciOiJkaXIiLCJlbmMiOiJBMjU2R0NNIn0.
.
-3wFc0S30MSUCTN8.
cR9ezVIjrkrOR5n9JnJ1coecSCirYc1kQ3ctoqcfwsFw8w2M38TEV2M29gGuOKef_UFOA2MDmNR156Y3GBlfkAjm1fLyeDJTdc_MwAsJim6w7jF1ya_OvKEdo_aXKN76vmnfxun0tjiqN8igSRVAk_Kz_9vowXZ0aCcKUv668x76uzaFEfro.
tlusz-6xlxiFN7kVj8tK6w
Decrypt
To decrypt the token:
const decryptJwt = async (jwt, secret) => {
	const options = {
		issuer: "https://example.com",
		audience: "https://example.com/test",
		contentEncryptionAlgorithms: ["A256GCM"],
		keyManagementAlgorithms: ["dir"],
	};
	return jose.jwtDecrypt(jwt, secret, options);
};
The issuer and the audience are verified, same as before. The new parts restrict the algorithms used:
contentEncryptionAlgorithmsis the algo used for the encryption (A256GCM)- the
keyManagementAlgorithmsis the algo to use to generate the wrapped key. Here it'sdirso there is no wrapped key
As usual, it's a best practice to verify these.
Usage:
const decrypted = await decryptJwt(encryptedJwt, secret);This returns an object:
{
	payload: {
		this: 'is',
		a: 'test',
		iat: 1663836398,
		sub: 'testsub',
		iss: 'https://example.com',
		aud: 'https://example.com/test',
		exp: 1663922798
	},
	protectedHeader: { alg: 'dir', enc: 'A256GCM' }
}
Debug
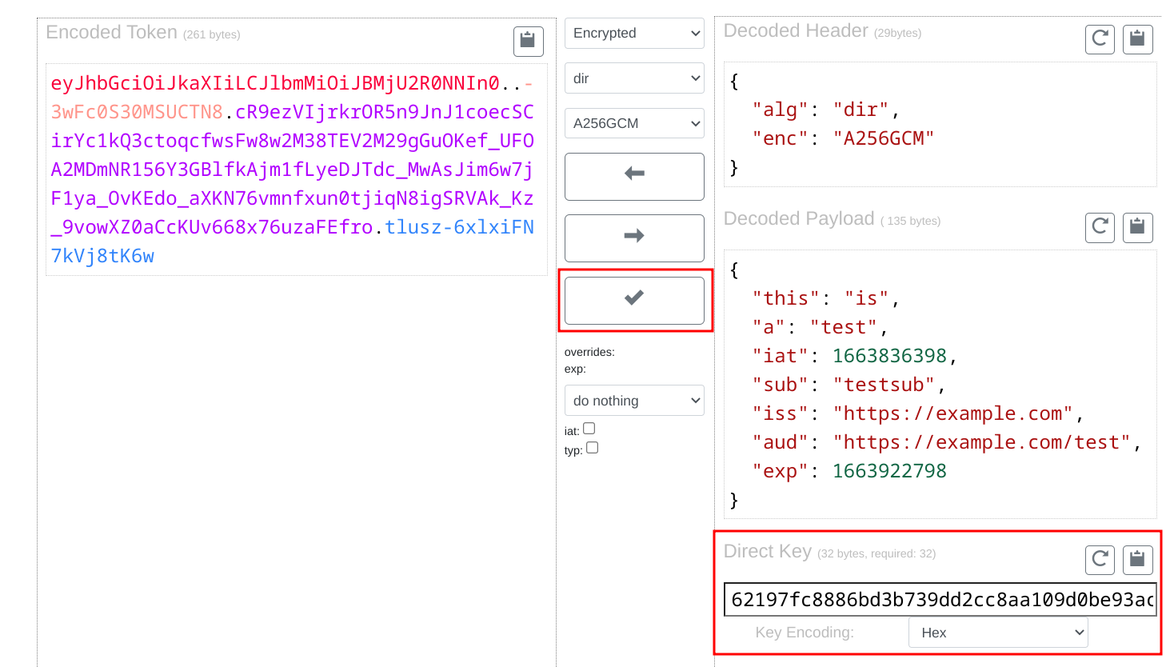
JWT.io does not support encrypted JWTs, but fortunately there are online sites that provide that missing capability. One example is https://dinochiesa.github.io/jwt/. Here, you can insert the token, the key, then decode the payload:
Conclusion
JWTs are powerful tools to provide a way to sign and encrypt data securely. Make sure that you choose the right algorithms for your use-case and verify as much as possible to avoid common vulnerabilities.