How to generate IoT Core certificates with Terraform
The resources to generate and sign certificates for AWS IoT Core devices

Generating IoT certificates
A certificate in IoT Core is a resource on the cloud-side that identifies the connected device. This has to be added in advance and the device needs to have the private key. This is the basis of a secure connection between the device and the cloud. In practice, a secure element holds the private key in a tamper-resistant way so that it can't be cloned.

Securing the connection like this is the gold standard for IoT security. But for proof-of-concepts and testing, it is also a barrier of entry. While CLI tools exist to generate and sign certificates, it is still a chore.
So I started thinking whether Terraform could generate certificates during the infrastructure provisioning process. Fortunately, there is the tls provider that offers the necessary resources. With this, a test setup can be automatically generated without any manual steps.
In this article, we'll examine two use-cases. First, we'll look into generating and provisioning a self-signed certificate, which is the common scenario. Second, we'll use a CA certificate and use that to sign the device certificates. This emulates a more complex scenario where not all certificates are equal, such as when the IoT platform is used by multiple clients.

Self-signed certificate
In this case, we'll generate a private key and then a self-signed certificate. The certificate can then be added to IoT Core to allow the device to connect via MQTT and identify itself using the private key.
First, generate a suitable private key:
resource "tls_private_key" "self_signed" {
	algorithm = "RSA"
	rsa_bits  = 2048
}
Then a self-signed certificate:
resource "tls_self_signed_cert" "self_signed" {
	private_key_pem = tls_private_key.self_signed.private_key_pem

	validity_period_hours = 240

	allowed_uses = [
	]

	subject {
		organization = "test"
	}
}
And that's it, the certificate can be added to IoT Core:
resource "aws_iot_certificate" "cert" {
	certificate_pem = trimspace(tls_self_signed_cert.self_signed.cert_pem)
	active          = true
}
The device needs the certificate and the private key for the connection, so add outputs for them:
output "cert" {
	value = tls_self_signed_cert.self_signed.cert_pem
}

output "key" {
	value = tls_private_key.self_signed.private_key_pem
	sensitive = true
}
CA-signed certificate
In this case, we'll generate a CA certificate that can be used to sign the device certificates. In practice, this is done on the manufacturer's side: they manage the CA, then use its key when they generate the device certificates.
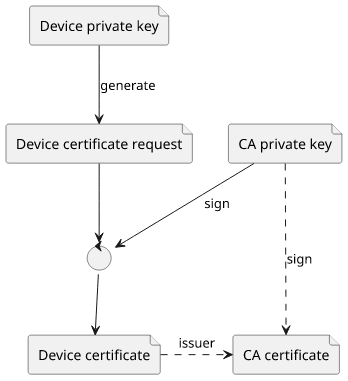
First, generate the CA certificate. This is the root of trust, so it is self-signed:
resource "tls_private_key" "ca" {
	algorithm = "RSA"
	rsa_bits  = 2048
}

resource "tls_self_signed_cert" "ca" {
	private_key_pem = tls_private_key.ca.private_key_pem

	validity_period_hours = 240

	allowed_uses = [
		"cert_signing",
	]

	is_ca_certificate = true

	subject {
		organization = "CA test signer"
	}
}
This is almost the same as the standalone certificate, only the is_ca_certificate = true attribute is extra and the allowed_uses
includes cert_signing.
Next, generate the private key for the device certificate:
resource "tls_private_key" "signed_1" {
	algorithm = "RSA"
	rsa_bits  = 2048
}
Then create a signing request for this key:
resource "tls_cert_request" "signed_1" {
	private_key_pem = tls_private_key.signed_1.private_key_pem

	subject {
		organization = "CA test"
	}
}
Finally, sign the certificate request with the CA key:
resource "tls_locally_signed_cert" "signed_1" {
	cert_request_pem   = tls_cert_request.signed_1.cert_request_pem
	ca_private_key_pem = tls_private_key.ca.private_key_pem
	ca_cert_pem        = tls_self_signed_cert.ca.cert_pem

	validity_period_hours = 240

	allowed_uses = [
	]
}
There are quite a few PEMs here:
cert_request_pemis the certificate request we created for the device certificateca_private_key_pemis the private key for the CAca_cert_pemis the certificate of the CA
Finally, add the device certificate to IoT Core:
resource "aws_iot_certificate" "ca_cert_1" {
certificate_pem = trimspace(tls_locally_signed_cert.signed_1.cert_pem)
active = true
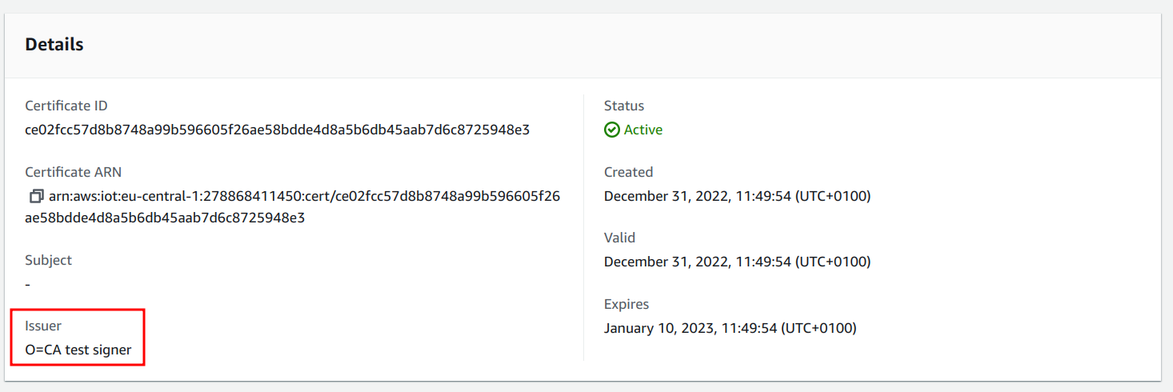
}The console shows that the issuer is the data from the CA certificate:
IoT Policy variables
One advantage of using a CA certificate is that it allows using the issuer variables in policies. In effect, you can define different permissions for certificates signed by different CAs. If you have multiple clients but with different CAs, you can define a permission by CA and not only by individual certificates.
Verify CA certificate
You can verify that a certificate is signed by a given CA using OpenSSL:
openssl verify -CAfile <(terraform output -raw ca_pem) <(terraform output -raw signed_1_pem)It returns a success:
/proc/self/fd/15: OKWhen the certificate is signed by a different CA (or self-signed), it returns an error:
O = CA test
error 20 at 0 depth lookup: unable to get local issuer certificate
error /proc/self/fd/15: verification failed
Device certificate provisioning
Device provisioning means adding the necessary resources on IoT Core so that AWS knows about the device and allows it to connect. This step is necessary and can be done in different ways.
By using a CA, certificates that are for the same purpose, such as for a single client, can be differentiated on the certificate level. AWS provides just-in-time provisioning feature where you only need to add the CA certificate and the devices will be added to IoT Core when they first connect. This process relies on a verification process that most manufacturers support, but is ultimately a manual task.
The more traditional provisioning process is to register the device certificate ahead of time. In this case, AWS only knows the certificate the device uses but not the CA. Because of this, you need to check the CA certificate before adding it to IoT Core.
Why?
All the issuer-related variables in the policy uses information that can be freely defined in the CA certificate. An attacker can then generate their own CA with the same data and the policy will be happily allow the same permissions as for certificates signed by the real CA.
Conclusion
Generating certificates with Terraform greatly simplifies testing and proof-of-concepts. With it, there is no need to manually run CLI commands for keys and the signing process, everything can be embedded in the infrastructure code.
But keep in mind that this is only for testing. For any real use-case, use a tamper-resistant hardware that keeps the private keys hidden even from you. The fewer sensitive values to be managed the better.