How to create a good Pull Request
A workflow and some tips for happy PR reviewers


Lately, I spend a lot of my time reviewing merge requests. I found that in many cases even a quick check proves that something important is missing, causing communication overhead. In this post, I present a simple workflow to create merge requests that are easy to review and contain minimal errors.
The key takeaways are:
- use meaningful branch names
- commit early and often
- write relevant commit messages
- review your work before pushing it
1. Prepare a branch
In the following example, there is a develop branch that serves as the main line of development
for our project. This is where eventually all code will be merged, and this is the basis for
future releases, so it's best to keep it in good shape all the time.
To make it easy to review and avoid adding unfinished code to the develop branch, we use
a separate topic branch for every new functionality.
# Switch to the integration branch
git checkout develop

# Get the latest code
git pull

# Create a new topic branch with the name "feature-135"
git checkout -b feature-135
Although we didn't start coding just yet, we already made an important decision: we had to give a name for the branch we'll be working on. Choosing this name carefully will make the life of the maintainers and code reviewers much easier.
I recommend the <branch-type>-<issue-id> format.
- The issue id provides a unique link to the related issue that can be found in the project's issue tracking system. Ideally, this provides all the context and information needed to create the necessary modifications (for example to create a new feature or fix a bug), and to review these changes later. This works even if the team doesn't use Github or similar service to manage their merge requests. Including a short description after the issue ID might make it easier to find a given branch.
- The branch type indicates the goal of the branch. The available branch types
should be agreed on as project conventions early on. There are numerous strategies that you can
look for inspiration. For example, in
Gitflow defines separate branches
for every
feature,hotfix, andreleasepreparation.
Use hyphens (-) to separate words in the branch names. Many CI environments use the branch names to create folders, so it's best to avoid filesystem path separator characters.
2. Create the modifications
Create your modifications as it feels the most natural to you. It's best to strive for a solution that you can try as early as possible. I prefer to do the plumbing and the hard parts first and refine the solution to its completeness, but ultimately it's up to you to decide how you break down and solve the problem.
Just make sure that while you prepare the modifications commit early and often.
Benefit 1: Commits are checkpoints
Coming up with a solution usually requires some experimentation. If you happen to break anything along the way, you can simply revert to a previous version of your code.
This reminds me how we played the classic X-COM: Enemy Unknown strategy game back in the days. We always kept several save files around, each taken before a significant decision or strategic move. If things didn't go as planned, it was easy to go back a few hours or days in game time.

(The image above is from Wikipedia. By Source (WP:NFCC#4), Fair use, https://en.wikipedia.org/w/index.php?curid=36710697)
There is a tool called git-bisect that might help if you are not sure when a bug was introduced to the system. It provides an interactive menu to perform a binary search to find the commit in question.
Benefit 2: Recover context from logs and diffs
Most developers are interrupted many times a day — after all, most software is developed collaboratively. When I get back to my computer to continue working and I have no clue about what I was doing before, I usually do the following to reconstruct the context:
- observe recently opened files and hit undo/redo a couple of times in my editor
- check
git status,git diffand maybe evengit log
The former usually works only for a few files, and I can only get back the most recent modifications.
On the other hand, git diff shows everything since my last commit. The commit messages can serve
as a work log that can come in handy later.
Mind your commit message
You can utilize these benefits the most if you:
- write descriptive commit messages
- add each logical change to a separate commit
Adding everything to a single commit after bashing the keyboard for half a day probably doesn't provide much information about what really happened, and you have a lot less option if you have to revert something.
It's easier to conceive a short sentence about your work while you are currently at it than come back later and try to guess why a particular change was necessary. See this style guide for excellent commit messages.
Make sure that you don't add more than one logical change to a single commit. Later this will make the changes much easier to review, while you have a more fine-grained work log and checkpoints from previous states of your work. For example, Uncle Bob's Boy Scout Rule is a great guiding principle that tells "always leave the campground cleaner than you found it". However, if you do this in the same commit with another change, you can't revert this commit without losing some of your work unintentionally. Also, make sure not to change the formatting of whole files when doing small changes in the codebase.
The commands
From time to time ask yourself: should I create a checkpoint?
To decide, you might check git status and git diff to review your latest uncommitted changes.
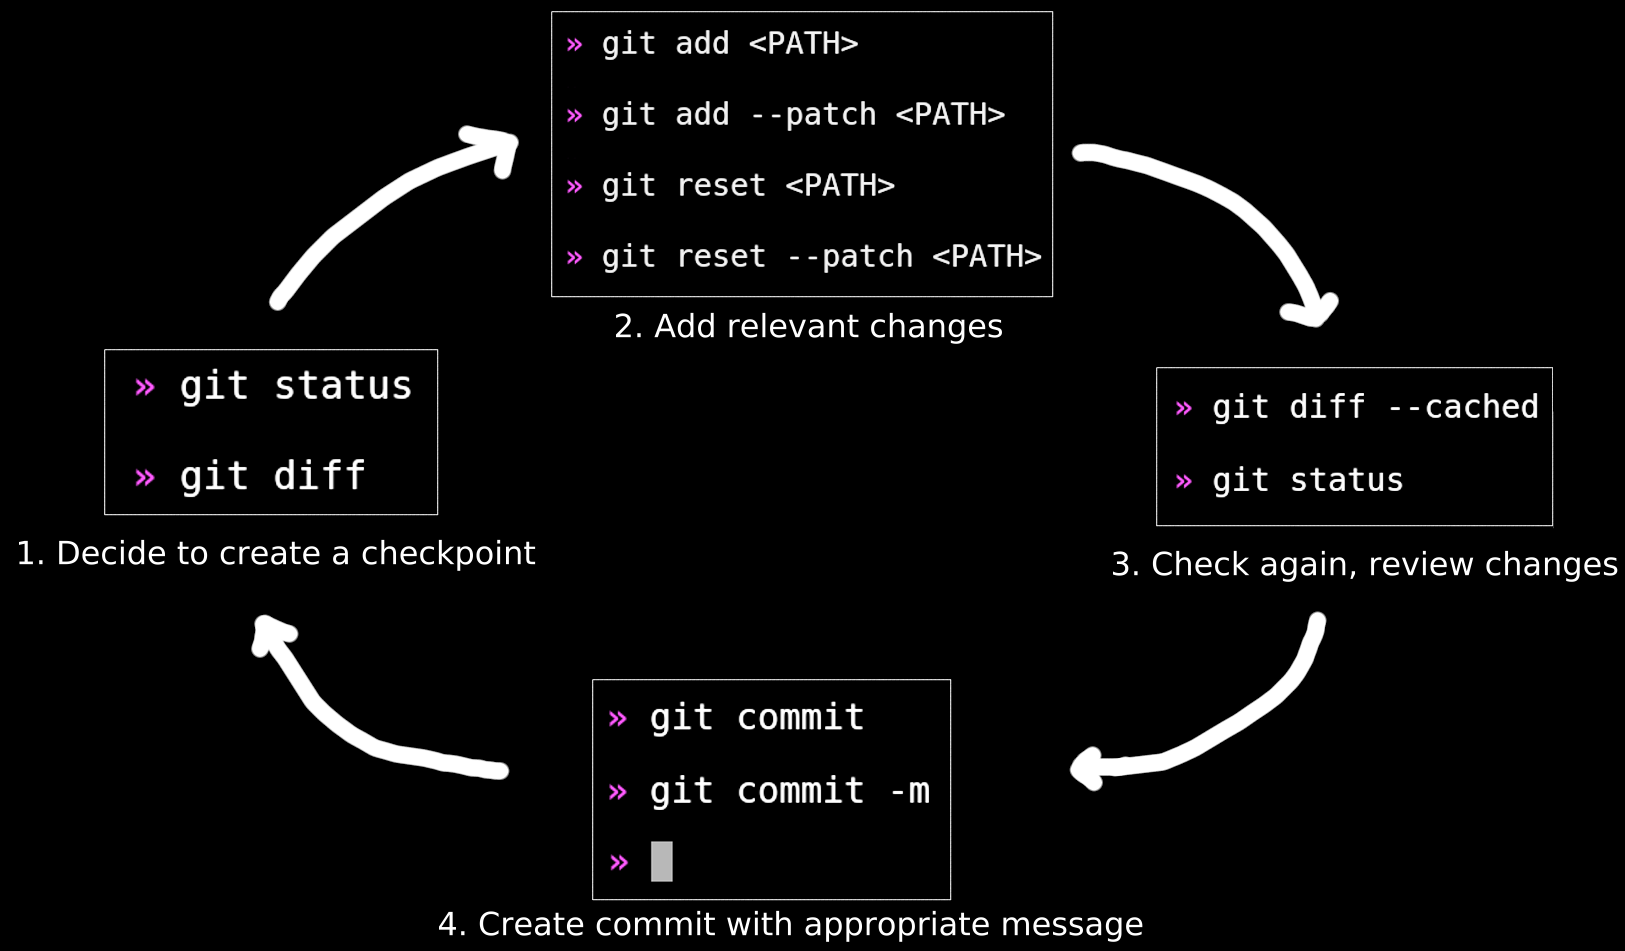
If there is some part of the solution that you consider to be complete (for example a new module,
a logical change or cleanup in the existing code), you can use git add <file-or-folder-path>
to stage these changes for the next commit. If a single file contains changes that belong to
different logical units, you can use git add --patch <file-path> to interactively stage only
parts of a file. Be careful with git add . as it stages everything in the current directory.
If you accidentally staged a file, you can unstage it with git reset <file-path> or
git reset --patch <file-path>.
Once you are finished, check again to ensure that only the necessary changes are staged
with git status and git diff --cached. I do this all the time to double check
and because git diff doesn't show the contents of the new untracked files by default.
With these commands, I can review every line that I am about to commit.
I am doing this in the terminal not in the IDE because the different presentation gives me a new perspective on how my changes will actually look.
In this review I tend to:
- Check that every line is necessary to do what I will describe in the commit message.
- Ensure that there is no weird formatting.
- Search for
TODOandFIXMEmarks, and try to sort them out. If the issue is out of scope for my task then I open a ticket in the issue tracker and put the issue ID right next to theTODOmark. I fish out the rest of theTODOsat the final review before I push the code, so in this phase I usually don't worry too much about them.
If everything looks fine, create the commit with git commit. The -m flag
might be great to quickly add one-line commit messages, but don't use it if you feel that you need space
to express your thoughts.
If you happen to realize that you forgot something or misspelled the commit message, you can add
more changes and modify the message with git commit --amend.
This might seem tedious, but in practice, it rarely takes more than a few seconds each time, and it provides additional opportunities to review your work.
Quick tips on going back in time
Here are a few commands that I use often if I need to go back to a previously working state. Note, that most of these commands are destructive in some way. Use them carefully and always watch out for your non-committed changes. When in doubt, create a backup first!
Revert a file to its last committed state:
The following command simply drops all non-committed changes of the related files.
git checkout <file-or-folder-path>Revert a file to a previous commit:
First, use git log to determine what commit you'd like to revert to.
To see what files are affected in each commit use git log --name-status,
or to see the changes themselves use git log -p.
After you have a commit ID, use the following command to get the earlier version of the file:
git checkout <commit-id> <file-or-folder-path>If you check the state of your working directory with git status and git diff --cached
after the command, you can see that a change has been made to the related files to produce
an earlier state, and these changes are already staged.
Revert a commit:
If you are lucky enough that your mistakes are isolated in a single commit, you can revert them easily:
git revert <commit-id>This creates a new commit that contains the opposite changes of the commit to be reverted.
With the -n flag the command creates and stages the changes, but does not commit them
automatically.
Create alternative versions of your work in separate local branches:
In many occasions, it might be useful to try alternative ideas, and see where they go. This can be especially handy when doing different performance optimizations or trying alternative versions of a UI.
To create a new branch based on the tip of the branch you are working on:
git checkout -b feature-135-experiment-01If you'd like to branch off from an earlier commit, then do the following:
git checkout <commit-id>
git checkout -b feature-135-experiment-from-commit
After this, you can easily change branches with git checkout <branch-name>
3. Review and Share
Integrate work from the develop branch
The first step is to integrate fresh changes from the develop branch to the topic branch,
and ensure that the new feature works well with the most recent code as well.
If your topic branch lives long enough, it's a good idea to merge the new code from time to time
to keep up with the main line of development.
This task can be accomplished easily with git merge or git rebase. Choosing one over
the other can be a matter of taste and project conventions. (For some food for thought see
this tutorial and
this post from Atlassian
about the topic.) For the sake of simplicity, I use git merge in this case.
# Commit or stash every change before you begin.

# Switch to the integration branch
git checkout develop

# Get the latest code
git pull

# Switch back to the topic branch
git checkout feature-135

# If curious, check what commits are about to be merged

# Merge new code to the topic branch
git merge develop
At this point, you have to resolve all conflicts (see git mergetool).
With git log or git diff you can check what commits are about to be merged to your branch.
I use the following right before the merge to see the new commits:
git log --right-only --cherry-pick -p ...developIt's useful to peek into incoming changes to avoid unpleasant merge conflicts. However, if you run
into a merge conflict that you'd finish later, you can abort the merge with git merge --abort.
Don't forget that after the merge it's your responsibility to test that your code integrates well with the rest of the software.
Review
Now the topic branch contains all code in the project with your additions. The next step is to review these soon-to-be published changes.
The first step is to build the project and run all the automated tests to see that everything works as expected. If the project lacks decent automated test coverage, it's best to do some manual checking as well.
Next, ensure that everything that is required for the scope is finished.
Finally, with following command you can examine every modification in your branch:
git diff develop...Use this for a self code review. As a rule of thumb, look for things that need improvement or look suspicious. It's also might be a good idea to create your own checklist based on the project conventions and your habits.
- Check for forgotten pieces of code like commented out blocks or debug statements.
- Ensure compliance to project conventions, naming and code formatting rules.
- Search for TODOs and FIXMEs.
- Look for code smells like:
- unnecessary code duplication
- overly complicated code
- careless error handling and logging
- a class, function, or method is doing too much that could be split to enhance readability (see Single responsibility principle)
- Verify that the necessary automated tests are in place and they follow the project conventions. The test cases are descriptive, easy to read, the test exercise the application at the right level.
If anything is missing or broken fix it and add a new commit.
If everything looks fine, it's time to hit git push and ask for a review. (Of course, if you are lucky
enough to have a CI server that builds and tests your topic branch then push frequently.)
The problems found by the reviewer should be handled the same way as the problems caught with your personal
code review.
Conclusion
This simple workflow is mainly about continuously reviewing your work, and mindfully adding new elements to the project's history. When I review code this is one of the things I value the most. There are many aspects of effectively using Git, and it's really flexible. Make sure to shape your conventions and processes to tailor it to your needs.