Generating a crossfaded slideshow video from images with ffmpeg and melt
How to configure ffmpeg and melt to generate a video from images
Images to video
When I was working on a video course I needed a way to turn a series of slides into a video, preferably with a nice transition in between. I had the slides in PNG format, and I also had the timing information, i.e. when the transition to the next slide should happen. Then I started looking for a solution to turn those images into a video and that turned out to be more involved than I initially thought.
This article is the summary of my approaches and how I found each of them. There is a GitHub repository where you can find the code and try the approaches detailed below.
The step before jumping into the exploration of video generation is to programmatically generate images. Fortunately, it's rather easy with node-canvas. The sample images the sample code generates are giant numbers in 1920x1080 resolution.
The result looks like this, with configurable number of images and durations:
And how does the part that gets the images and outputs the video looks like? I ended up implementing it in 3 different ways as I experienced runaway memory consumption with the first two.
Note that the three solutions described above generates a video that looks the same, but I did not compare them frame-by-frame and there might be some differences in length.
Approach #1: ffmpeg with fade and overlay
The first solution that looked promising was this excellent answer. It turned out to be exactly what I need and it wasn't hard to implement in NodeJS.
This solution uses ffmpeg to convert the images into a crossfaded video slideshow:
ffmpeg -y \
	-loop 1 -t 32.5 -i /tmp/NQNMpj/0.png \
	-loop 1 -t 32.5 -i /tmp/NQNMpj/1.png \
	-loop 1 -t 32.5 -i /tmp/NQNMpj/2.png \
	-filter_complex "
		[1]fade=d=0.5:t=in:alpha=1,setpts=PTS-STARTPTS+32/TB[f0];
		[2]fade=d=0.5:t=in:alpha=1,setpts=PTS-STARTPTS+64/TB[f1];
		[0][f0]overlay[bg1];
		[bg1][f1]overlay,format=yuv420p[v]
	" -map "[v]" \
	-movflags +faststart /tmp/output/res.mp4
The good thing about ffmpeg is that it is everywhere and it can be installed easily:
apt install ffmpegIt works by constructing a series of filters that overlay the next image with a fade-in effect. The input images are looped with the -loop 1 so that
they are treated as a video instead of a single frame. Then they are repeated for a duration they are shown (-t 32.5).
The magic is inside the filter_complex, which seems quite complicated but only until you know the structure.
Each filter defines one step in a pipeline and it has inputs and an output. The structure follows this pattern: [input1][input2]...filter[output];. Some
filters, like the fade needs only one input, while the overlay requires two. The [0], [1], ... are the input files, and later
filters can use the outputs of earlier ones.
The first filter is this: [1]fade=d=0.5:t=in:alpha=1,setpts=PTS-STARTPTS+32/TB[f0];. This gets the second image, then adds a fade-in
effect that starts at 32 seconds (defined in the setpts parameter). Then it outputs the result as f0.
Then the second filter does the same but it gets the third image ([2]) then adds the fade-in effect at 64 seconds. Its output is f1.
When all but the first image is faded, it moves on to construct an overlay filter chain. The [0][f0]overlay[bg1]; gets the first image and the
faded-in second image and runs the overlay filter. Its result is bg1. Then the last filter overlays f1 over bg1 and outputs v.
Since there are only 3 images in the slideshow, this is the last part.
Finally, -map "[v]" tells ffmpeg that the result video is the one that comes out as v.
Visually, this filter configuration looks like this:
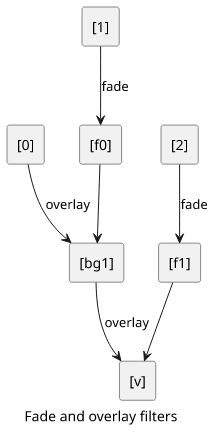
With this structure, it's easy to add more images. Just define the new input, add a new fade filter that generates the faded-in version, then add a
new overlay that merges the current result and the new image.
It does the job quite well for a few input images. But it uses more memory the more images it gets, and my dev box with ~2GBs of RAM runs out at ~50 inputs. And this is a problem as sometimes I have more than 50 slides.
So I had to restart my search for a solution.
Approach #2: ffmpeg with xfade
Then I stumbled on this comment that suggests
that a new ffmpeg filter, xfade is better suited for this kind of job.
One downside is that xfade is a new addition to ffmpeg and it is not in the mainstream repositories. But hopefully it won't be a problem in a few years.
Since this is a solution specifically to crossfade inputs, it is easier to implement:
ffmpeg -y \
	-loop 1 -t 32.5 -i /tmp/Ilb2mg/0.png \
	-loop 1 -t 32.5 -i /tmp/Ilb2mg/1.png \
	-loop 1 -t 32.5 -i /tmp/Ilb2mg/2.png \
	-filter_complex "
		[0][1]xfade=transition=fade:duration=0.5:offset=32[f1];
		[f1][2]xfade=transition=fade:duration=0.5:offset=64,format=yuv420p[v]
	" -map "[v]" \
	-movflags +faststart -r 25 /tmp/output/res.mp4
It uses only the xfade filter that gets two inputs and configurations for the duration and the start time, and outputs the result.
The first filter gets the first and the second images ([0][1]), adds a crossfade at 32 seconds and names the output f1. The next filter
gets this and the third image, adds another crossfade and outputs as v. Then the -map "[v]" tells ffmpeg that this is the final result.
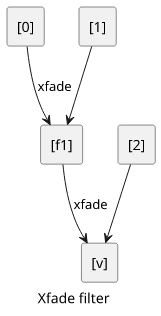
While this solution is easier to implement, it turned out to be as bad in terms of memory consumption as the previous one.
Approach #3: melt
I've been using Shotcut, a libre video editor, and that is build on the MLT framework. It generates an XML file then uses a dedicated tool called qmelt
to render the video. qmelt, it turned out, is a simple wrapper around melt, which is the MLT framework's dedicated CLI tool to process videos.
Since Shotcut is capable of crossfading between images and rendering itself is not dependent on Shotcut, I should be able to generate the XML programmatically and feed that to melt and that should have the same effect.
After reading the documentation, melt can be configured with CLI arguments alone instead of an XML file for simple cases. And crossfading between images is supported. This made it quite easy to configure:
melt \
	/tmp/DdV4ig/0.png out=824 \
	/tmp/DdV4ig/1.png out=824 \
	-mix 12 -mixer luma \
	/tmp/DdV4ig/2.png out=812 \
	-mix 12 -mixer luma \
	-consumer avformat:/tmp/output/res.mp4 frame_rate_num=25 width=1920 height=1080 sample_aspect_num=1 sample_aspect_den=1
The order of arguments are important here. The <file> out=... lines are the input files, where the out number defines the number of frames the
image is visible. Then the -mix 12 -mixer luma mixes the last two parts with a length of 12 frames.
This yields a simple structure: add 2 images, do a crossfade, add another image, do another crossfade, and so on.
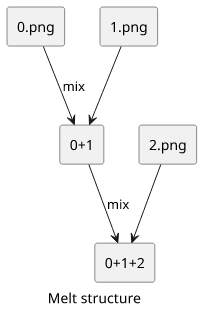
And the good news is that the memory usage seems not dependent on the number of inputs or the video length. This makes it a suitable solution.
Melt is included in the major repositories, and besides a few warnings that it needs a display, it works fine in a server environment.
Benchmarks
At this point I had three solutions that produced videos that looked the same and I had a hunch that ffmpeg somehow consumed more memory as the number of input images increased. But I wasn't sure whether that was due to the fact that it also increased the overall length of the video or just the number was the culprit.
So I run some benchmarks to see into this.
Number of images
First, let's see how the number of images affects the running time!
Each image is shown for 2 seconds, so each additional image increases the total video length by a fixed amount.
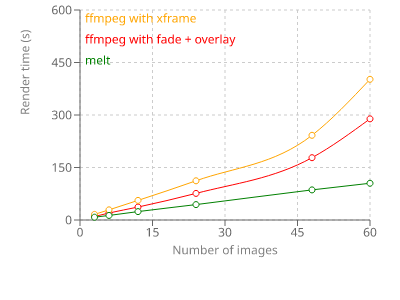
The lines are straight lines up until a point where the two ffmpeg-based solutions shoot up. I suspect that is the point where the available memory runs out and the system starts using the swap space.
With melt, there is no break in the line and I didn't observe increased memory usage as the tests run.
Video duration
But let's see if the memory usage is the result of the number of input images or the total length of the video!
To measure that, I used 3 images but changed how long each image is shown. This keeps the number of inputs fixed but the video length changes.
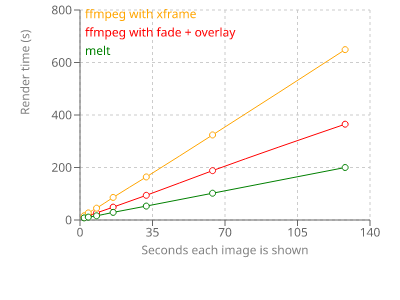
All three configs are straight lines, so it seems like the video length does not matter.
Conclusion
I was surprised to see how versatile ffmpeg is with all its filters and its stream hierarchy. Once I understood the structure of the filter_complex it was
easy to see how the parts work together and provide the crossfade effect. But ultimately, it turned out not to be the good tool for the job.
Another surprise came when I saw how powerful the MLT framework is. This time it was enough to use the CLI parameters, but I see the potential of assembling a more complex XML and feeding it to melt to implement all sorts of effects that are usually only available in visual editors.
Do you have an idea how to fix the ffmpeg memory usage? You can play with the code in the GitHub repository and let me know if I missed something important!


